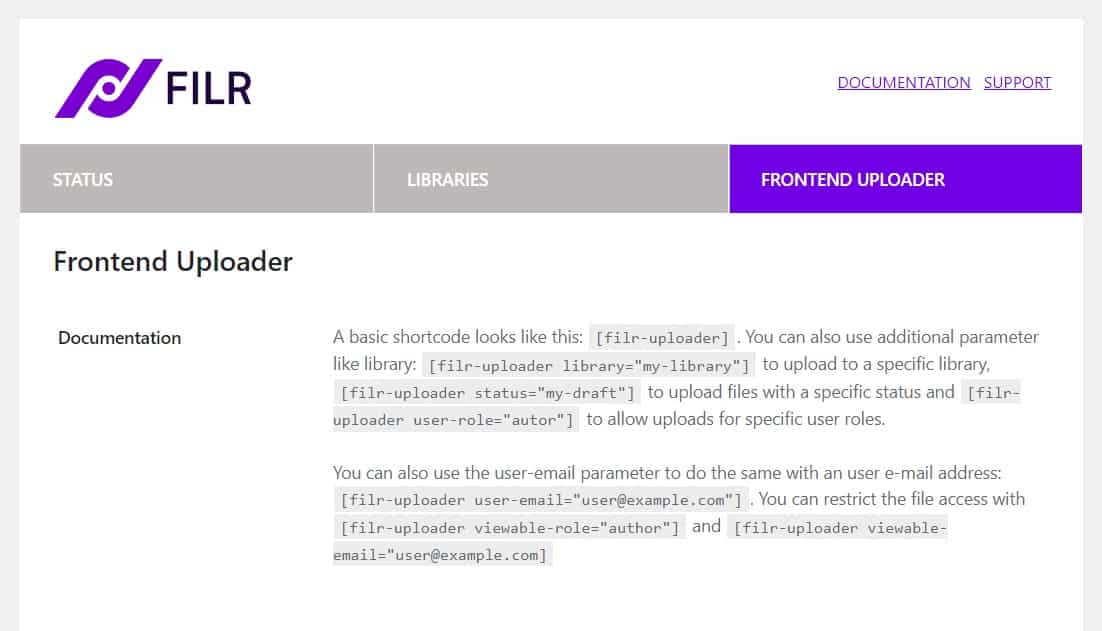
Changelogs
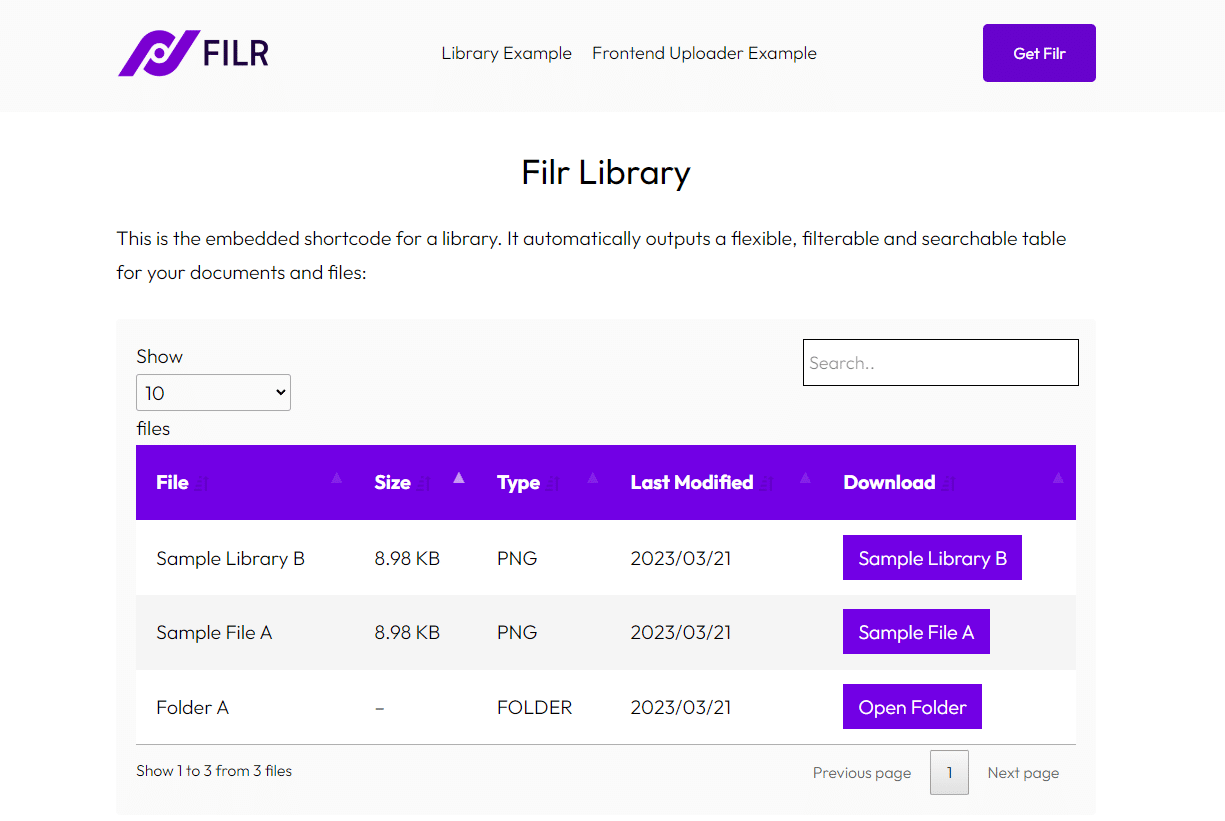
Get an overview of the current development status of Filr. Here you find all the latest releases in chronological order.
-
Version:
How to Protect WordPress Media Files
Release-Date:
If you’re looking to protect the media files you upload to your WordPress website, this is the guide for you.
In this guide, we’ll explore the limitations of WordPress protect media files and what you can do to protect them more securely.

Specifically, we’ll walk you through:
- The benefits of protecting WordPress media files.
- Limitations of WordPress in protecting media files.
- A tool you can use to protect WordPress media files.
Filr – WordPress Document Library Plugin
Easily upload, store and share files in WordPress. Secure, flexible, and user-friendly document libraries for your next project.
But first, let’s explore the benefits of protecting your WordPress media files.
The benefits of protecting WordPress media files
WordPress media files are any images, videos, audio files, or other types of documents that are uploaded to a WordPress site. These files can be used in a variety of ways, such as in blog posts, pages, and product listings. However, it is important to protect WordPress media files from unauthorized access and theft.
Who would benefit from protected media files?
There are many different types of websites and owners who would benefit from protecting their WordPress media files. Some examples include:
- Photographers: Photographers can use WordPress to showcase their work and sell prints and digital downloads. Protecting their media files ensures that only authorized users can access them.
- Bloggers: Bloggers often use a variety of media files in their posts, such as images, videos, and infographics. Protecting these files helps to prevent unauthorized use and copyright infringement.
- Ecommerce sites using WooCommerce: Ecommerce sites typically use media files to display product images and videos. Protecting these files helps to prevent them from being copied and used by other businesses.
- Membership sites: Membership sites often offer exclusive content to their members, such as images, videos, and e-books. Protecting these files helps to ensure that only paying members can access them. Using the tool in this guide will work for such sites that don’t need all the features of a fully-fledges membership plugin.

What are the benefits of using WordPress to protect media files?
There are many benefits to protecting WordPress media files, including:
- Preventing unauthorized access: By protecting your media files, you can prevent unauthorized users from accessing them. This can help to protect your privacy and prevent your files from being stolen or used for malicious purposes.
- Safeguarding copyrighted material: If you own the copyright to any of the media files on your WordPress site, it is important to protect them from unauthorized use. This can help to prevent copyright infringement and protect your financial interests.
- Prevent malware infections: Hackers often target media files to infect websites with malware. When you prevent direct access, you’ll make it more difficult for hackers to compromise your site.
- Give you peace of mind: Knowing that your media files are protected can give you peace of mind and allow you to focus on other aspects of running your website.
So now we know the benefits, let’s talk about WordPress.
Limitations of WordPress in protecting media files
WordPress is a powerful content management system (CMS) that allows users to create and manage websites of all kinds. One of the features of WordPress is the ability to upload and store media files, such as images, videos, and audio files. These files can then be used in blog posts, pages, and other content on the website.
How WordPress lets you upload files
There are two ways to upload files to WordPress:
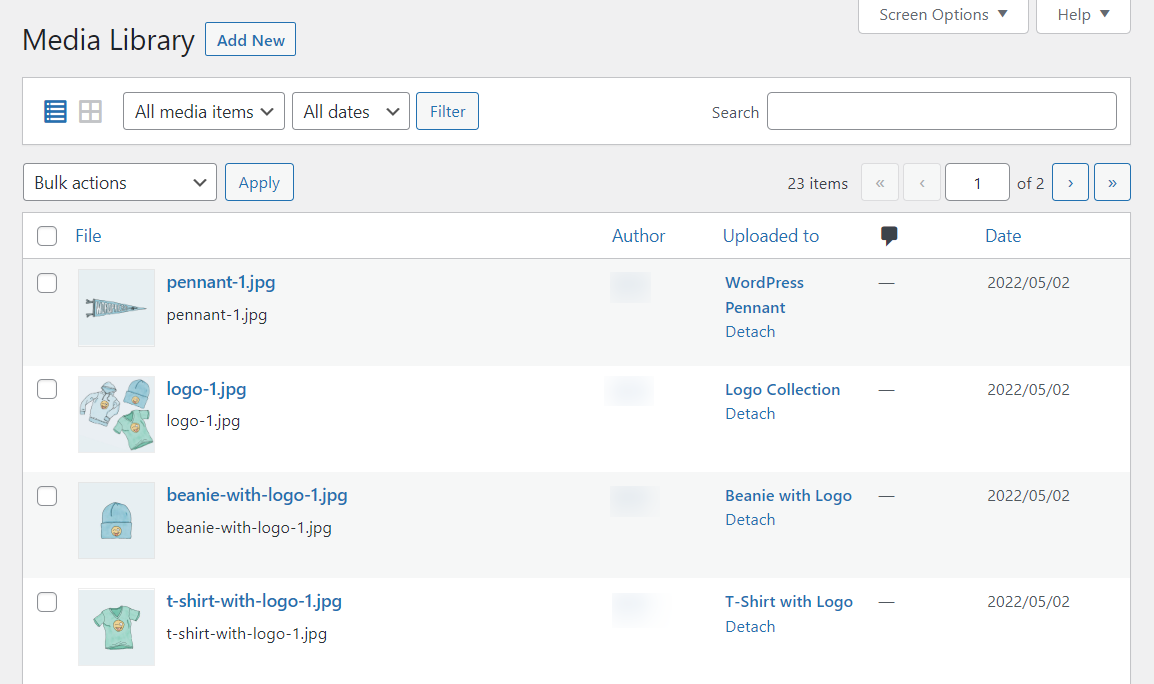
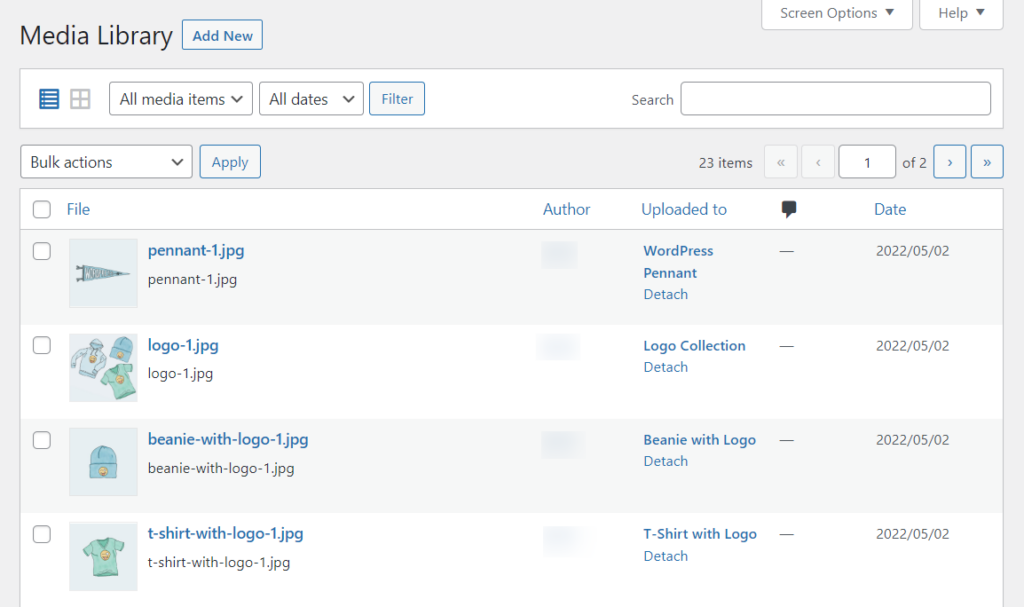
- Media Library: The WordPress Media Library is a built-in feature that allows users to upload and manage media files from the WordPress dashboard. You can add pretty much any file type to the Media Library and it’s very easy to use.
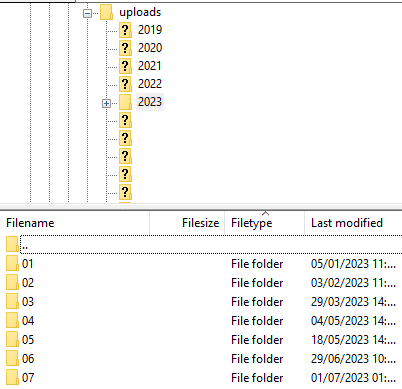
- wp-content/uploads file path via FTP: Users can also upload files to WordPress by connecting to the server using FTP (File Transfer Protocol) and uploading the files to the wp-content/uploads directory.
These two methods are pretty standard, but how are the files protected?
How WordPress protects media files
WordPress itself does not offer many options for protecting media files. By default, all uploaded media files are stored in the wp-content/uploads directory, which is accessible to anyone who knows the URL.
This can be a security concern, especially for websites that store sensitive or valuable media files.
For example, any user who knows the URL of the wp-content/uploads directory can access the media files stored there. This means that unauthorized users could potentially access and download sensitive or valuable media files.
WordPress media files are also vulnerable to tampering by unauthorized users. For example, a hacker could inject malicious code into a media file or modify the file in a way that causes it to distribute malware to visitors to your site. It is important to have a way to verify the integrity of your media files to ensure that they have not been tampered with.
So, with these security concerns in mind, how can we protect WordPress files on our websites? Well, to give your media files the protection they need, you’ll need the help of a tool.
Filr – WordPress Document Library Plugin
Easily upload, store and share files in WordPress. Secure, flexible, and user-friendly document libraries for your next project.
The need for a plugin: introducing Filr
Filr is a file protection WordPress plugin that allows you to protect your WordPress media library files in a few different ways. Let’s say you want to protect your PDF uploads from not only site visitors, but specific user roles too.

Filr allows you to do the following:
- Encrypt File IDs – this masks the attachment ID in the URL which is added by default in WordPress. By masking this (hiding it from view), you’ll prevent unauthorized viewers from finding the original source URL of the file.
- Set secure download links – this hides the path to the file and instead shows a short URL as a link to the media file. This means unwanted users can’t see how to get to the file itself through your media uploads folder.
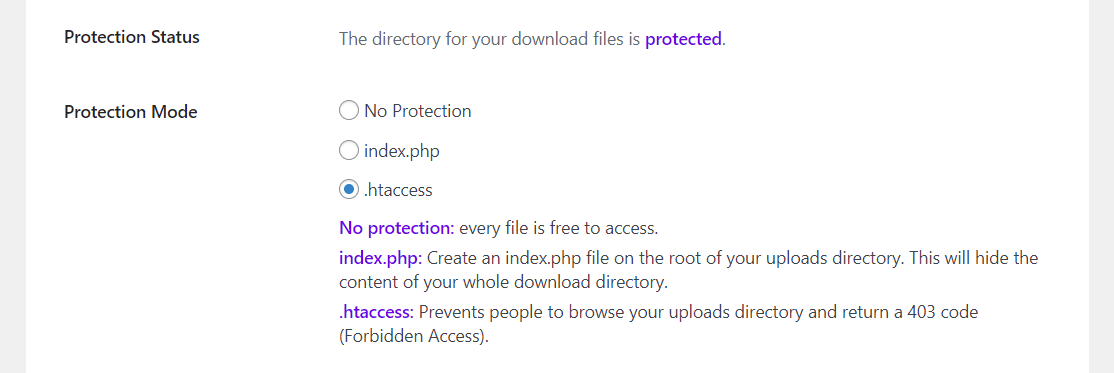
- Restrict access via .htaccess or index.php – with Filr, you can automatically create an index.php file that will hide the content of your download directory, or use .htaccess to prevent browsing of your uploads directory via a 403 (forbidden access) code. This also has the added benefit of restricting access by search engines like Google.
- Restrict file access via emails or user role – you’ll also be able to restrict access to specific file uploads via setting user role and email restriction.
- Restrict file uploads via user role and email – should you want to allow users to upload their own files to your website, you can restrict who has access to this via user roles and email addresses. This way only the people you want will be able to upload new files.
That’s a lot of protection in one plugin! Filr not only allows you to create private files, but protect your WordPress uploads, and create private download links too.
So, with all this in mind, let’s get it set up and take a closer look in the next tutorial section.
How to WordPress protect media files with Filr
To use Filr to protect your WordPress media files, you’ll first need to purchase the Filr plugin: https://wpdocumentlibrary.com/
Filr – WordPress Document Library Plugin
Easily upload, store and share files in WordPress. Secure, flexible, and user-friendly document libraries for your next project.
Then, take the following steps to get it installed:
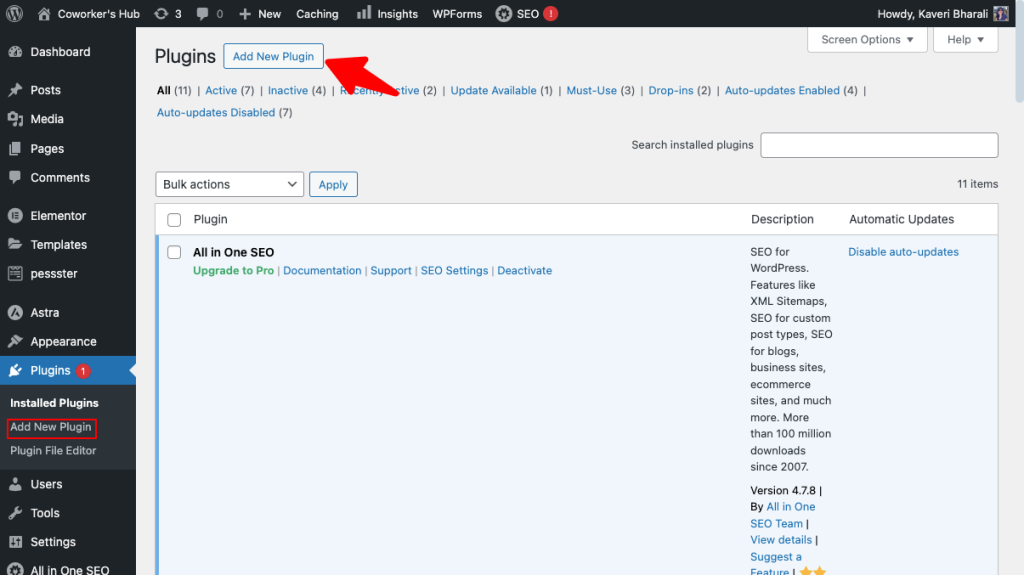
- Go to Plugins > Add New on your WordPress dashboard and click the Upload Plugin button.
- Select the ZIP file of the extension you previously downloaded and click Install.
- When the installation is done, click on Activate Now.
- Enter the license key and click Agree & Activate, and that’s it.
Now that we have Filr installed, let’s get to securing your WordPress website.
Step 1: Secure all files via encryption
The first step is to get your file directory in WordPress admin secured. This is the step where we’ll pick our protection method and secure our links.
The good news is, doing this only takes a few clicks and Filr takes care of the rest:
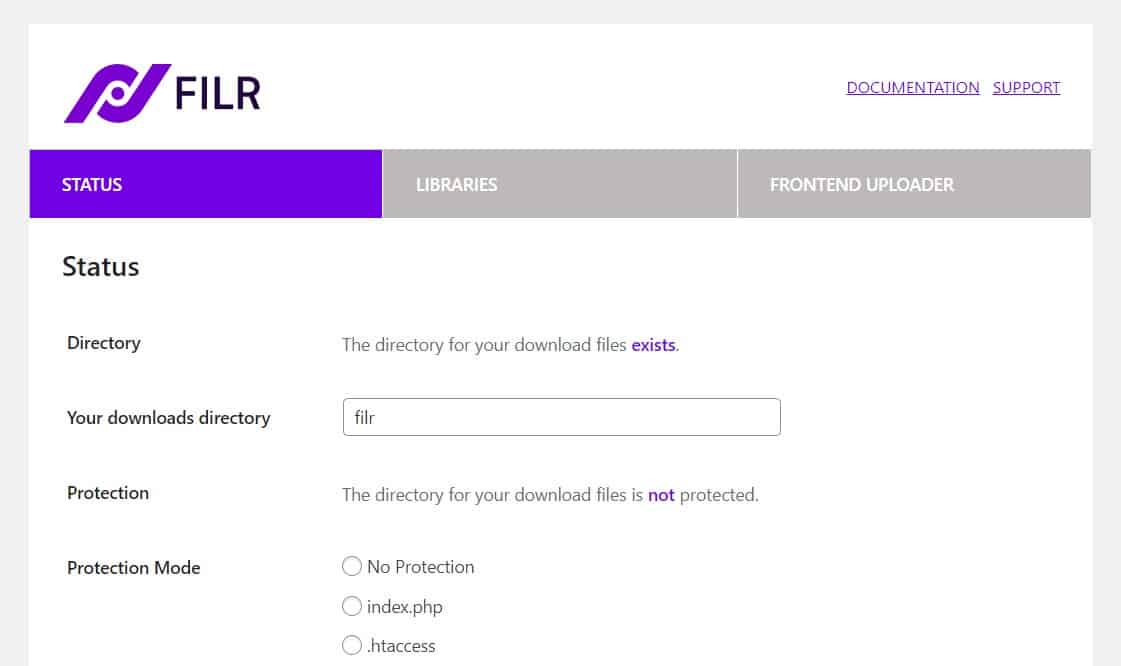
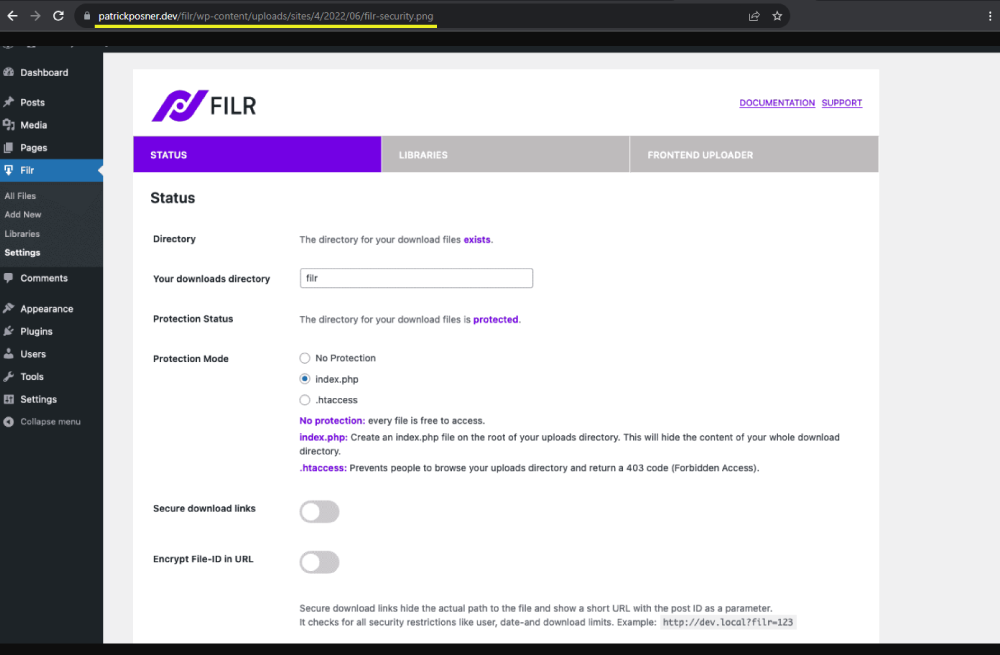
- From your WordPress dashboard, go to Filr > Settings and click the Status tab at the top of the page.
- The first thing we’ll need to do is select our Protection Mode. You have a few options here depending on what you’re after, but for full protection, we recommend .htaccess file.
- Next, you’ll want to click on the toggle button next to Secure download links. This will create the short URL file path to all media uploads.
- Lastly, click the toggle button next to Encrypt File-ID in URL. This will replace the file ID with one Filr has created.
- Once you’re happy with these changes, save them.

So now we have your secure foundation set. Next, we’ll walk you through securing a specific media file to not prevent unauthorized website visitors from even seeing it on your website.
Step 2: Protect a specific media file
For this step, we’re going to upload a file we want to protect to WordPress, restrict access via a user role, and then we’re going to make it invisible to non-logged-in users.
To do this, take the following steps:
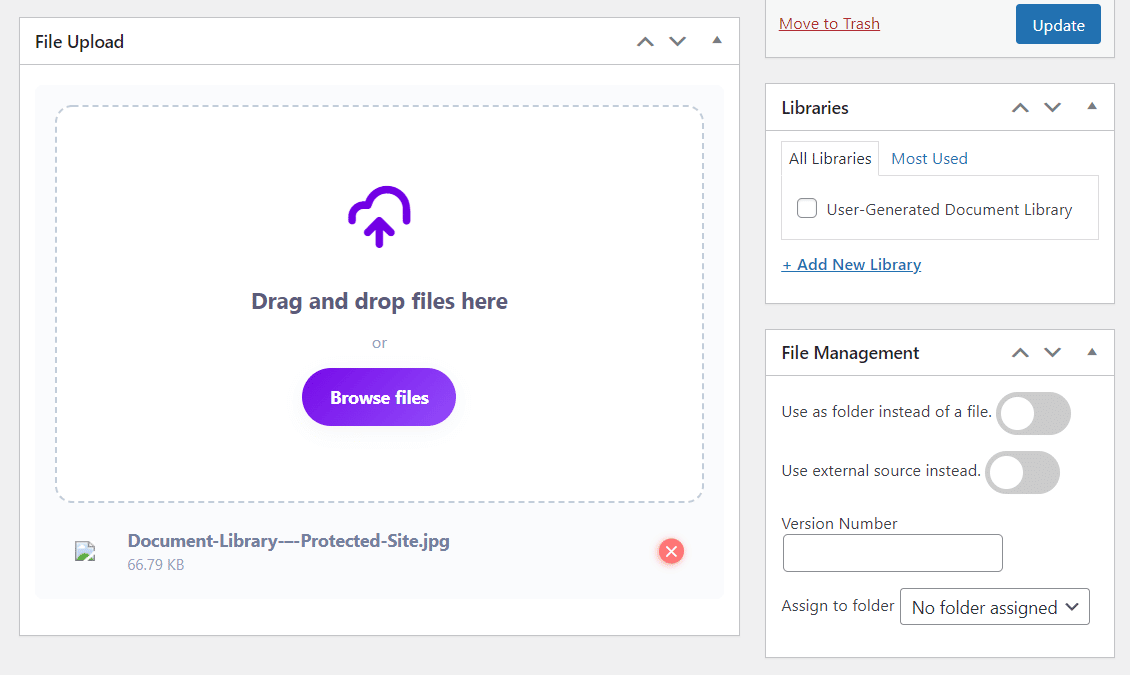
- From your WordPress dashboard, go to Filr > Add New to create a new file we can protect.
- Upload your file to the uploader (this can be anything from a jpeg, to a png, PDF, and more).
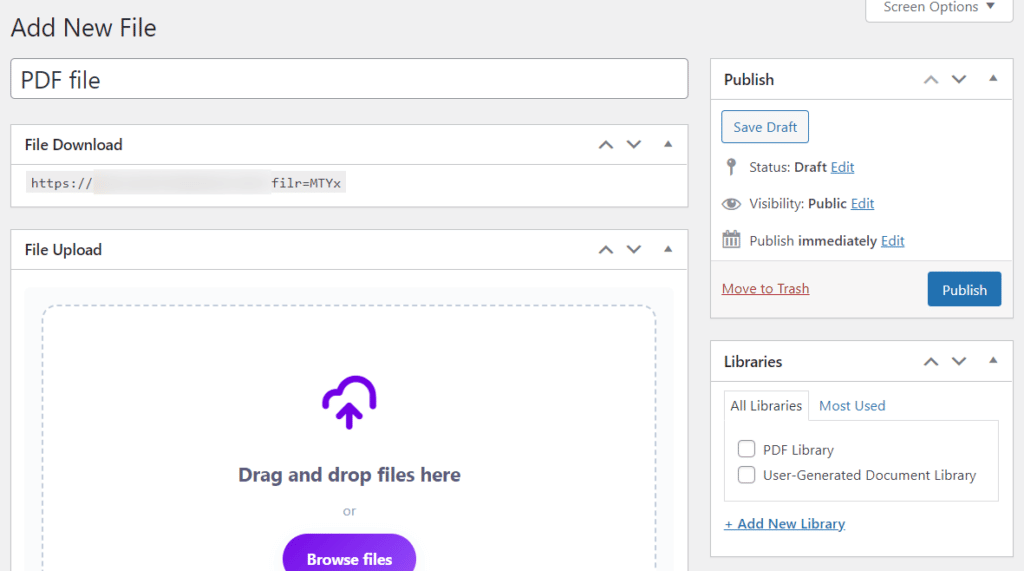
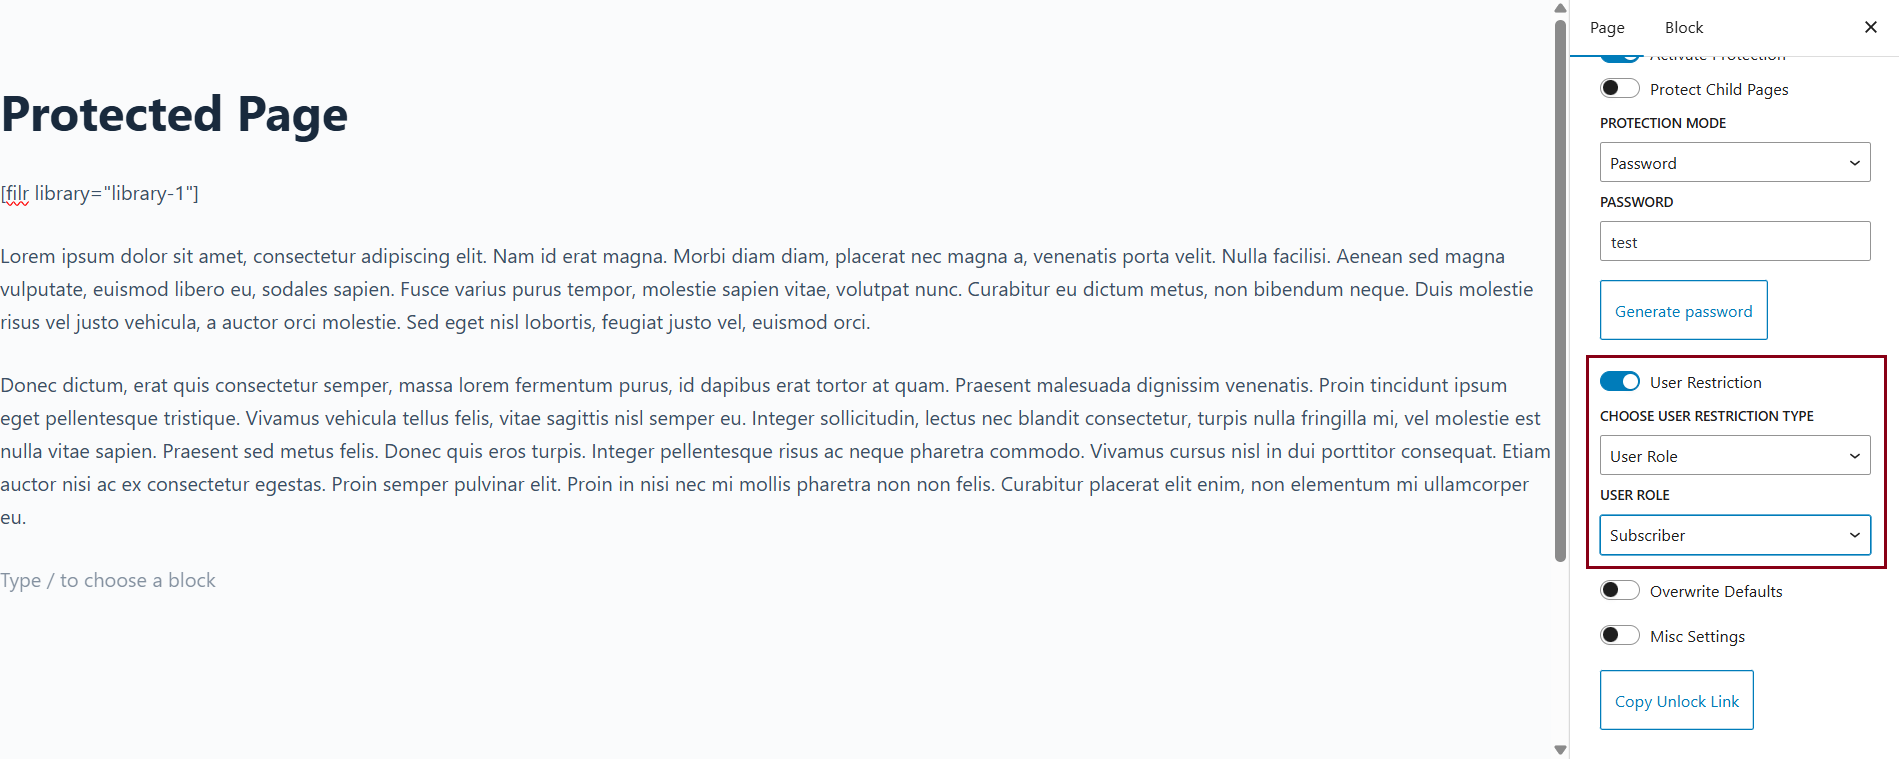
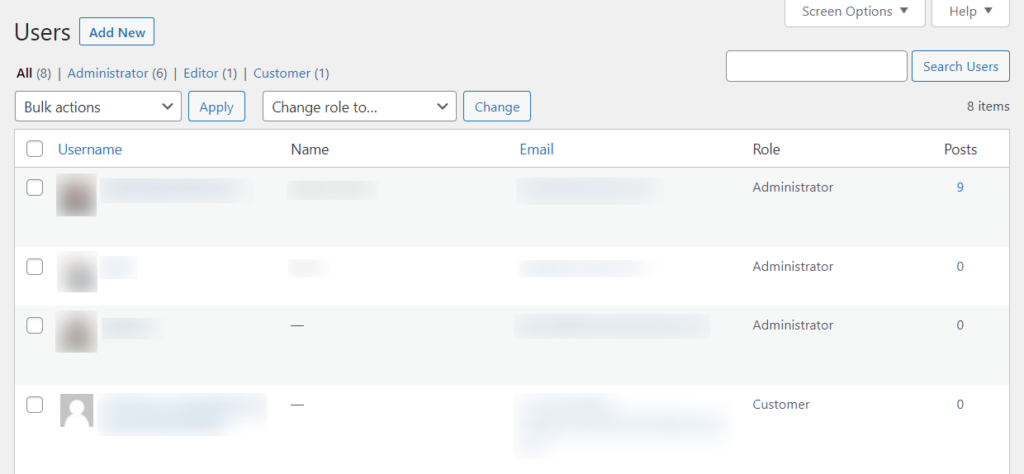
- Once done, on the right, you’ll see the User Options section. It’s here you can restrict this file, either by email or user role. In this case, we’re going to restrict this file to Editors only.
- Publish your file and copy the File Download URL from the top of the page.
If this is all you need to do, you can stop here. But if you’d like to add this file to a WordPress page or post and prevent guest users from seeing it, we’ll show you how.
- From your WordPress dashboard, go to Pages > Add New.
- Give your page a title as you usually would, and add your page content.
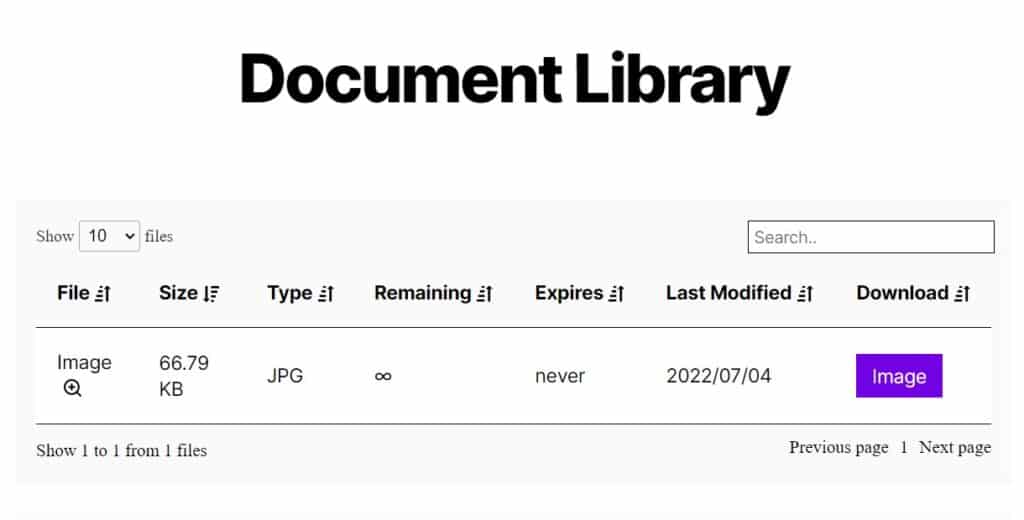
- To add your image, paste in the Download URL you copied from earlier. The image will then appear.
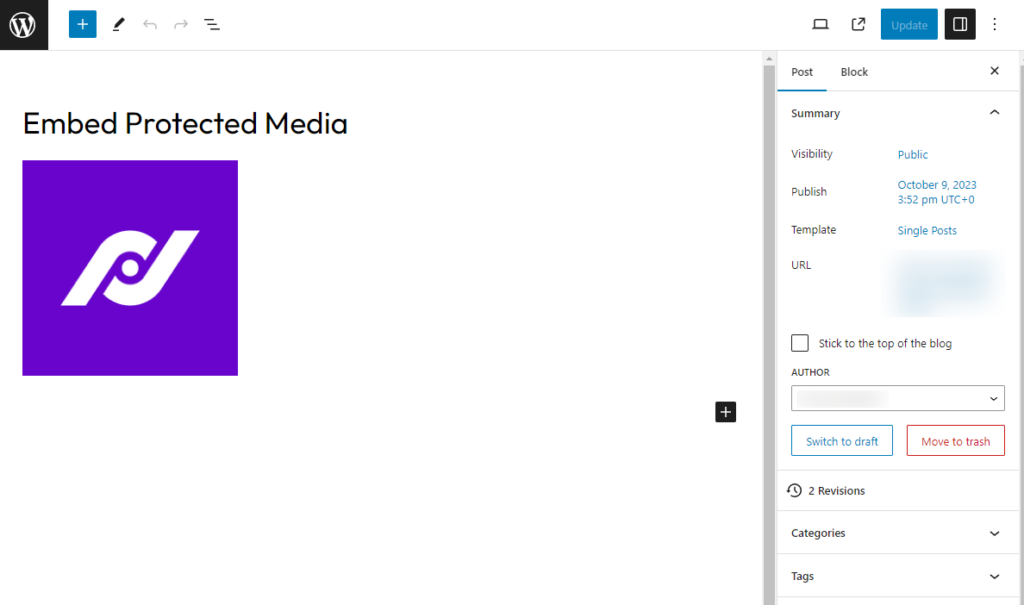
This image will only be visible to users who are logged in with the user role Editor. Anybody else viewing the site, will see nothing.
Protect your WordPress media files today
It doesn’t matter if you’re uploading jpgs, gifs, or important documents. The files you upload to your WordPress website should be as secure as possible.
WordPress gives us great control over uploading and storing files, but to secure them, we need a little extra help.
This is where Filr comes in, the best WordPress plugin for not only protecting your media files, but by restricting them, allowing user uploads, organizing them, and so much more.
If you want full control over your files in WordPress, Filr has your back.
Filr – WordPress Document Library Plugin
Easily upload, store and share files in WordPress. Secure, flexible, and user-friendly document libraries for your next project.
-
Version:
How to Organize WordPress Documents in 2025
Release-Date:
When you first launch your website, managing documents in WordPress feels effortless. You can easily find the files you need with minimal effort. But as your site grows, the story changes.
You start adding more content to your website. Now you have blog post images, product PDFs, team photos, marketing assets and so much more. And before you know it, your media library starts feeling crowded and chaotic.
The problem arises when you need to find specific documents from your media library, especially if you don’t remember the file name correctly. This lack of organization can not only lead to frustration but can also hamper your productivity.
Luckily, your media library doesn’t have to be that way anymore. With tools like Filr, you can organize your WordPress documents and create a system that’s easy to manage.
In this post, we’ll talk about how Filr can transform the way you organize your WordPress documents. But before we begin, let’s understand why it’s important to organize your documents in WordPress.
Why Organize Documents in WordPress
Managing your WordPress document efficiently is extremely important. This is especially true for websites with a large amount of content or multiple contributors.
Organizing your WordPress documents allows you to structure them under proper categories, tags, or folders. Contributors can use these categories, tags, or folders to easily locate their files without having to remember the file names.
This helps keep your site relevant and up-to-date while offering a seamless experience to users in the back end.
Now that you know the importance of organizing your WordPress documents let’s understand the default WordPress media library and how it works.
Understanding the Default WordPress Media Library
By default, WordPress stores all the uploaded media files in a centralized location called the WordPress Media Library.
Here you’ll find all the media files, such as images, videos, PDFs, audio, etc. that you’ve uploaded to your website. You can access the media library from your WordPress dashboard.
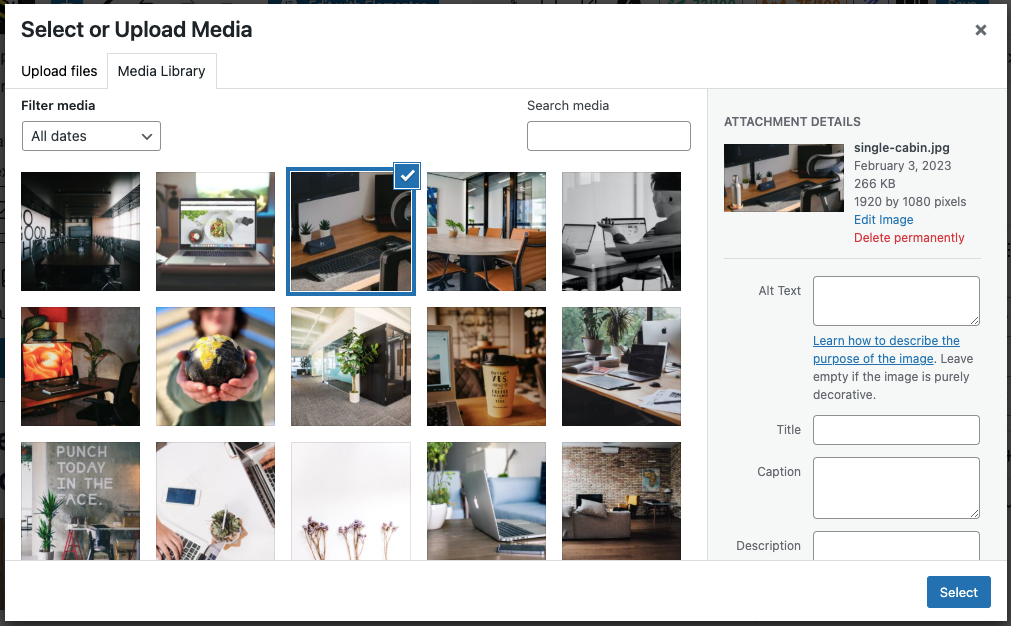
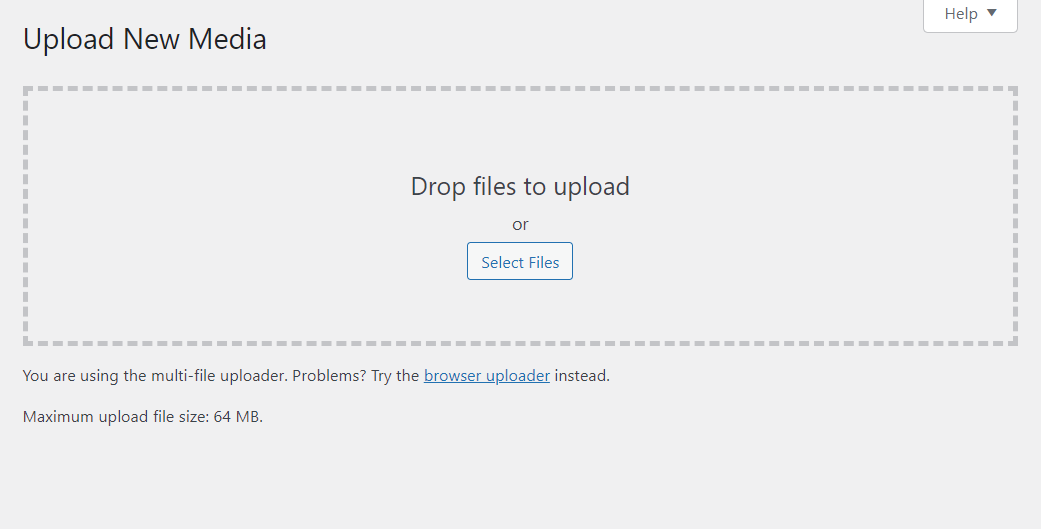
Here you can upload various file types like images, audio, video, documents, spreadsheets, etc. using the Upload button.

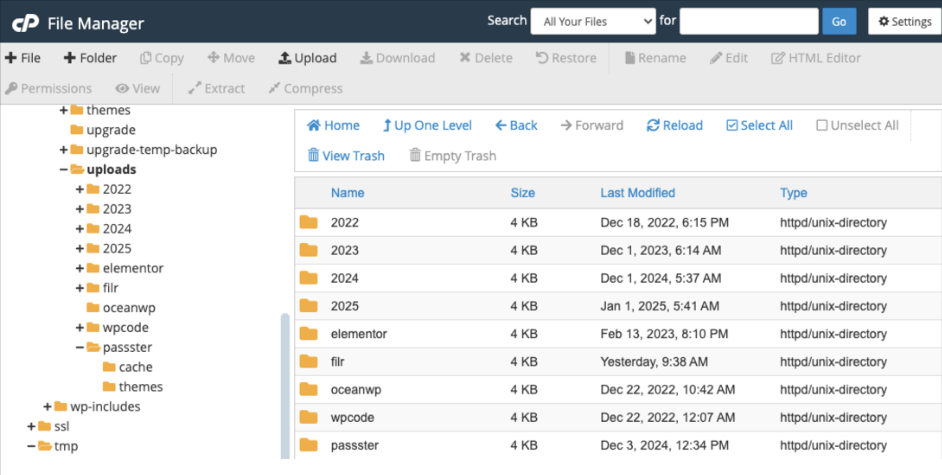
You can find the actual location of your Media Library Folder through your web hosting cPanel by navigating to File Manager > uploads.
Here, WordPress automatically creates different sub-folders based on years and months. It then organizes and adds media files to these folders based on the dates you upload them.
Now the problem is that the default WordPress media library comes with its limitations. It lacks several important features that help you manage your files effectively on your website.
Let’s look at some of those limitations in the following section.
Drawbacks of the Default WordPress Media Library
The default WordPress Media Library allows you to create a basic document management system. The problem is that it comes with several drawbacks. Let’s look at some of these drawbacks here:
- Cannot Classify Uploads – It only allows you to arrange your files based on their upload date. You cannot categorize or group them under custom folders. So you can’t classify the uploads based on criteria other than the upload date.
- Cannot Prevent Unauthorized Access – It lacks security control that prevents unauthorized users from accessing the uploaded WordPress documents.
- Lacks Filtered Search Option – It lacks filter options to help you improve search results.
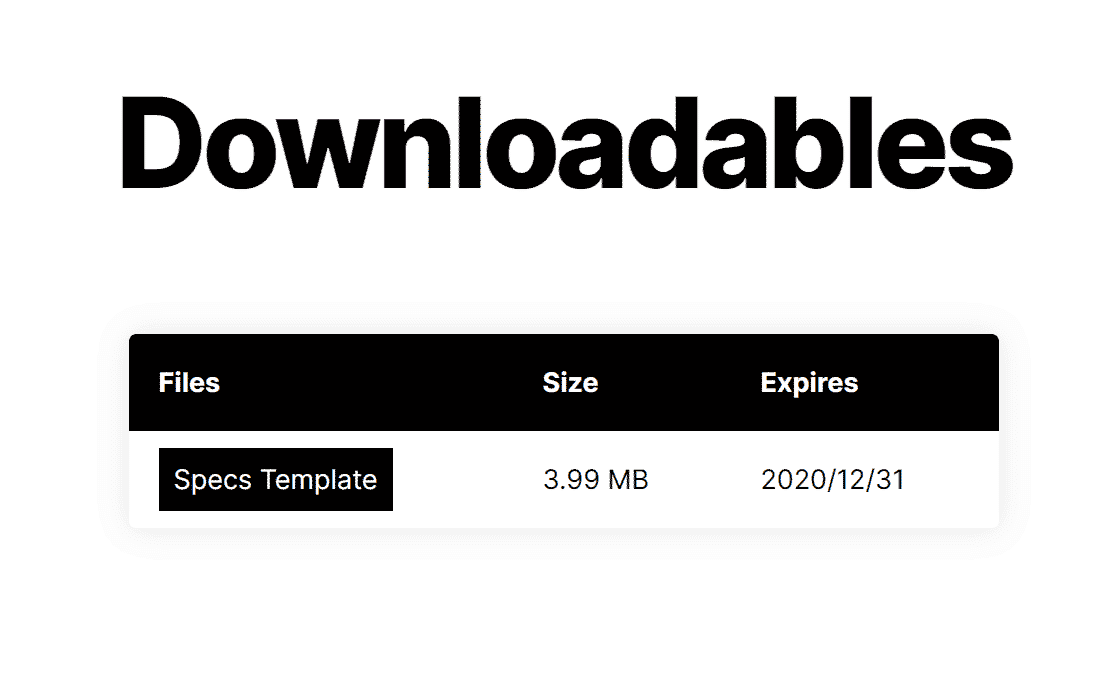
- Does not Allow Document Expiry – Once you upload and publish a file, there’s no way to automatically expire it upon a set date. This feature can be helpful if you publish timed content on your website.
Fortunately, you can solve all the above problems by using the Filr WordPress document management plugin. Let’s learn a bit about it.
Filr Plugin – The Best WordPress Document Management Plugin
Filr is one of the most effective WordPress plugins that helps you create and manage your documents on your WordPress dashboard. This plugin is super user-friendly and even a newbie without experience can use it with ease.
The plugin comes in two different versions –
- Lite Version or the Free Version
- Pro Version or the Paid Version
Although the lite version is an equally great option to manage and organize your WordPress documents, the pro version comes with even more options.
The pro version of the plugin, lets you control the file expiration by date. You can even restrict access to your files by email or user role to keep your files secure. And not just that, it also allows your users to add documents from the front end of your website.
With many other amazing features, this plugin is a must-have for anyone who wants to manage and organize their documents in the WordPress media library. Now let’s check out how to do that with Filr.
How to Organize WordPress Documents with Filr
In this section, we’ll walk you through a step-by-step tutorial on how to organize your WordPress documents using Filr. For the sake of this tutorial, we’ll be using the Lite version of the plugin. However, we’ll also explain how to activate the pro version.
Towards the end of the post, we’ll tell you about the additional features you can have when using the pro version of the plugin.
So let’s get started. We’ll begin by installing and activating the plugin in WordPress.
Step 1: Install and Activate Filr WordPress plugin
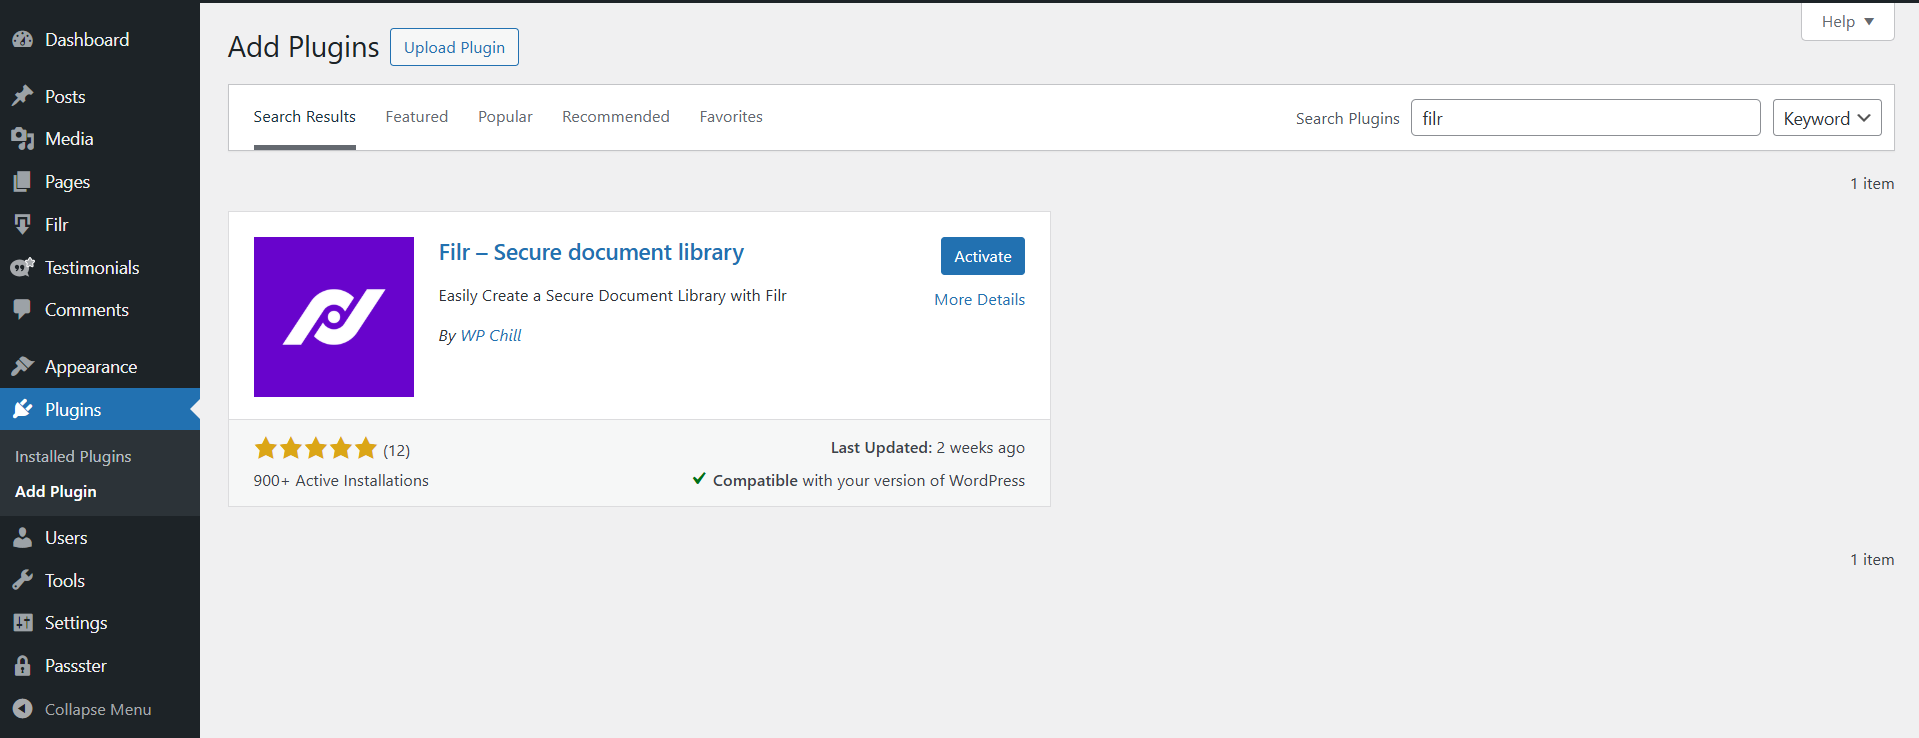
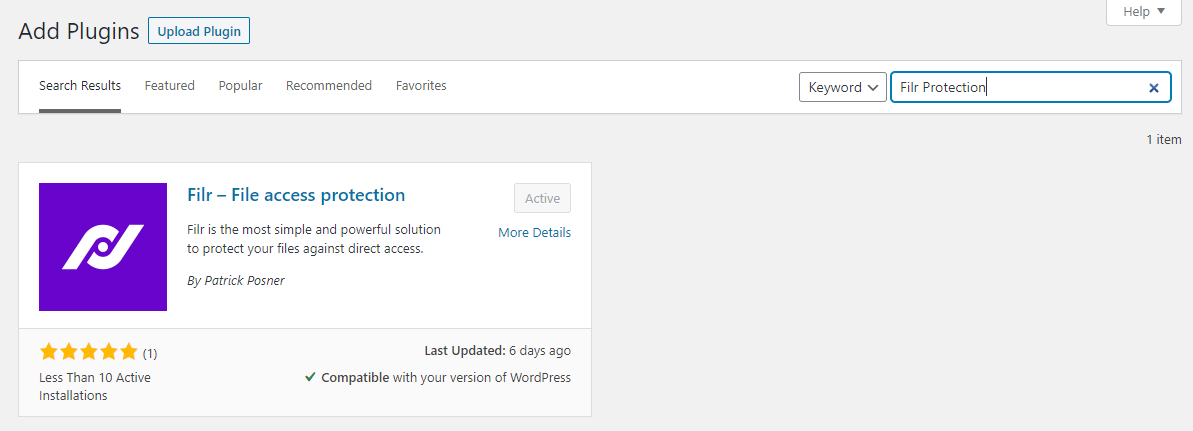
To install the Filr plugin, navigate to Plugins > Add New Plugin
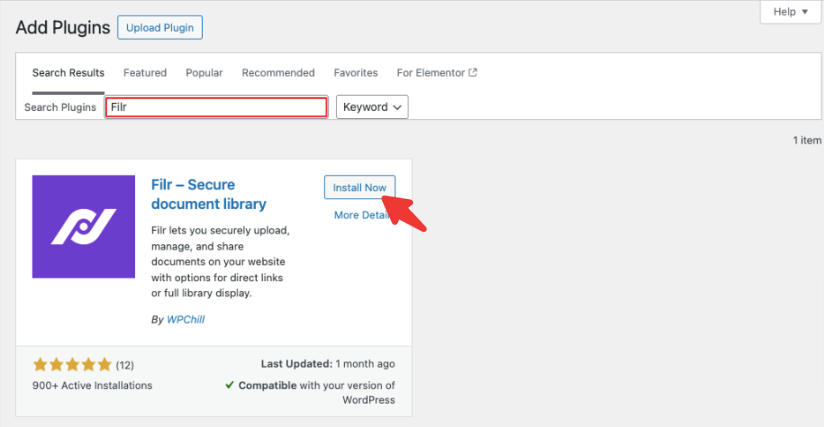
Then using the search box, find the Filr plugin and click Install Now > Activate.
Once the plugin is activated on your website, you can start creating your Document Library. If you want to use the pro version, you have to follow a different method.
To use the pro version of Filr you’ll first need to purchase Filr.
Once you do that, you’ll receive an email notification with a download link and a license key. Click on the download link to download the Filr plugin premium version. Then you can take the following steps.
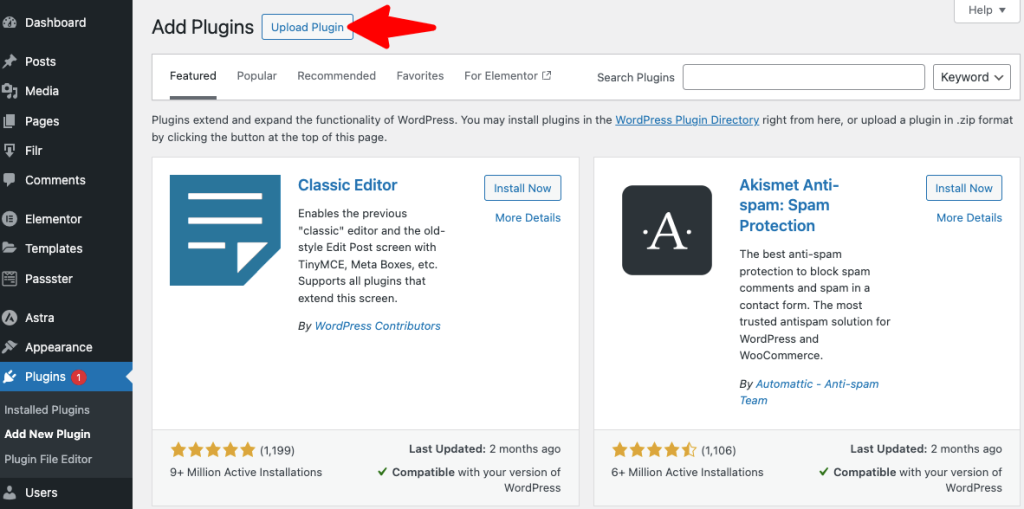
On your WordPress dashboard, go to Plugins > Add New > Upload Plugin. Now click on the Choose File button to upload the file that you’ve just downloaded.
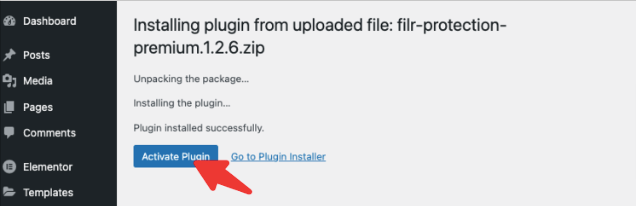
Once done, click on Install Plugin > Activate Plugin to start the installation process.
Your plugin will now be active on your website. To start using the pro version of the plugin, you’ll need to add the license key. To do so, go to Plugins > Filr > Activate License on your WordPress dashboard.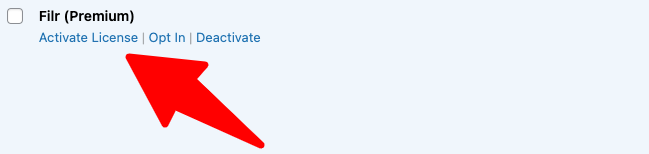
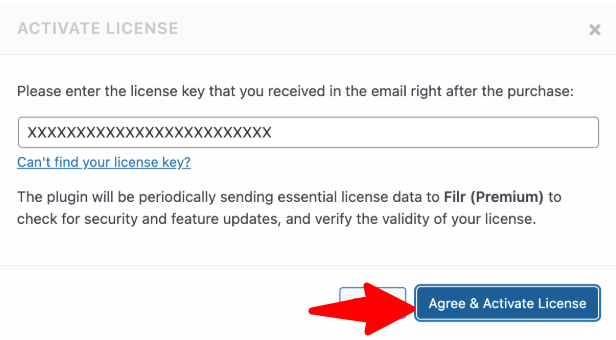
You’ll now see a popup box where you can add the License key. Copy the key from your email and paste it here. Then click Agree and Activate License.
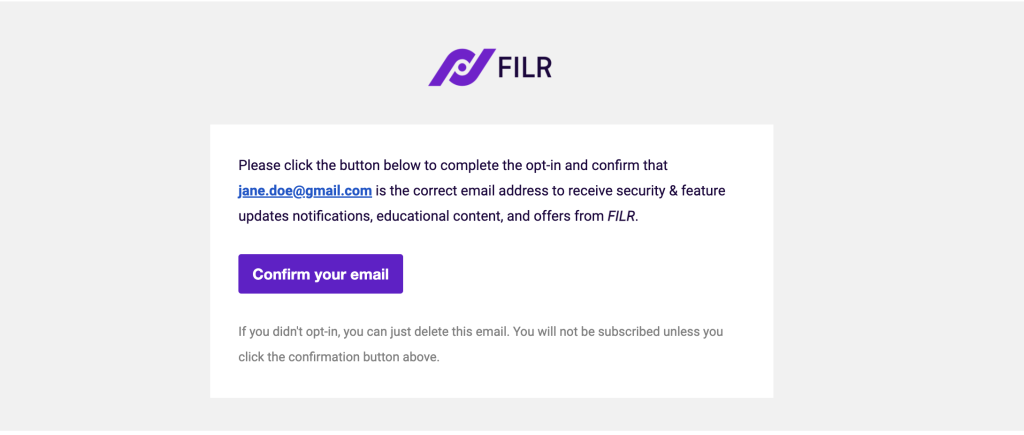
On your WordPress dashboard, you’ll see a message saying you’ll receive an email on your registered email address where you need to confirm the opt-in.
So go to your email address and click on Confirm Your Email to activate the pro version of the plugin.
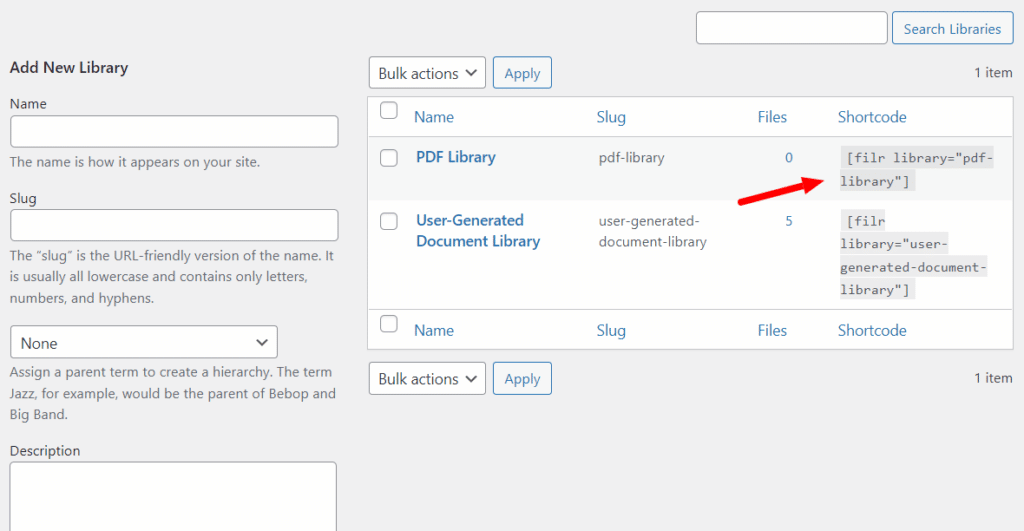
Step 2: Create a Document Library
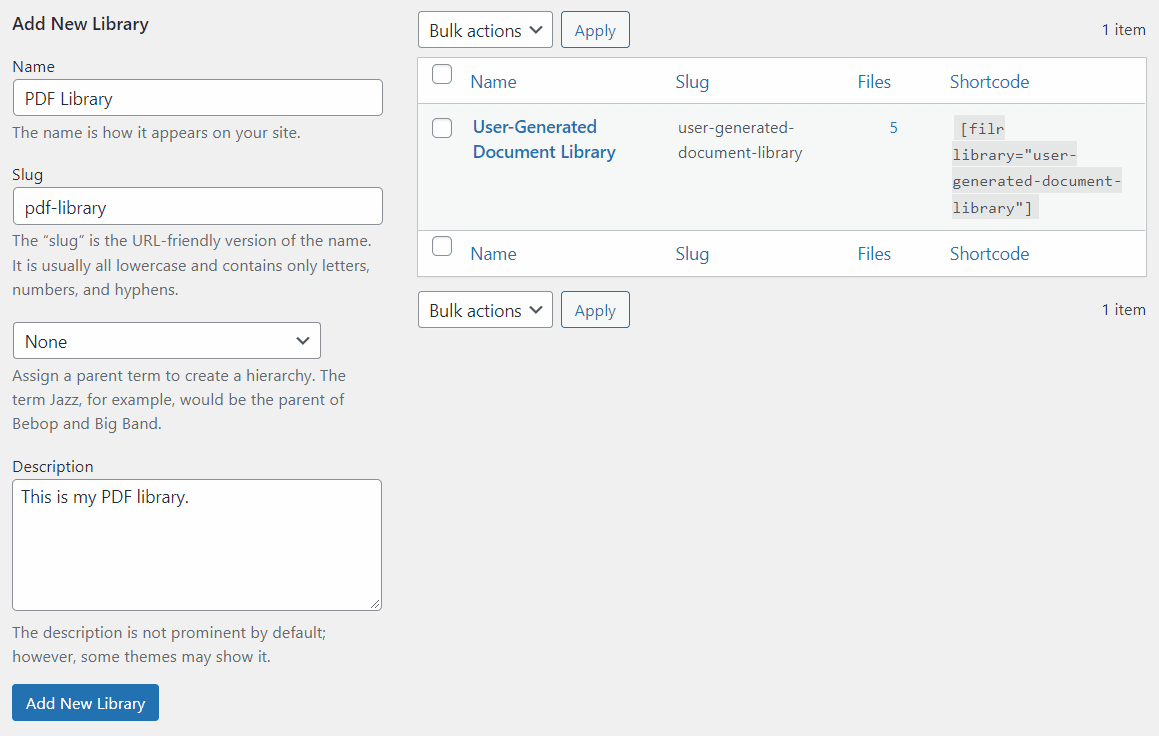
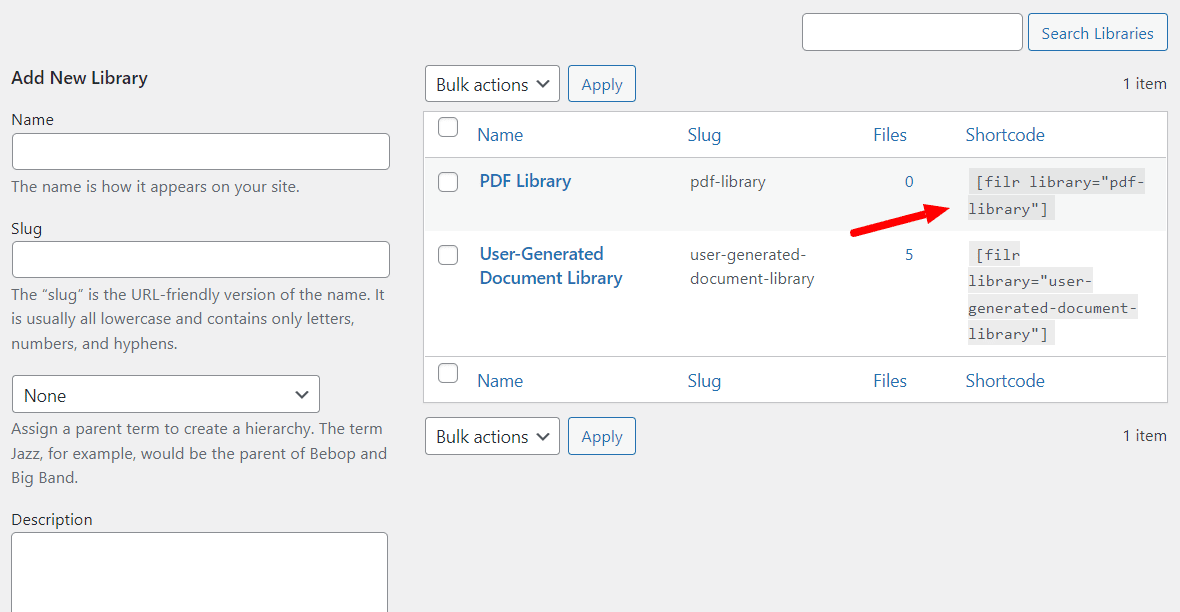
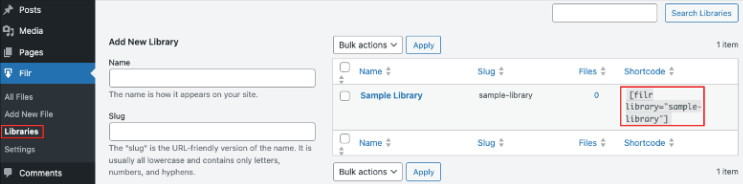
In the next step, we’ll create the document library. For that, go to Filr > Libraries. On the right side of your screen, you’ll see various fields under the Add New Library option. Here you can fill in the details as labeled.
You just have to fill in your library name, and add the slug (which is the same as your library name but in lower caps and with a hyphen in between the names).
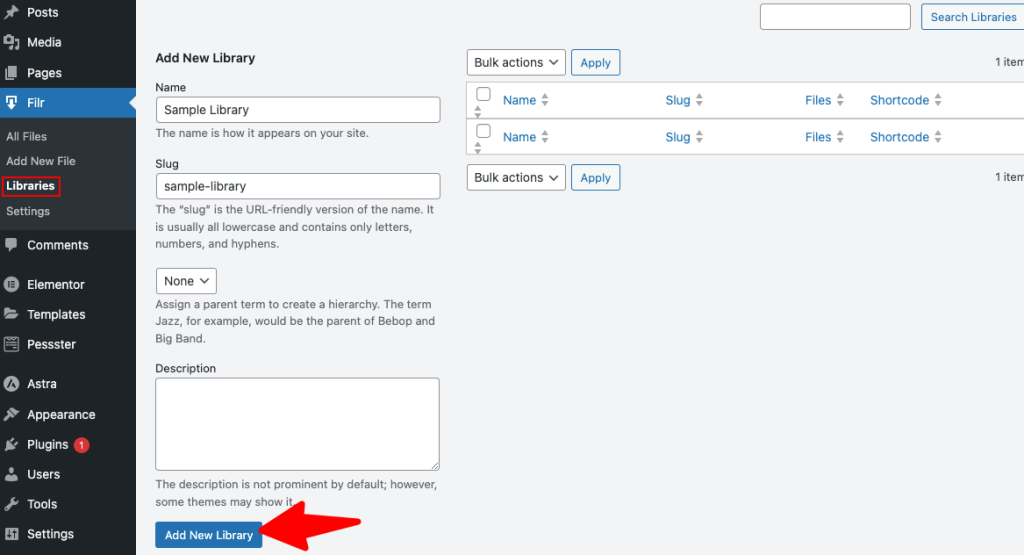
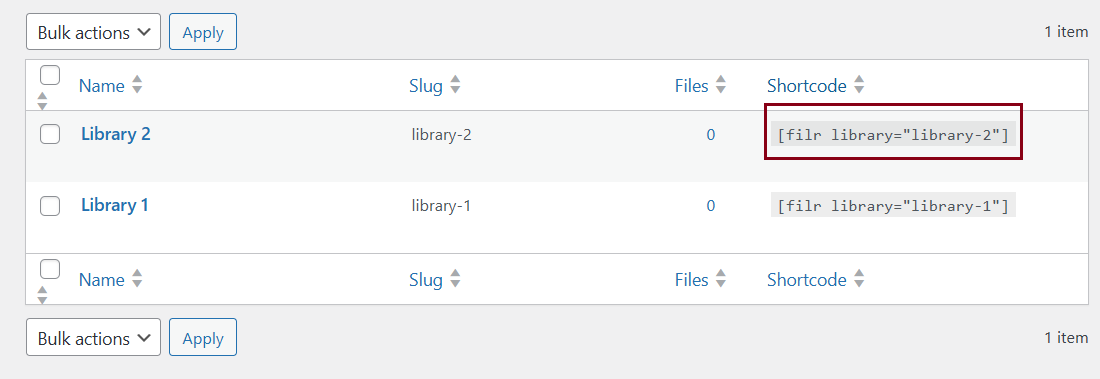
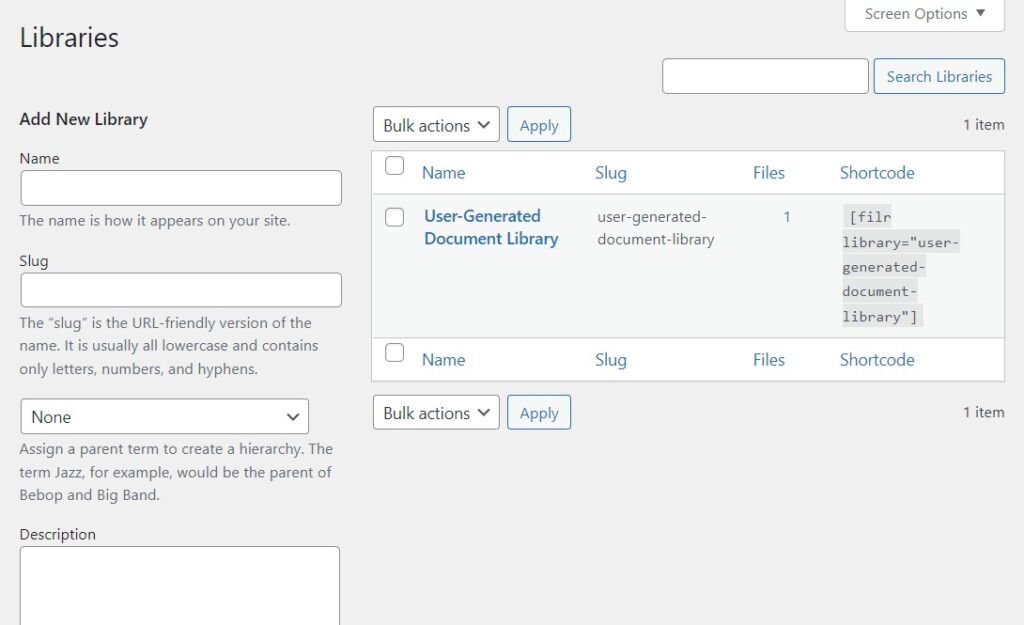
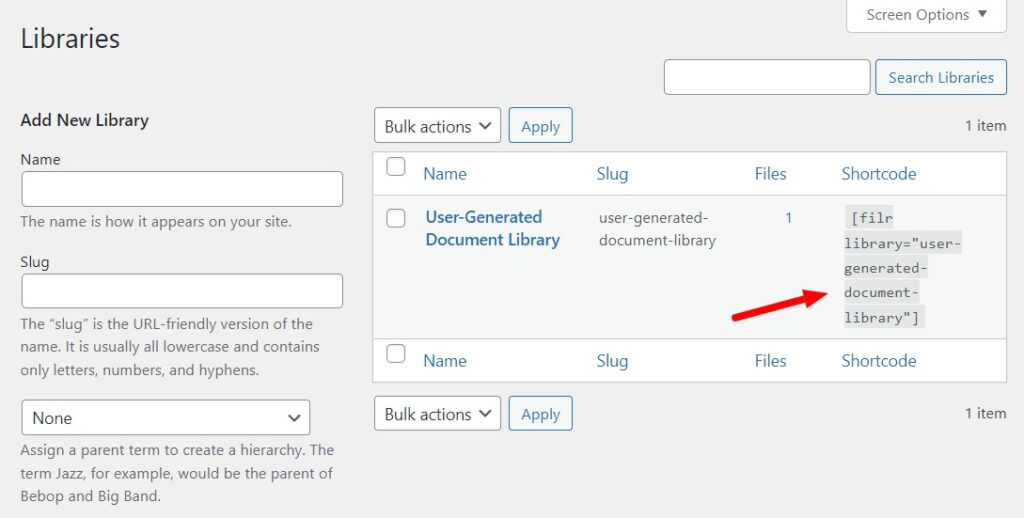
Once done, click on the Add New Library button at the bottom. Now on the right side, you’ll see the newly created library along with the slug and the shortcode next to it.
We’ll use this shortcode later to display your document library on your website. Now you’ll have to add your files to this library.
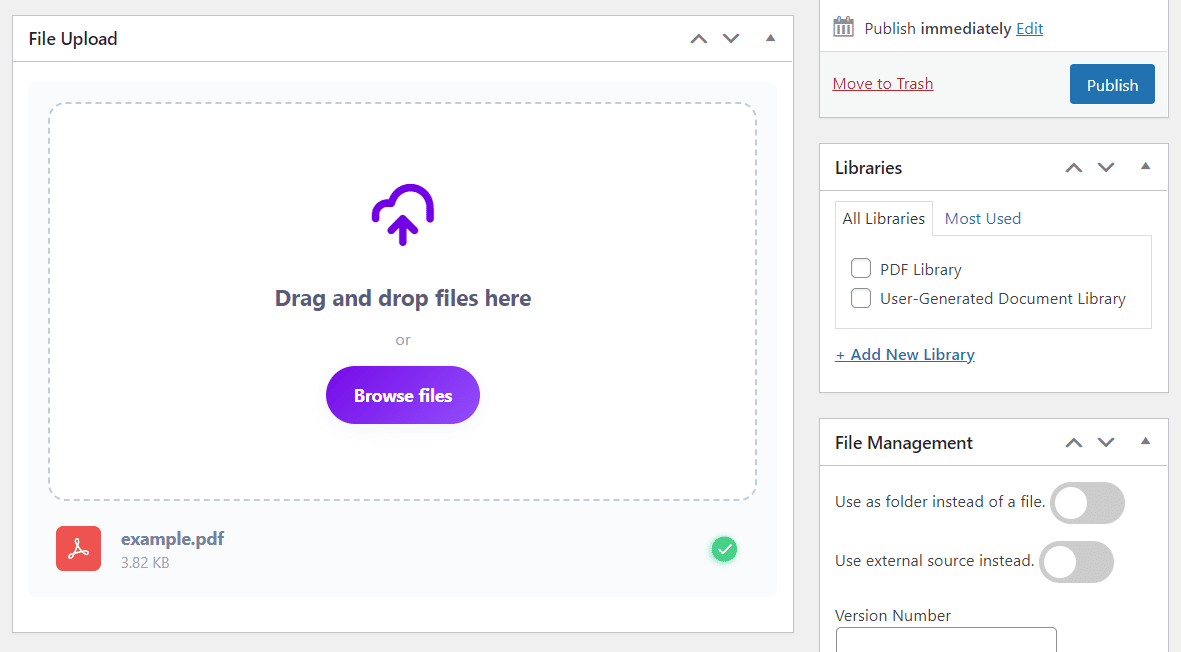
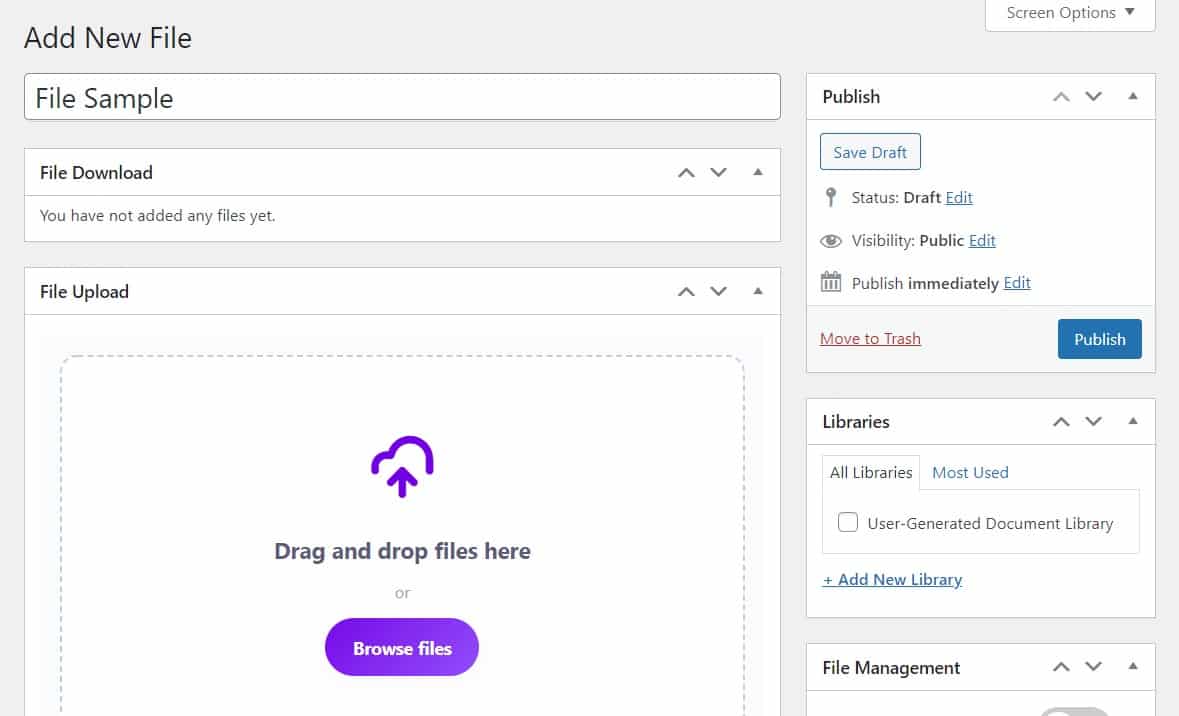
Step 3: Add Files to Your Document Library
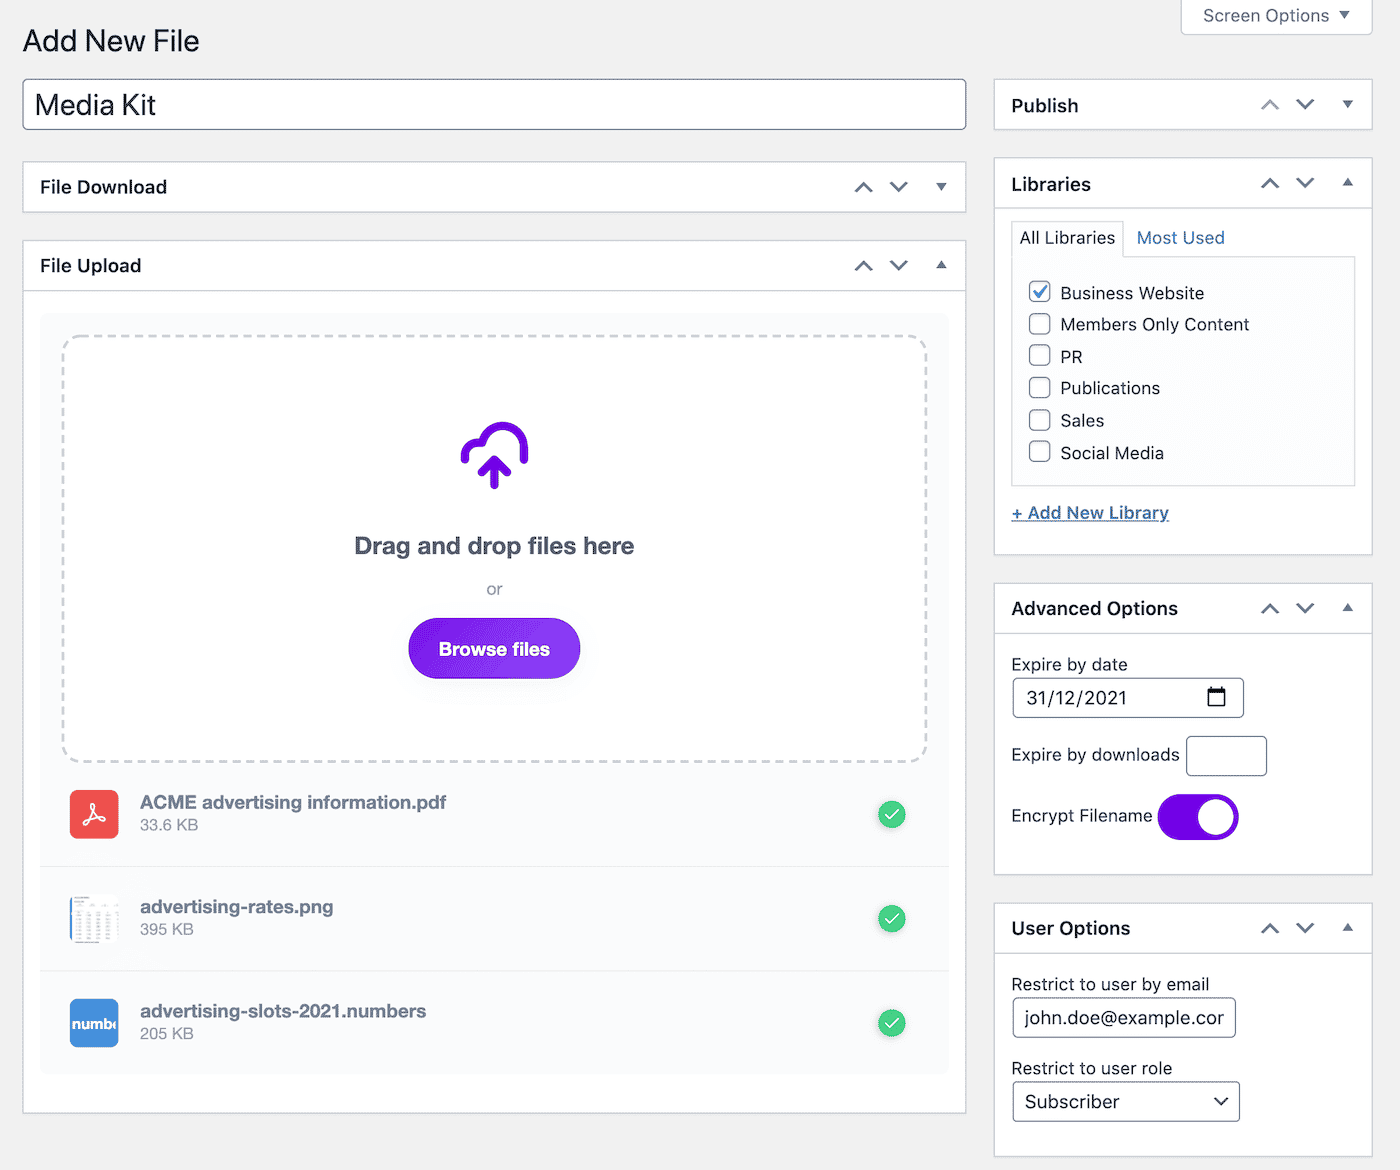
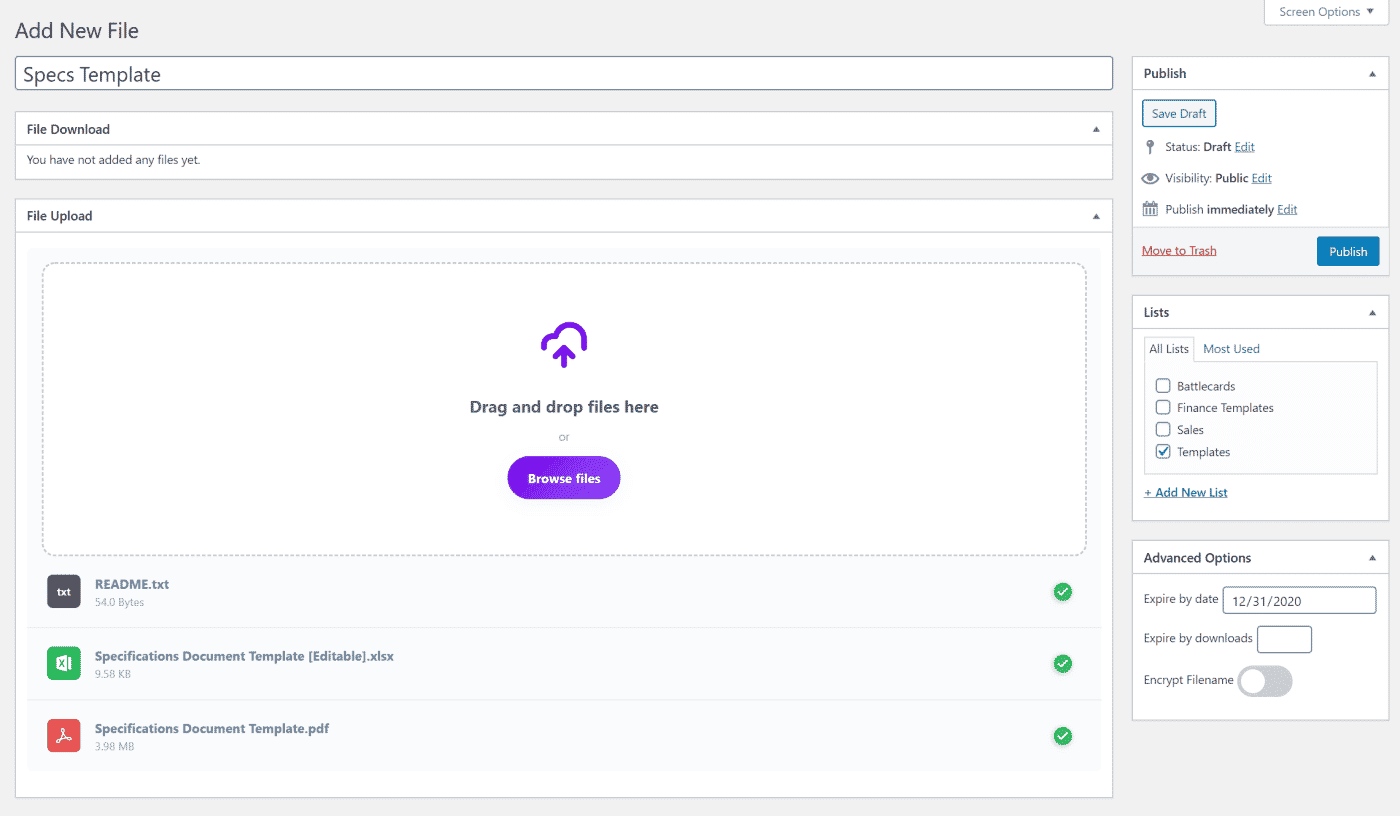
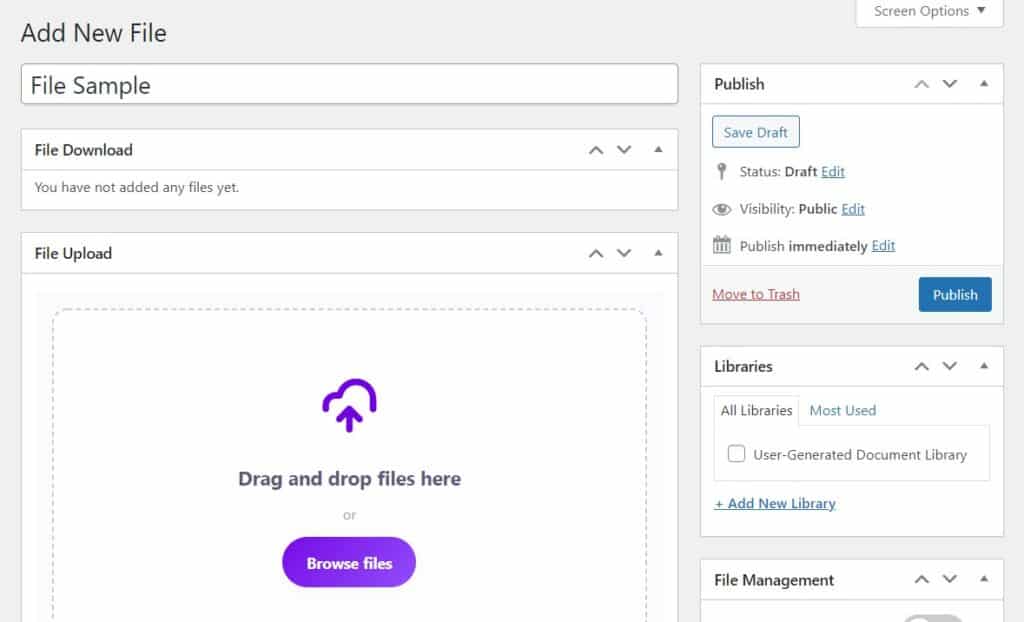
To start adding new files to your library, go to Filr > Add New on your WordPress dashboard. Here you can add a title and start adding your files using the Browse Files button.
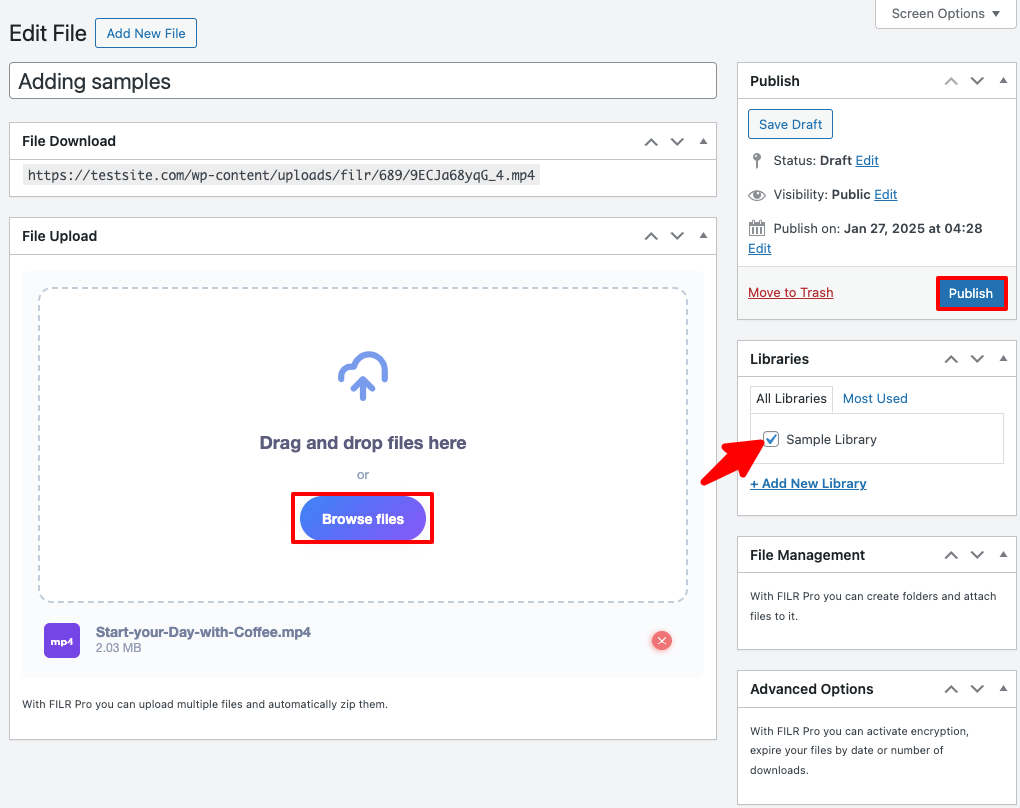
Next under the Library option, on your right, select Sample Library. This will connect the library and file you’ve created and keep them organized under one section. Once you’re done click on the Publish button to set it live.
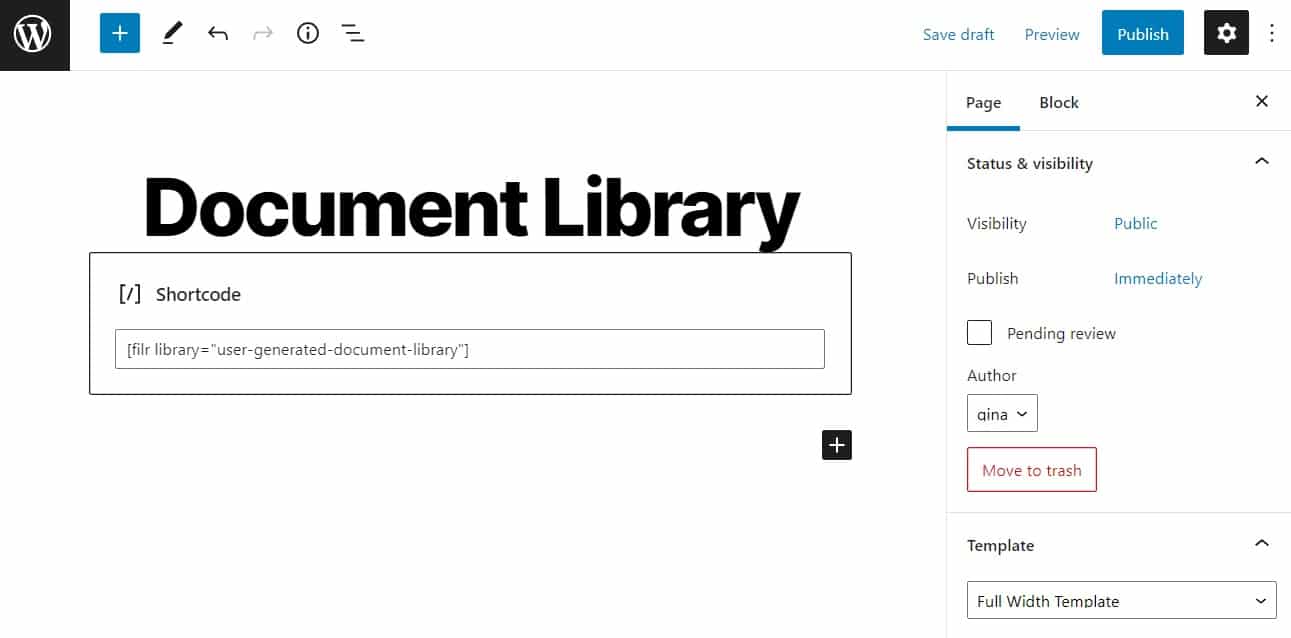
Step 4: Display the Library on Your WordPress Website
Now that we’ve created your library and added some files to it, it’s time to showcase it on your WordPress website. To do that, go to Pages > Add New and create a new page on your WordPress dashboard.
Next, give this page a name and add all the additional information or content you want on the page. Once you’ve done that, again on your WordPress dashboard, go to Filr > Libraries. From here, copy the shortcode of the library that you created in step 2.
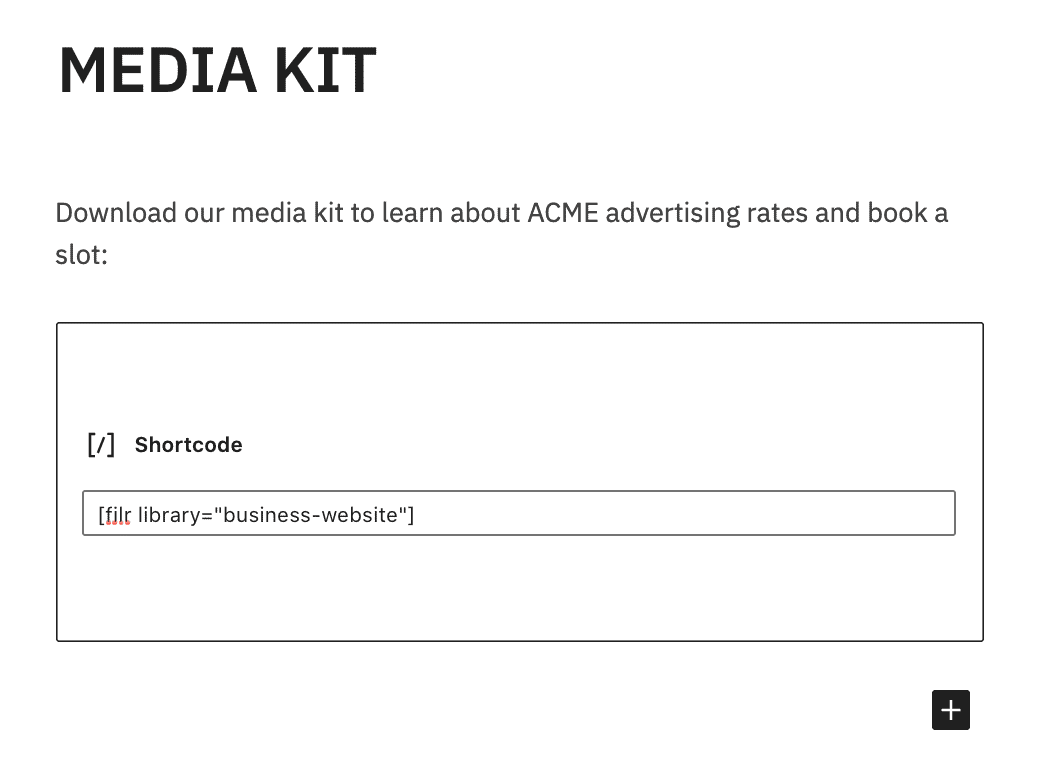
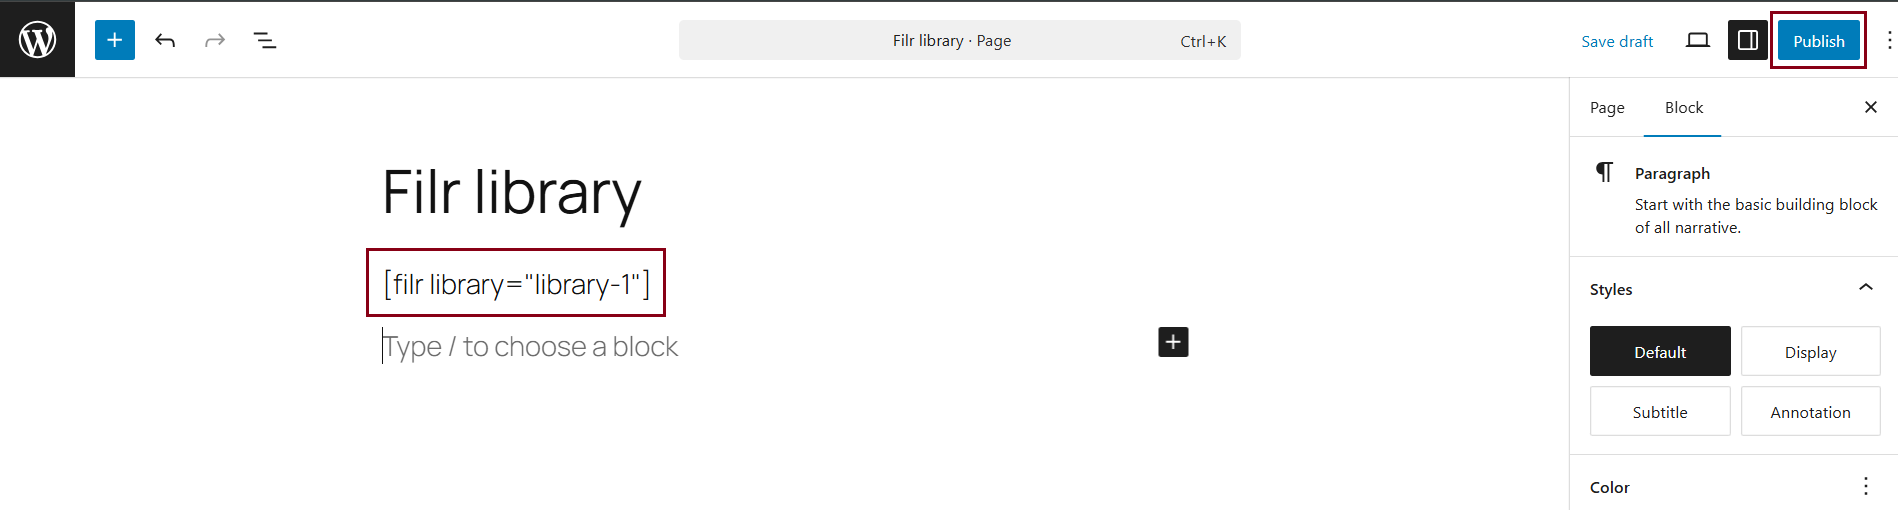
Paste this shortcode in the new page that you’ve just created. Next, hit the Publish button. You can also add any other content that you want to the page. We are adding some demo content here for your understanding.
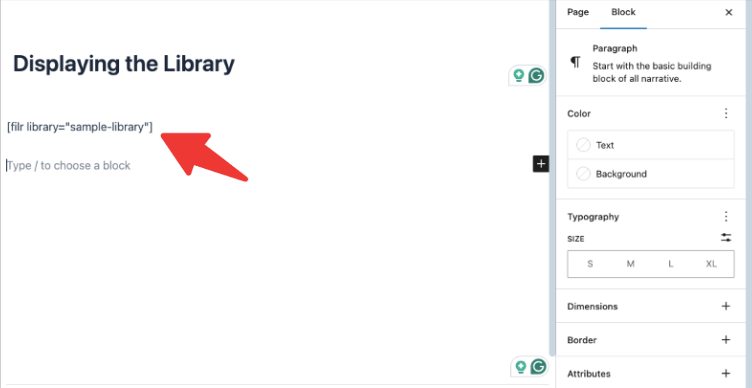
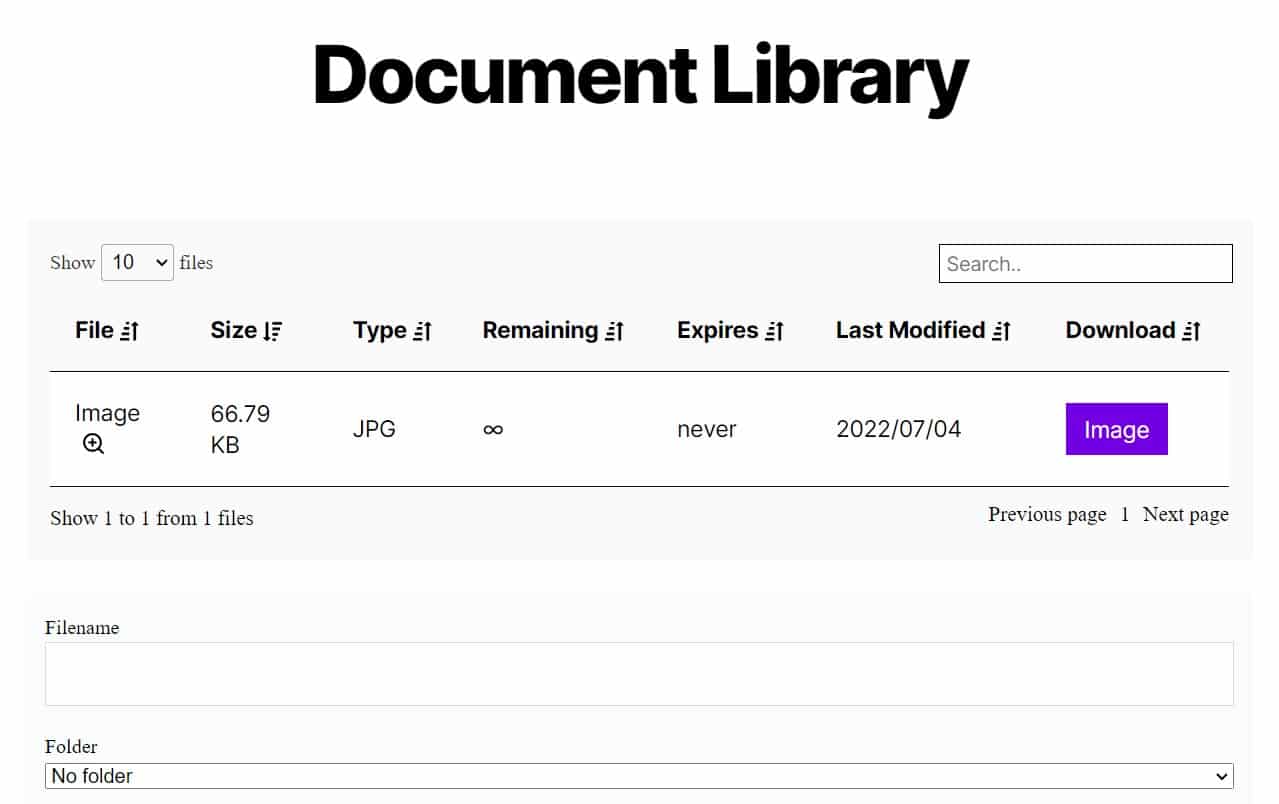
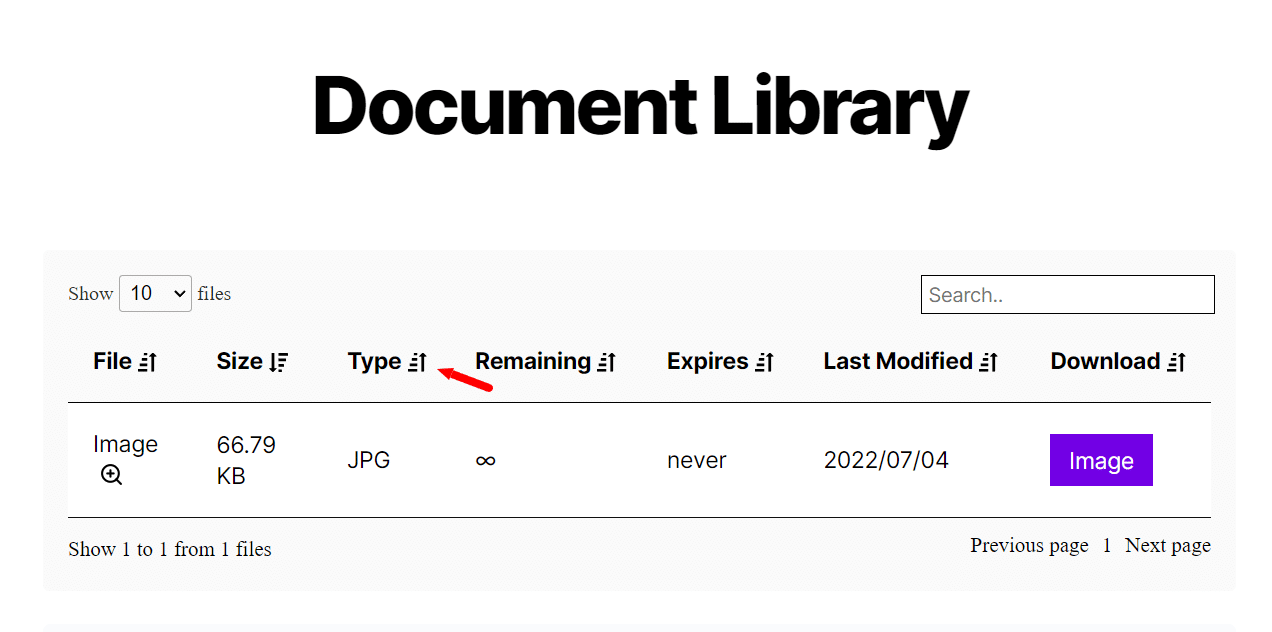
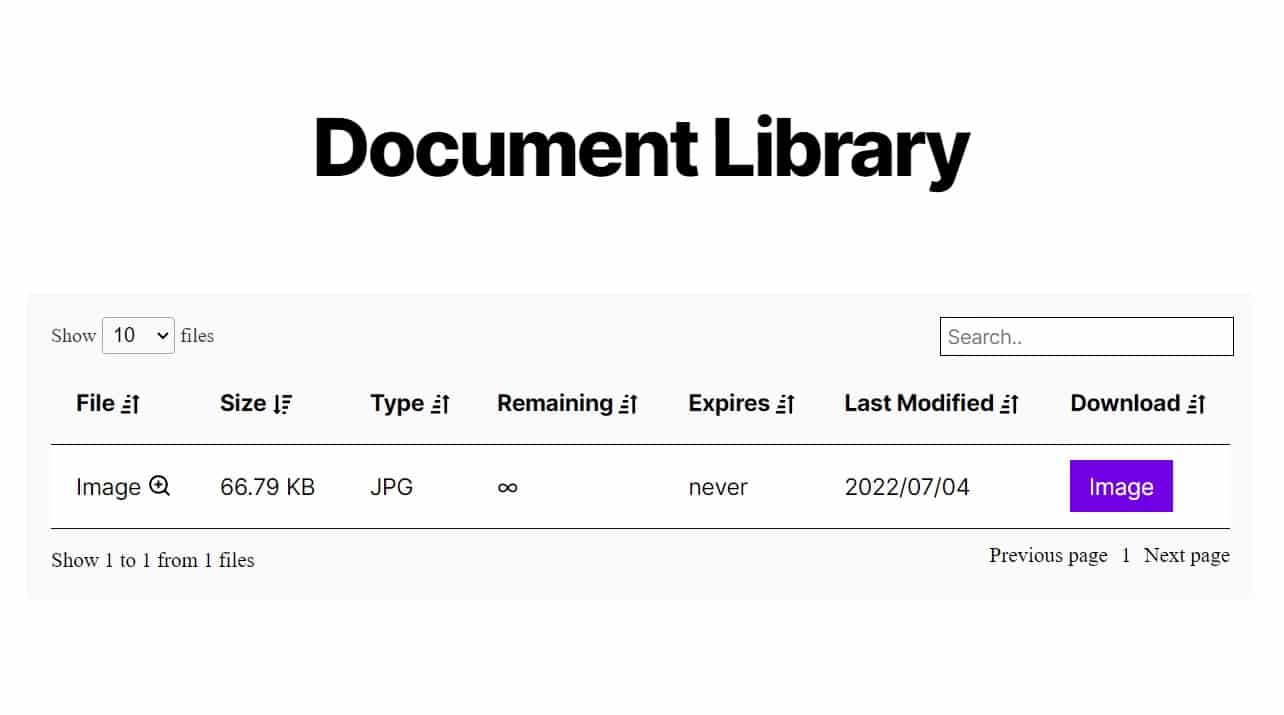
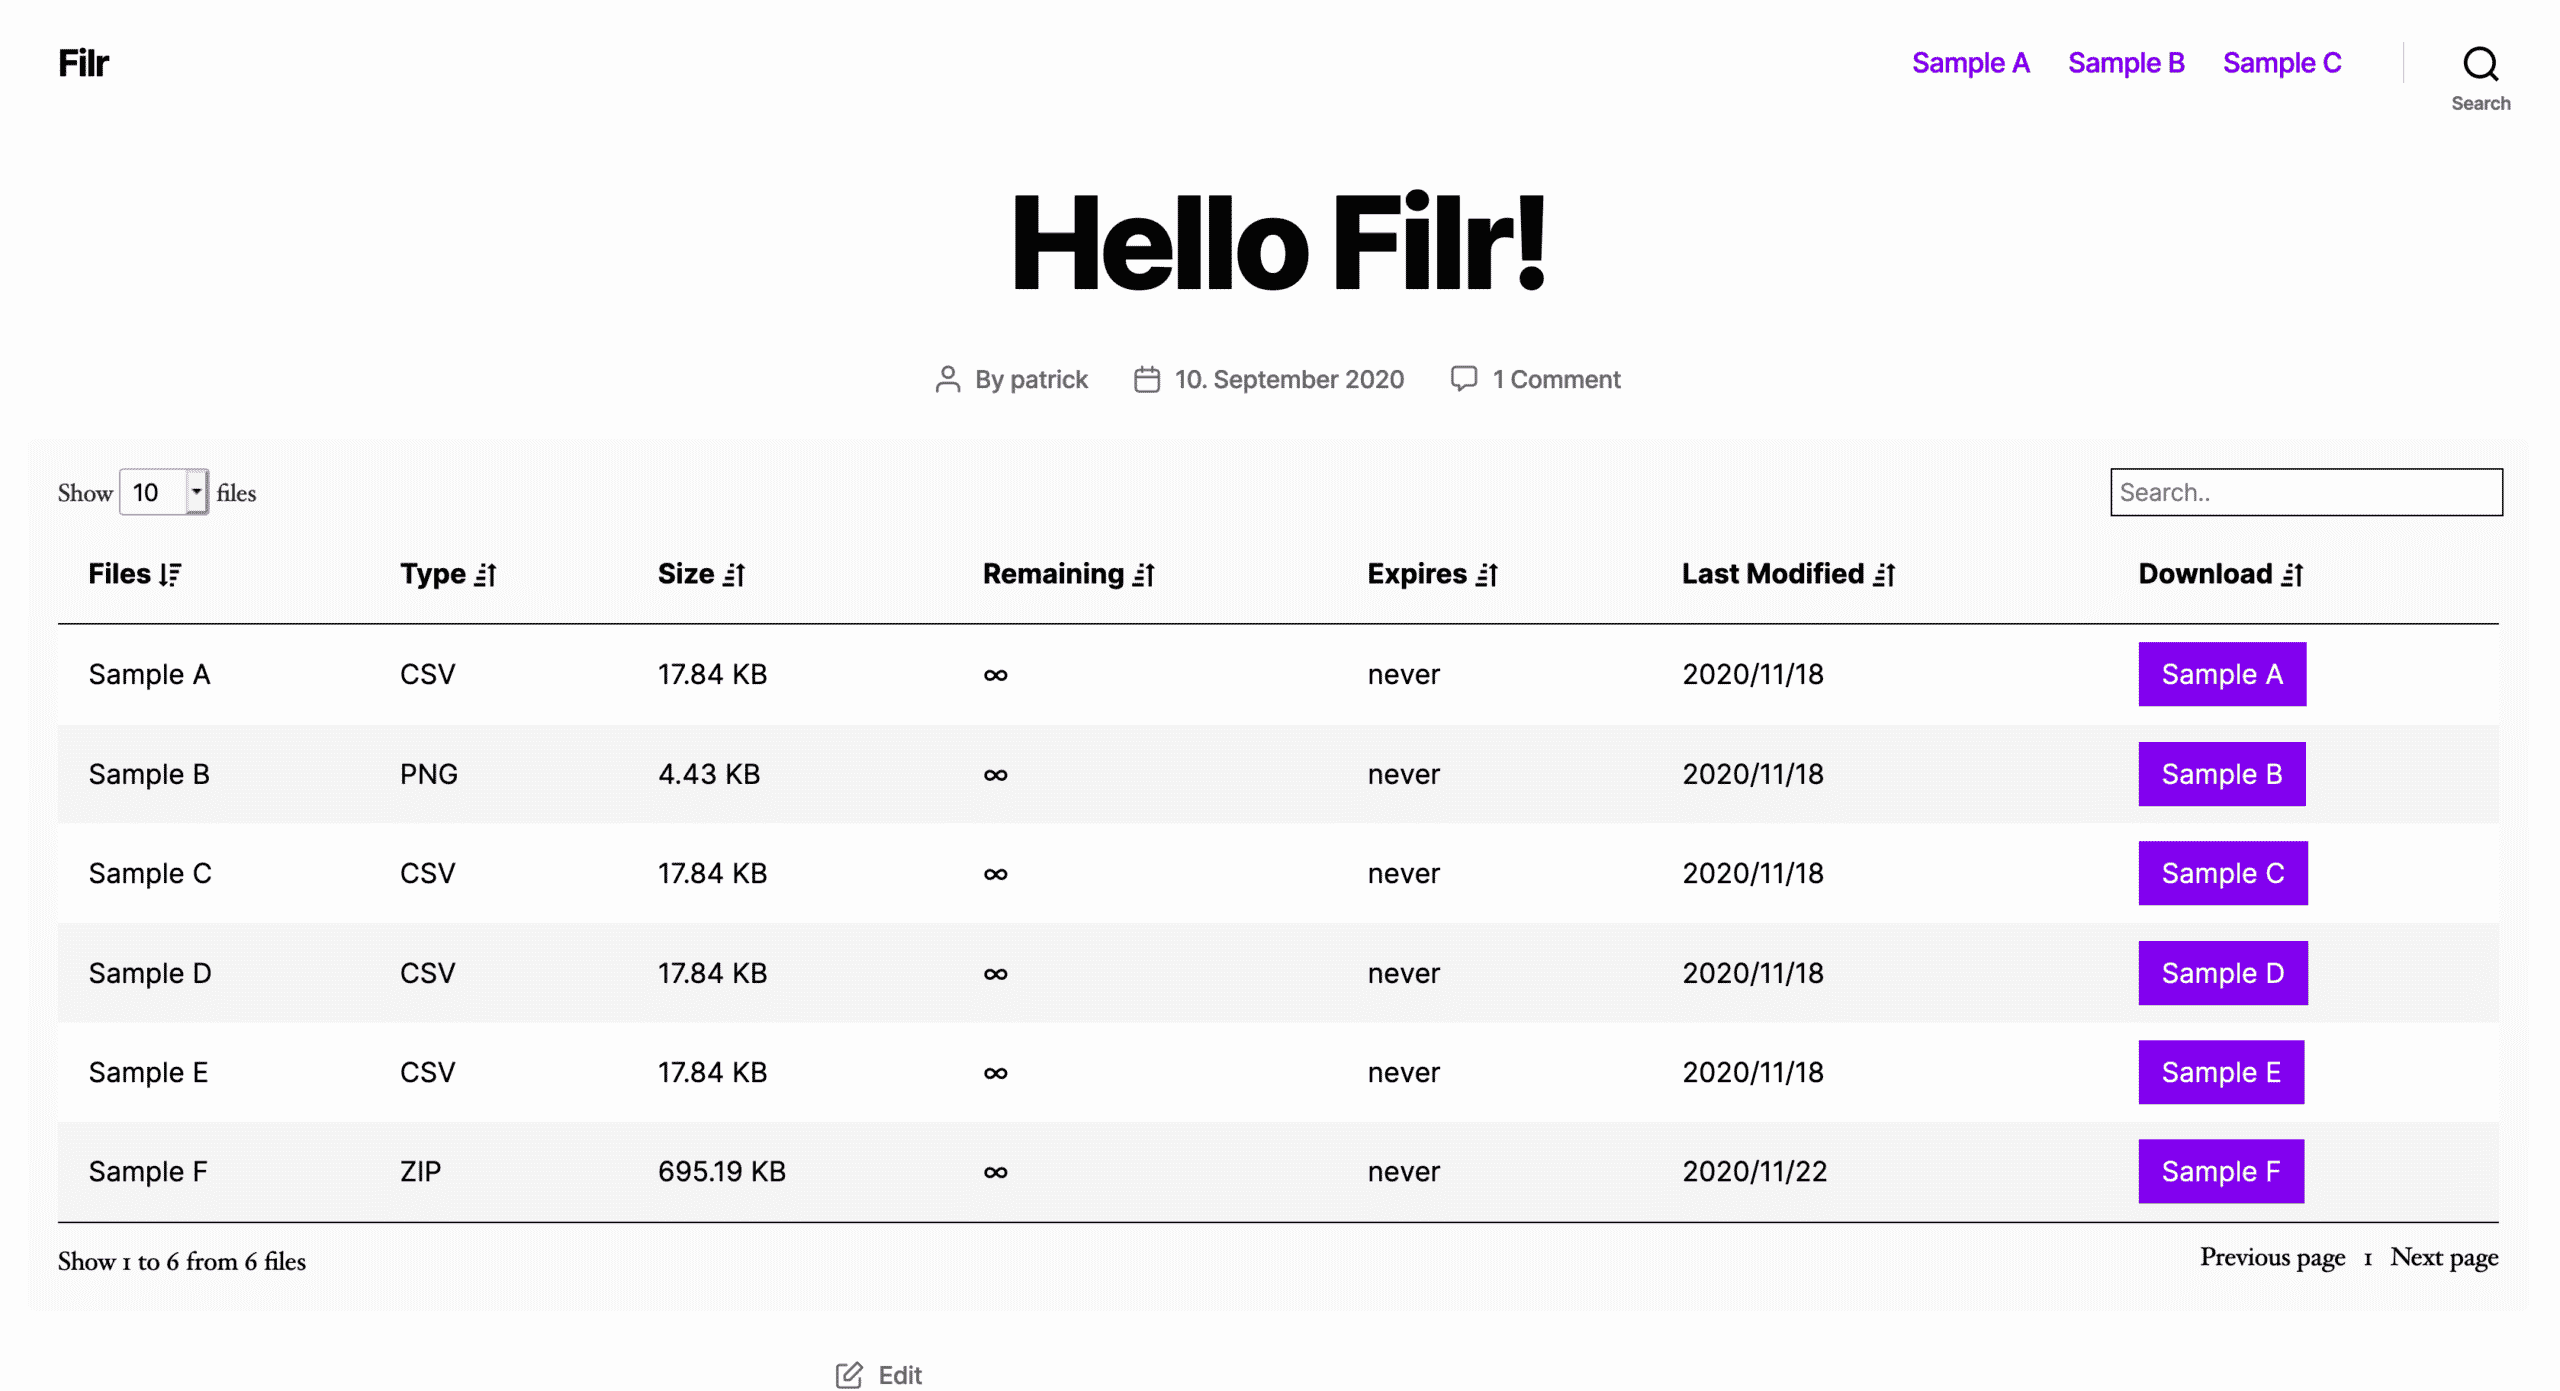
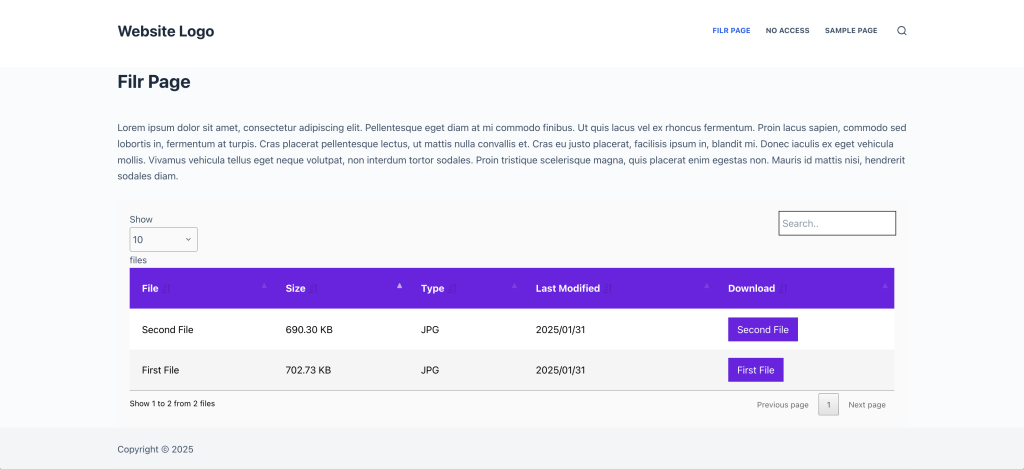
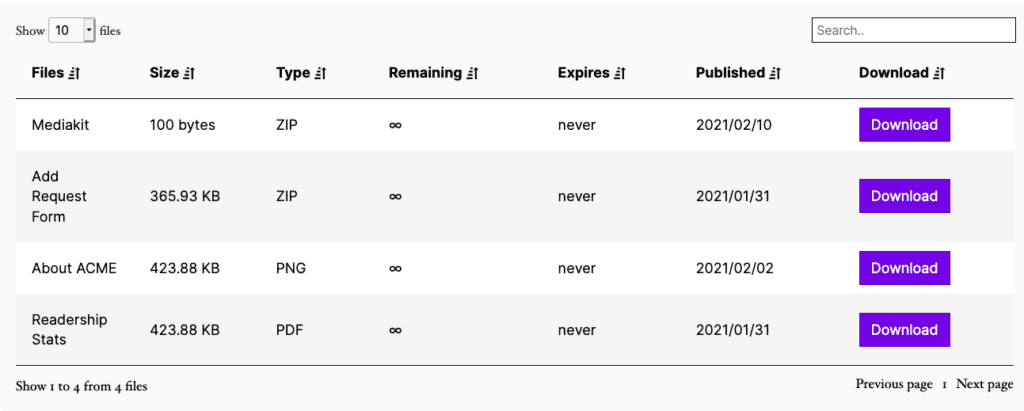
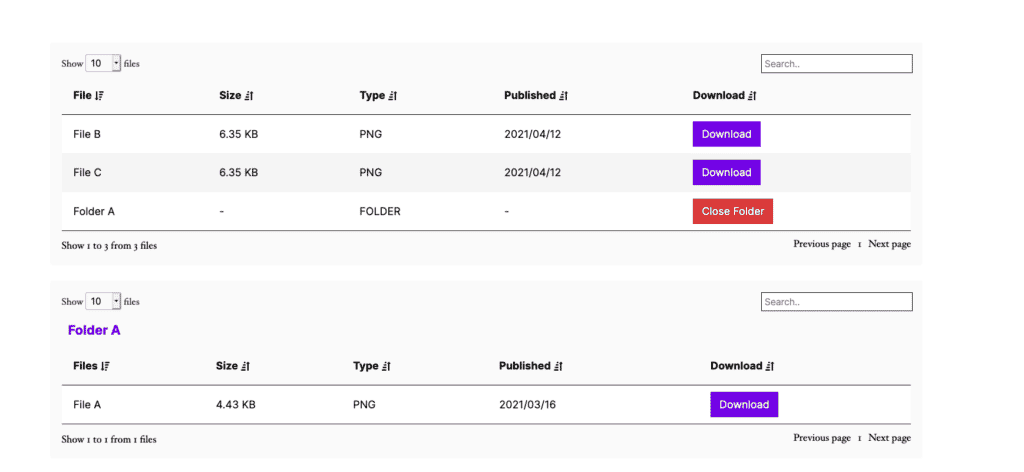
Your document library will now start reflecting on the front end of this page.
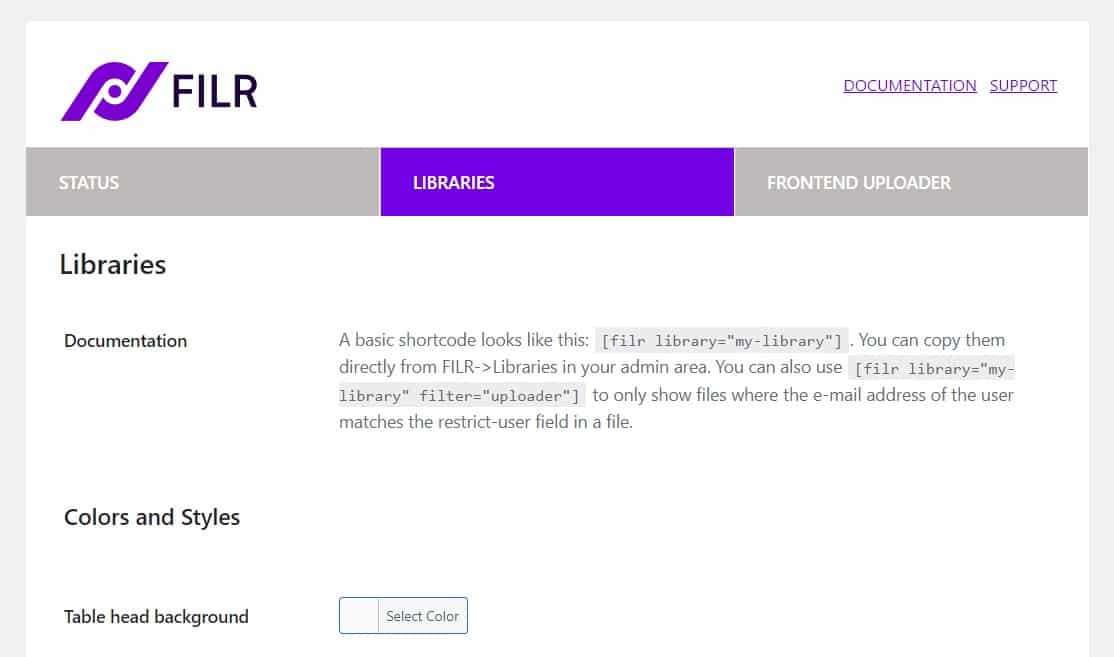
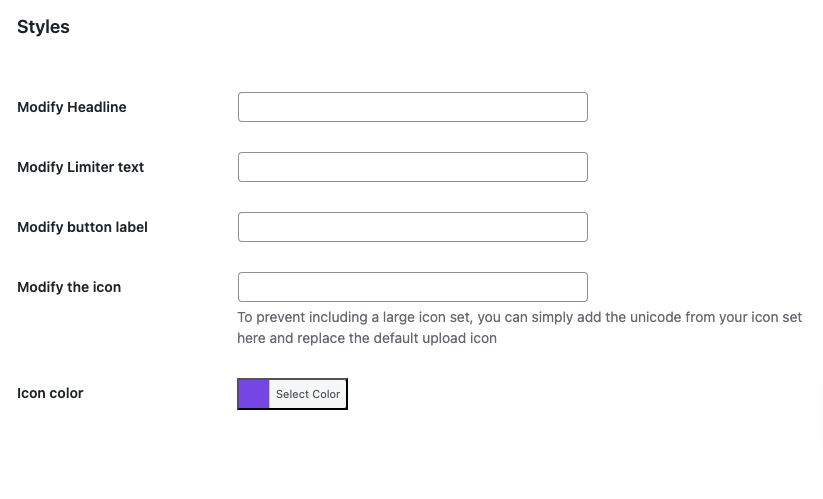
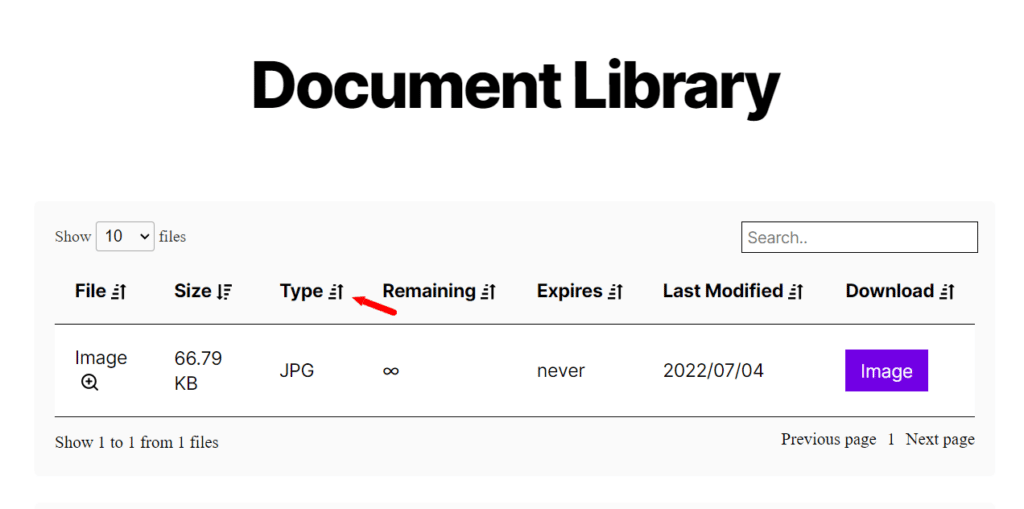
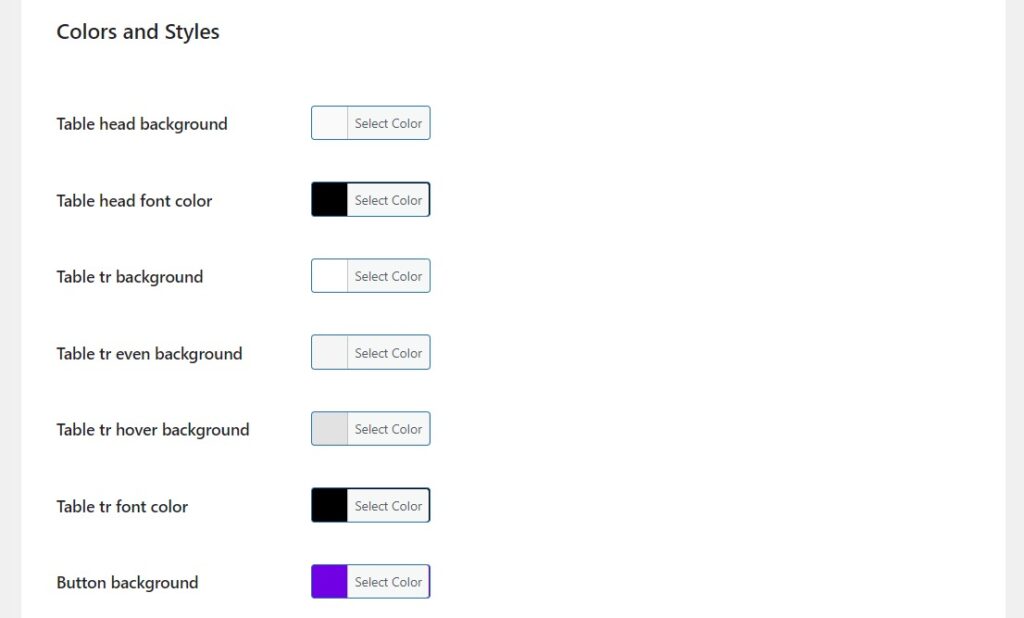
Customizing the Appearance of Your Document Library
The best thing about Filr is that it lets you customize the look and feel of your Document Library. Although the default option looks good too, sometimes you might want to match it to your brand colors. In that case, customizing it can be super easy.
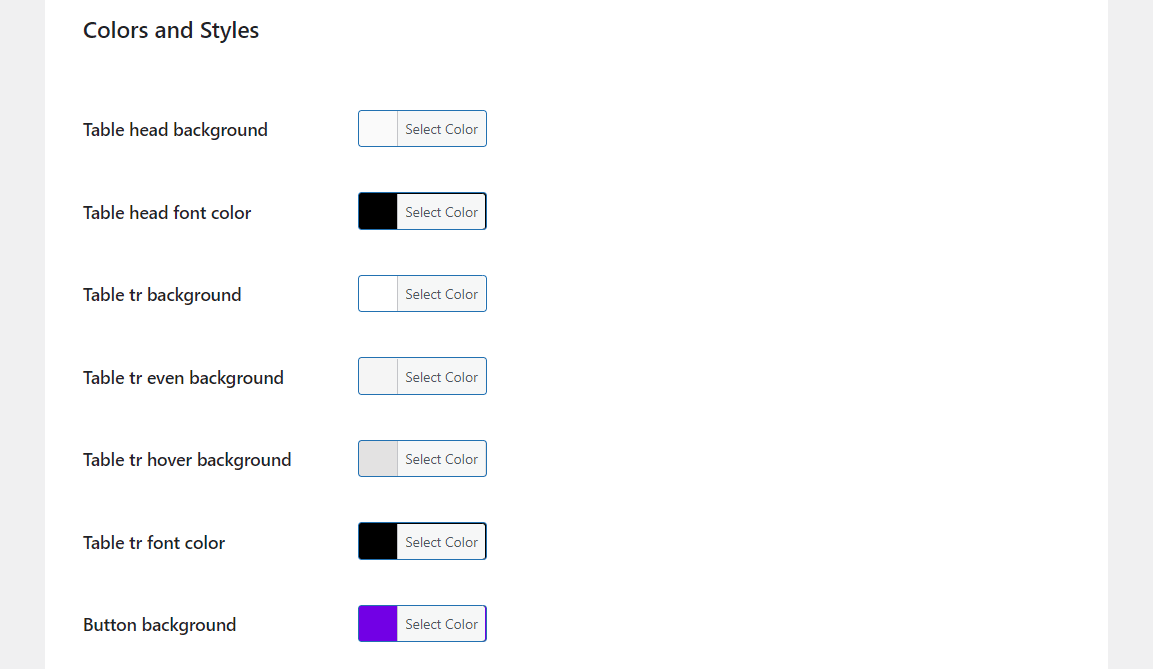
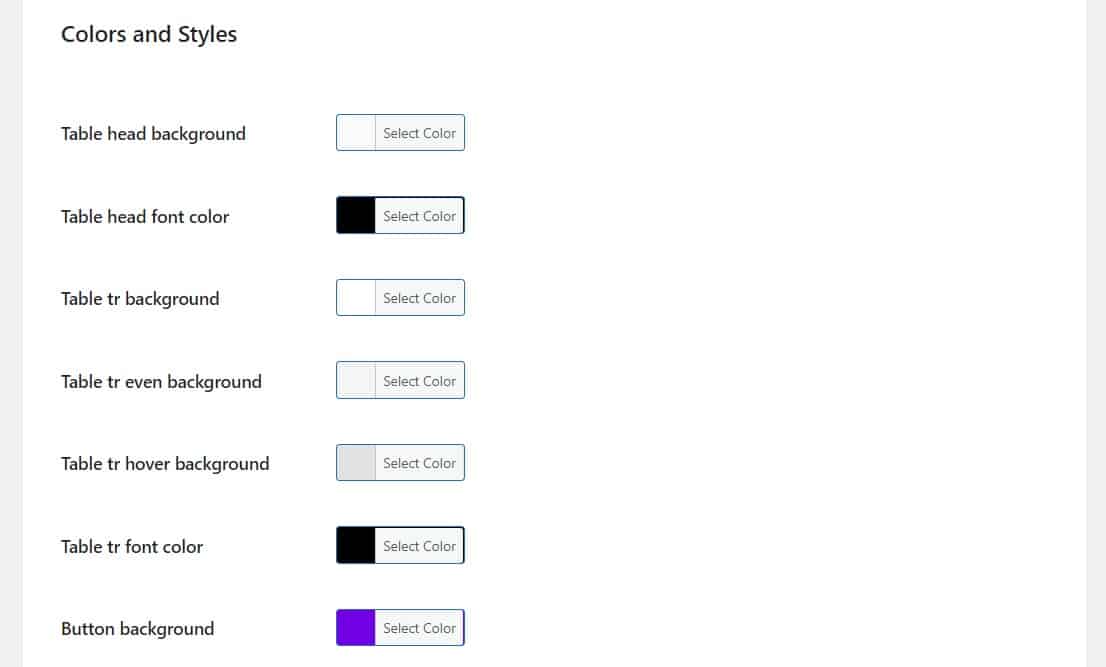
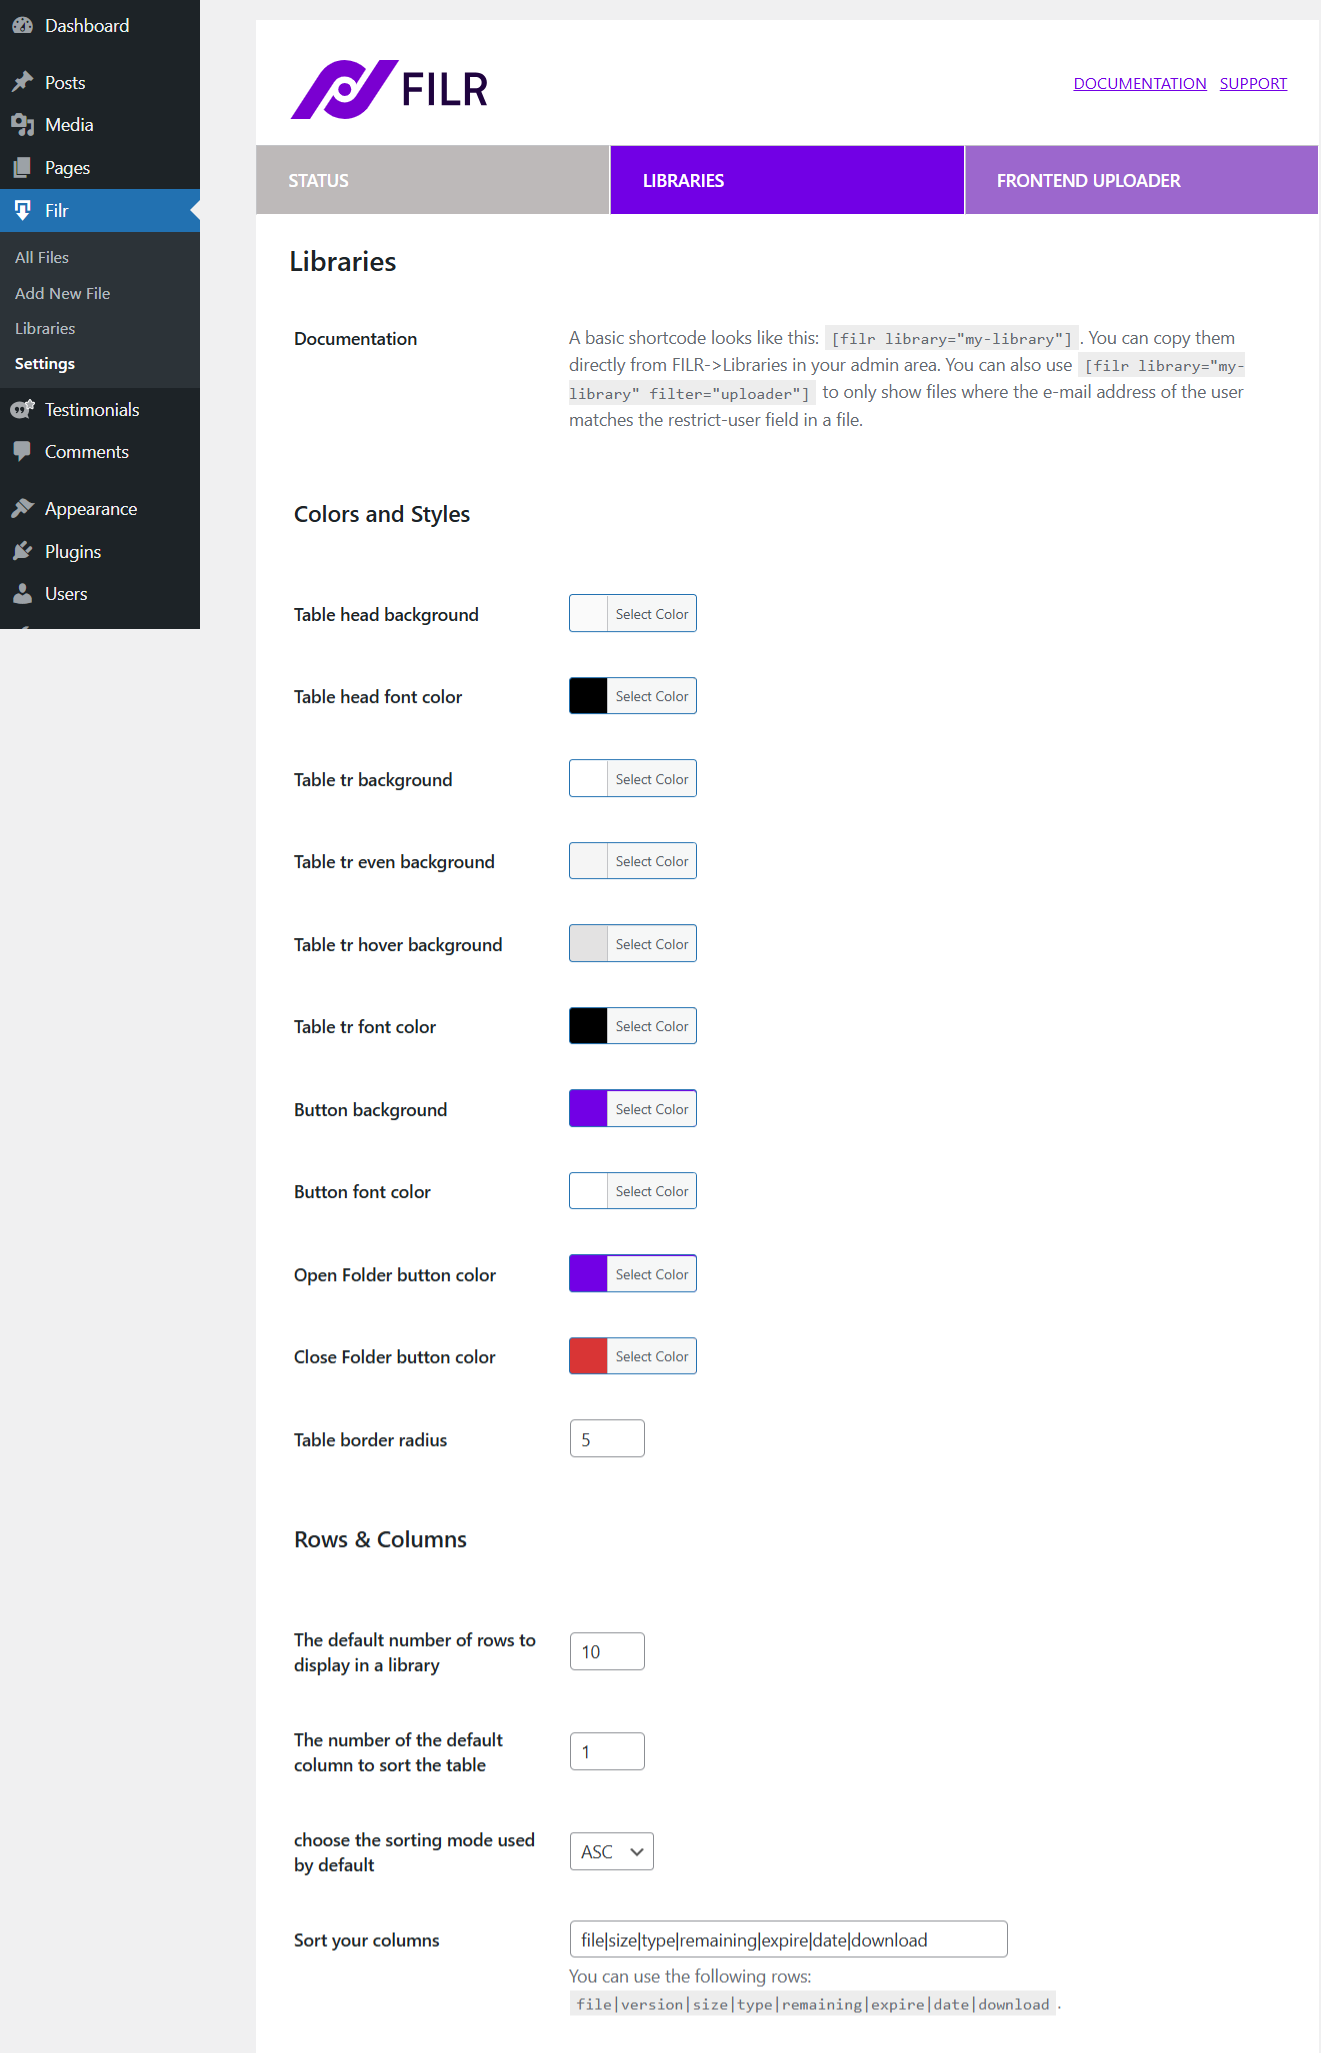
To do that, go to Filr > Settings > Libraries.

Here you can easily change the color and style of your library. It lets you change the background color of your table headings and even the entire table. You can also add hover effects, change the button color, and button font color, add a table radius, and more.
By scrolling further, you’ll see options to customize the rows and columns as well. Here you can add the number of rows and columns you want. You can also choose the sorting mode in this section.
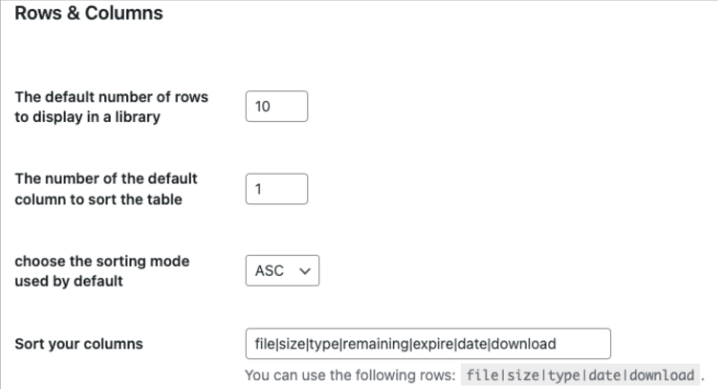
If you scroll further down, you’ll see options to deactivate the name column, file size column, type column, etc.

By scrolling further below, you can also add alternative text for folders that contain no files. You can also rename your download button, activate file preview, enable the opening of the external file in a new tab, and deactivate the search option and pagination options.
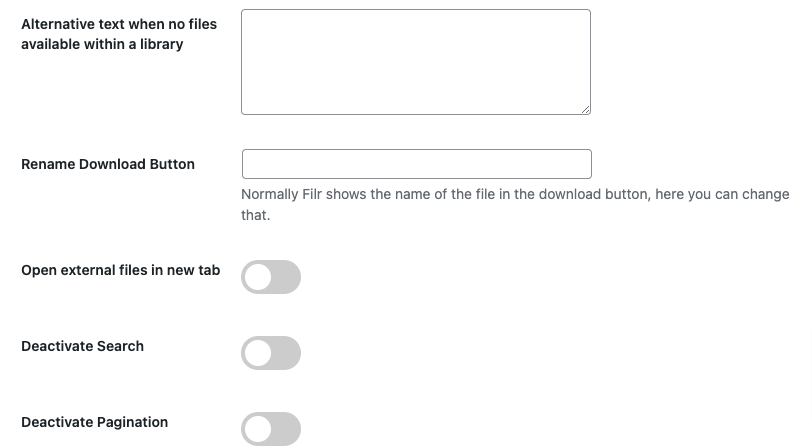
Just scroll through these options and turn them on or off based on your requirements. Once done, hit the Save button to save the changes.
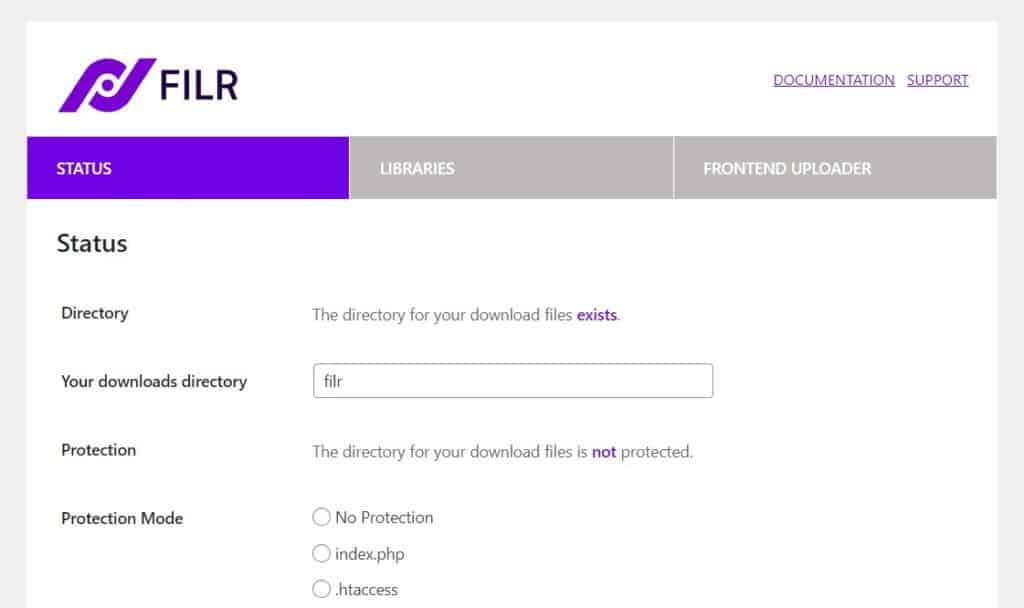
Adding Overall Security to Your Documents with Filr
In this section, let’s learn how to add document security with Filr. By adding security measures to your documents, you can control who can access your files.
To start adding security measures to your files, go to Filr > Settings > Status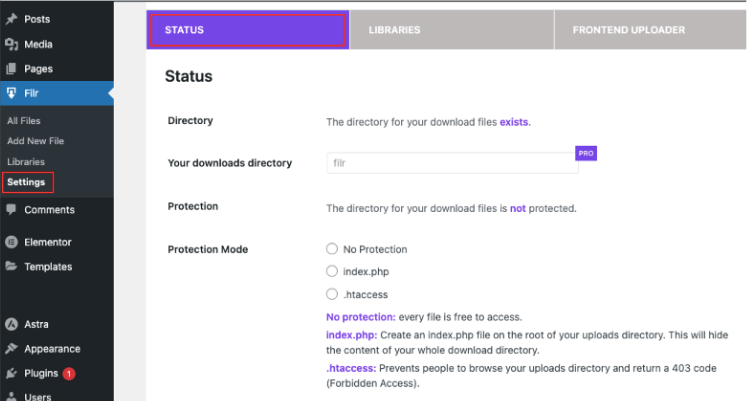
Here under Protection, you’ll have three options. Based on your needs, you can choose the kind of protection you want.
- No Protection – If you don’t need any protection select this option.
- Index.php – Select this option if you want to restrict access to an entire file directory. You can also select this option if you’re using server types like Nginx or Windows.
- .htaccess – You can select this option if you use an Apache server. This will forbid unauthorized access to any files within a directory.
Once you’ve made all the changes, click the Save Changes button to save the changes. This was about the lite version of the plugin. Let’s now look at some of the pro features.
Filr Pro Features
Using the Pro version of Filr lets you use several additional features. Let’s look at some of them in this section.
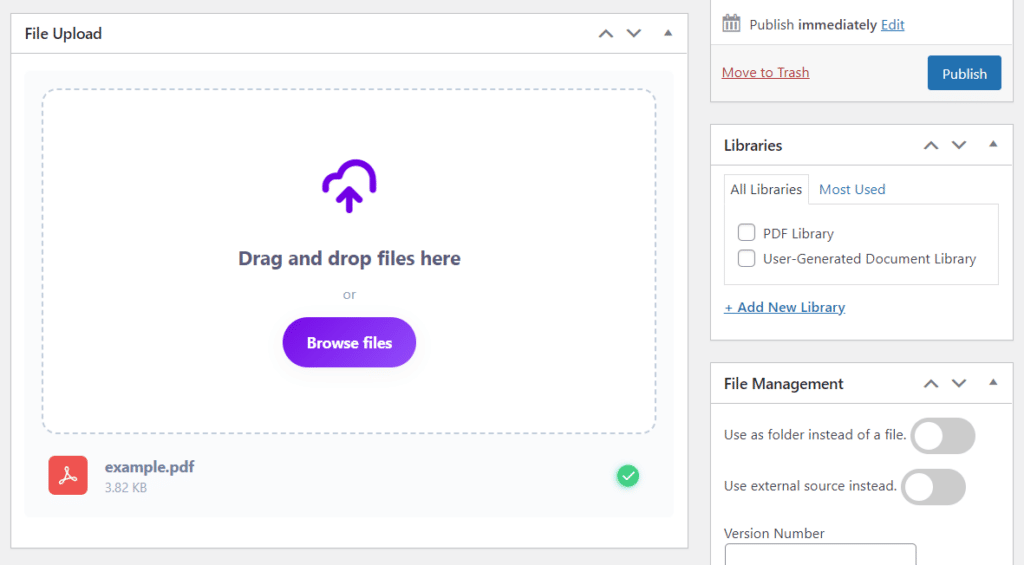
1. More Options Upon Adding Files
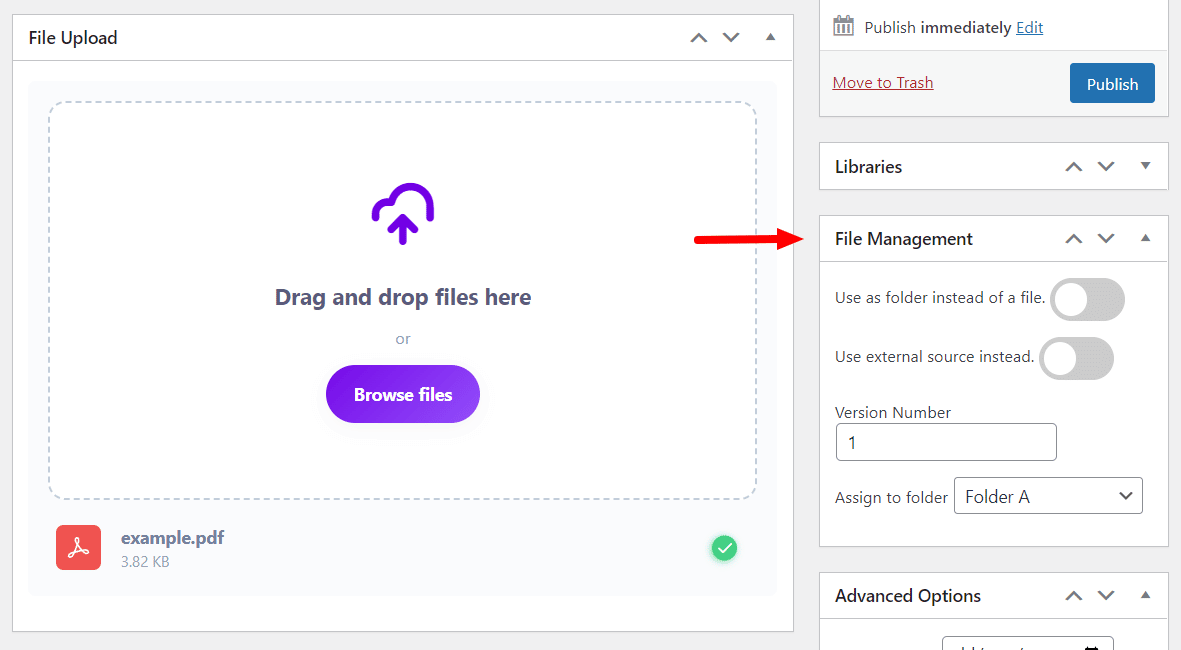
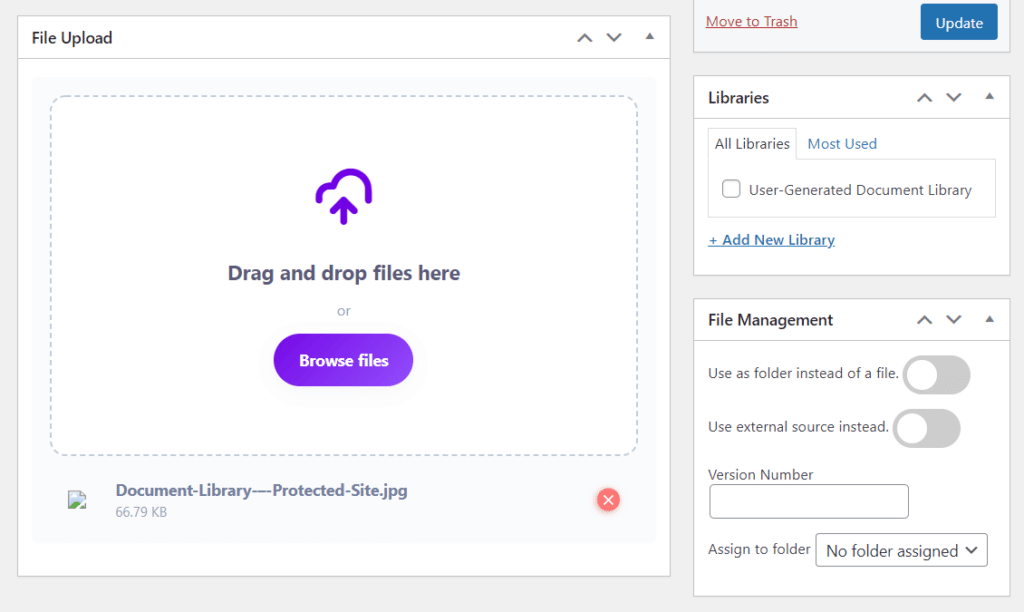
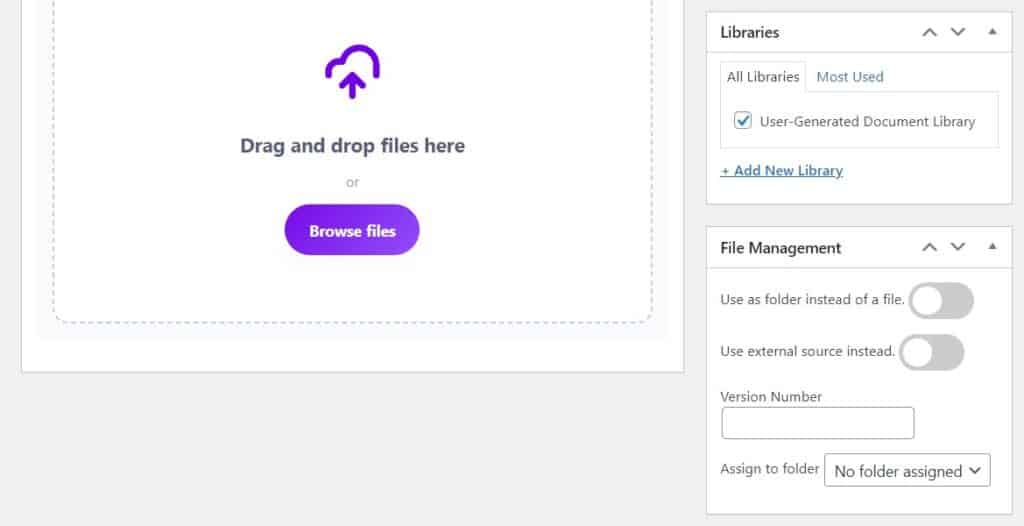
If you’re using the pro version of the plugin, when you add your files, you’ll see more options on the right of your screen under various sections. Lets look at the File Management section for example.
Here, if you’re uploading more than one file, you can organize them in a folder by creating a folder. For that, click on the toggle bar labeled Use as folder instead of a file.
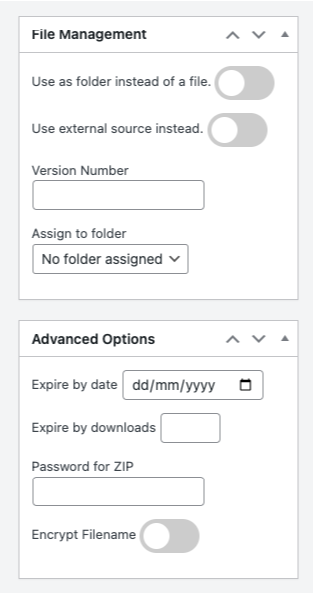
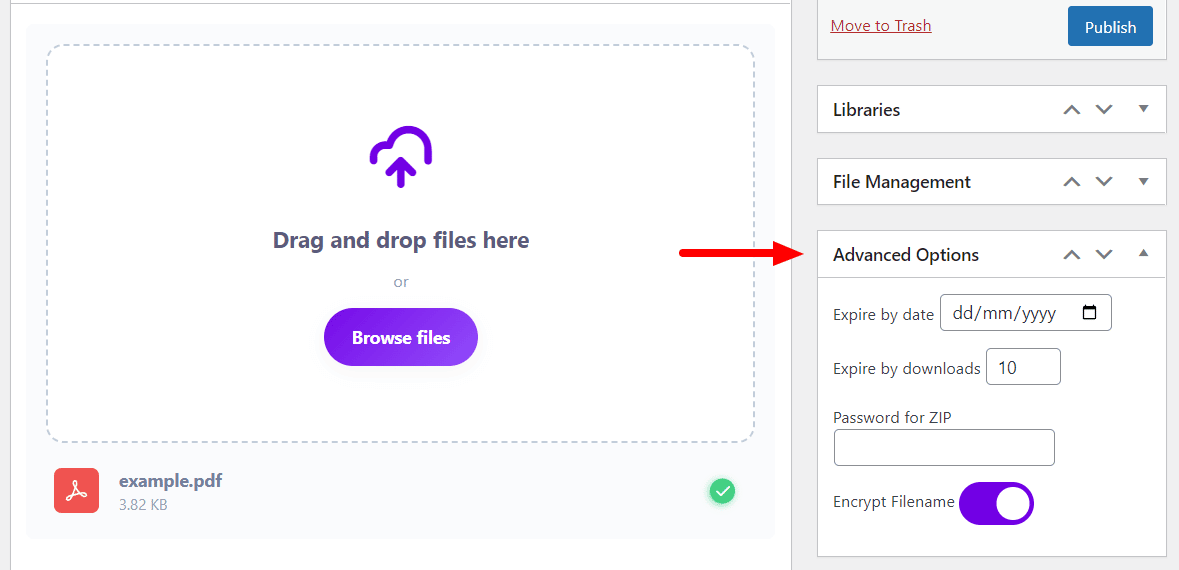
Now you can scroll down to find the Advanced Option. Under this section, you can do the following –
- set an expiration date for the file
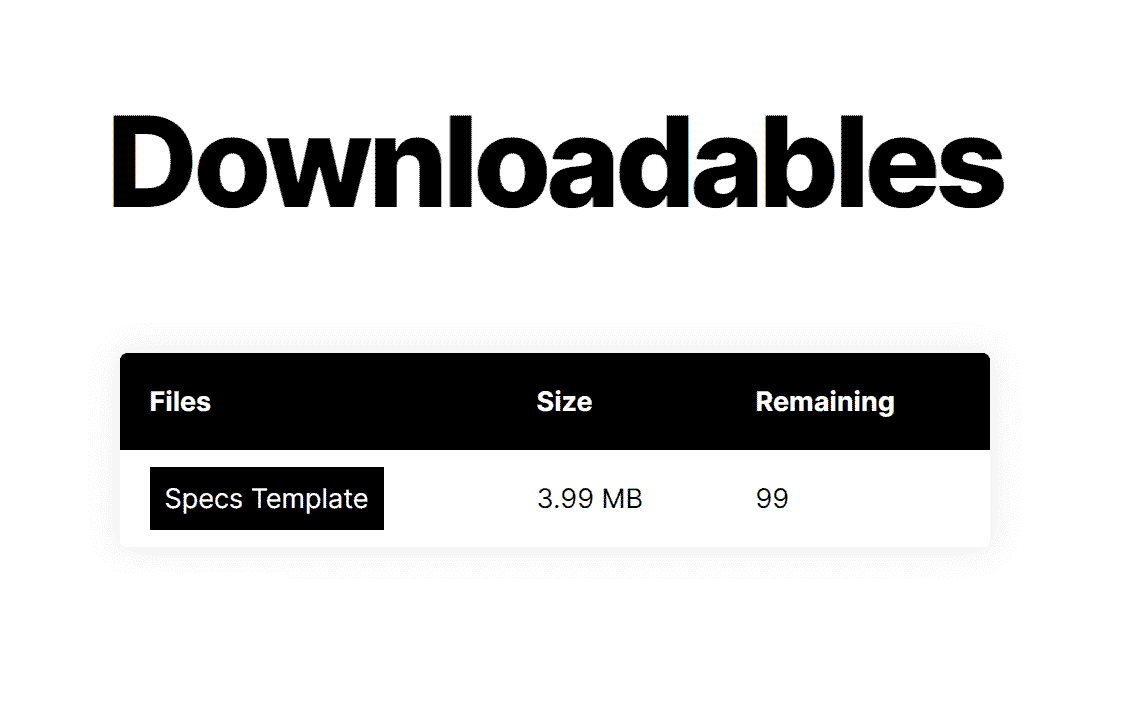
- set the number of downloads after which you want the file to expiry
- add a password for the ZIP
- encrypt the filename
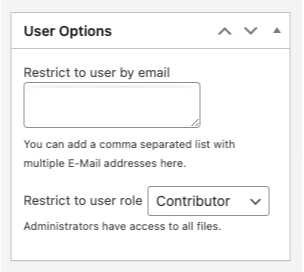
Filr Pro also lets you determine who can access this file by email or WordPress user role. For that, you can scroll down the page to find the User Options.
2. More Customization Options
Apart from the above customization options, here are a few more options that come with the pro plugin.
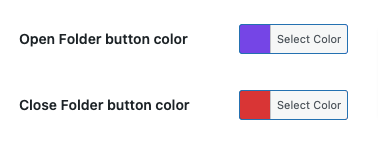
First, you can add your own colors for folders when it is opened by the user. You can also change this color when the folder is closed.
You also have the option to deactivate the following columns.
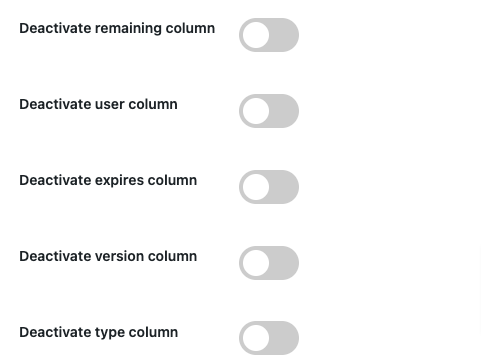
In the pro version, under Additional Settings, you can also enable showing the expired downloads in the library, and activate the file preview as well.

If you’re using the pro version, you can also add a date to deactivate a specific column and deactivate the expired column and the version column.
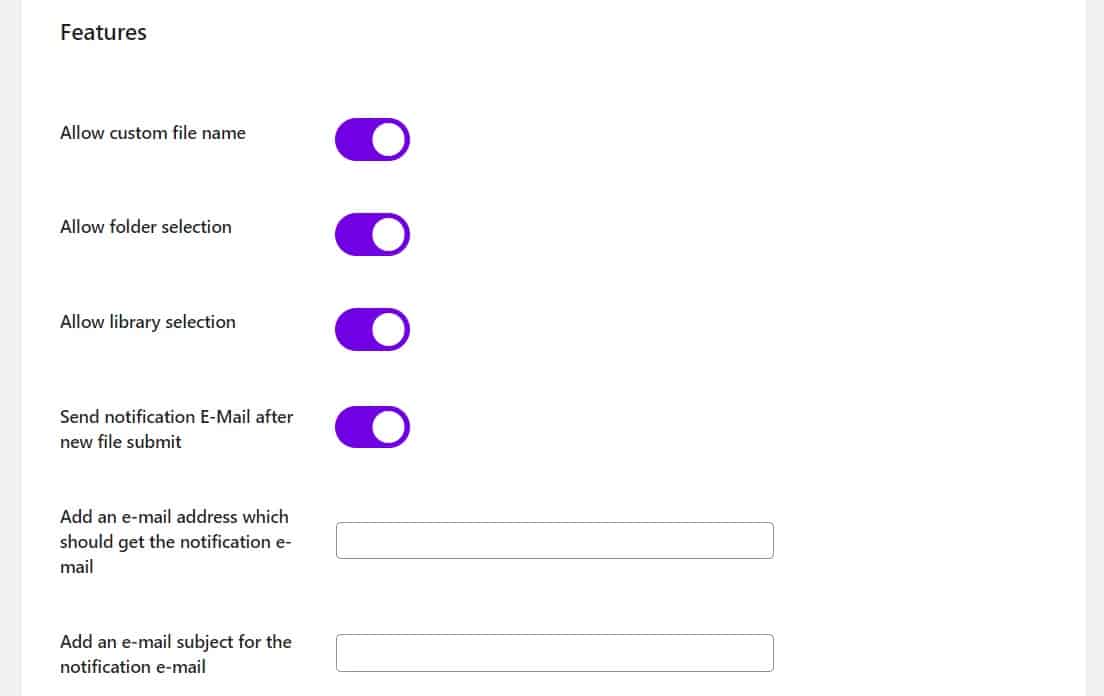
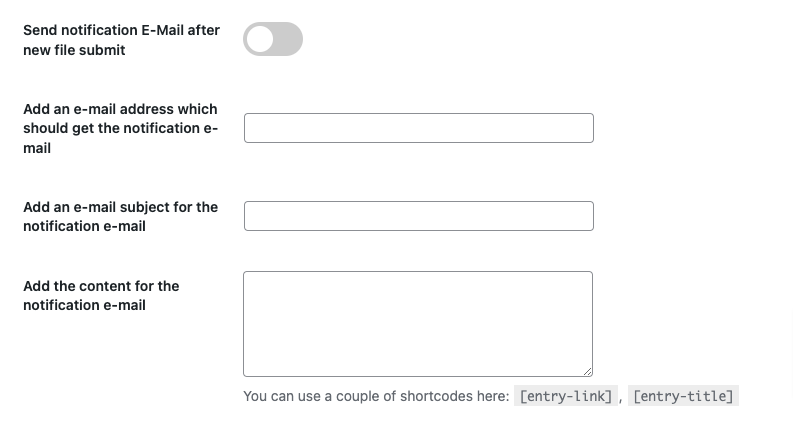
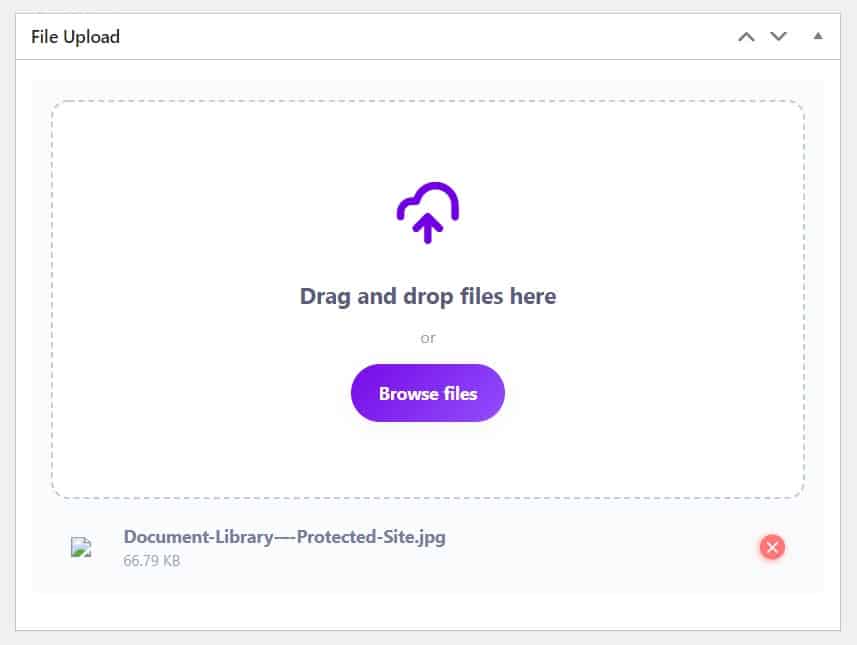
3. Frontend Uploader Option
With the pro version, you can also allow your users to upload files from the front end of your website.
You can also send an email to your users once the file is submitted along with several other amazing features. Here’s a screenshot of them.
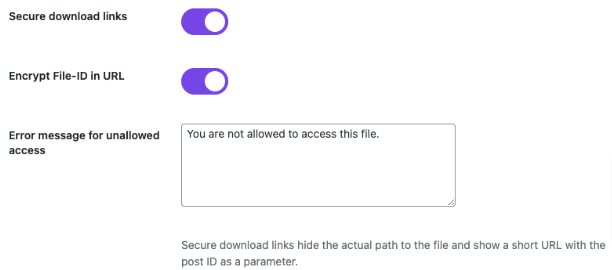
4. Security Features
If you have the pro version of the plugin, you can protect your document further by securing your download links. For that, turn on the Secure Download Links option. You’ll also find options to encrypt file IDs in URLs. All you have to do is turn on the Encrypt File-ID in URL option. You can also add an error message for users with unallowed access.
Now that you know the differences between the lite and the pro version, you can select which one to opt for based on your requirements.
Conclusion
Managing a large volume of WordPress documents can be a daunting task. But with Filr, it doesn’t have to be. This powerful WordPress plugin is designed to help you manage any amount of digital files easily and efficiently.
Whether you’re dealing with a few important files or a vast collection of documents and other digital assets, Filr is up to the task. It simplifies the process of organizing your site’s files, making search and retrieval straightforward and quick.
But Filr doesn’t stop there. It also enhances collaboration, making working together easier for you and your colleagues. Plus, it ensures secure file access, giving you peace of mind.
So don’t let document management be a headache. Start using Filr today and experience a more secure, flexible, and user-friendly way to organize your WordPress documents.
-
Version:
How to Create a WordPress Document Management System
Release-Date:
If you want to create a WordPress document management system, this article is for you.
By default, WordPress has a basic media library for storing all the digital assets you upload. But with a few tweaks, you can transform your WordPress website into a secure, well-organized, and easily accessible document management system.

In this article, we’ll walk you through creating a document management system in WordPress using the plugin Filr.
Filr – WordPress Document Library Plugin
Easily upload, store and share files in WordPress. Secure, flexible, and user-friendly document libraries for your next project.
But first, let’s understand what a document management system is.
What is a document management system?
A document management system (DMS) is a tool or software that manages digital documents efficiently. It allows you to store, retrieve, and manage documents and files electronically, making tracking and accessing crucial information easier.
Think of a DMS as a digital filing cabinet holding documents such as contracts, invoices, reports, or even photos and videos. It provides a centralized location where you can access, edit, and share these files with others while keeping them secure.
WordPress document management system using Filr Who can use a WordPress document management system?
Any business that relies on efficient file management should set up a WordPress document management system.
Here are a few examples:
- A sales and marketing firm – a DMS can help sales and marketing firms to manage the set of media files that supports the sales of their product or services. For example, product catalogs, proposals, presentations, etc. The system can make organizing and accessing marketing materials and sharing them with clients or prospects easier.
- For accounting and finance – any business can use a DMS to manage its financial docs, such as receipts, invoices, etc., more efficiently.
- Human Resources – any business with an HR department can use a DMS to store and manage employee records, including resumes, job applications, performance evaluations, and other HR-related documents.
- A membership business – a membership website may find a document management system particularly useful. With this in place, files will be held in a secure location only accessible to the right people.
Of course, these are just a few very specific examples. Your needs might be completely different from the ones listed above.

If you already have a WordPress website, you can use it for document management. There are a few reasons why WordPress is suitable for document management. Let’s address them in the next section.
Why use WordPress for document management?
WordPress has a built-in media library where you can upload files and access them. This allows you to have a DMS within your existing WordPress website. Apart from that, WordPress is a good option for document management because of the following reasons.
Default WordPress Media Library It is cost-effective
WordPress is cost-effective, and once you purchase a hosting plan, you’re set for the year. You can add as much content and users as you like without incurring additional costs.
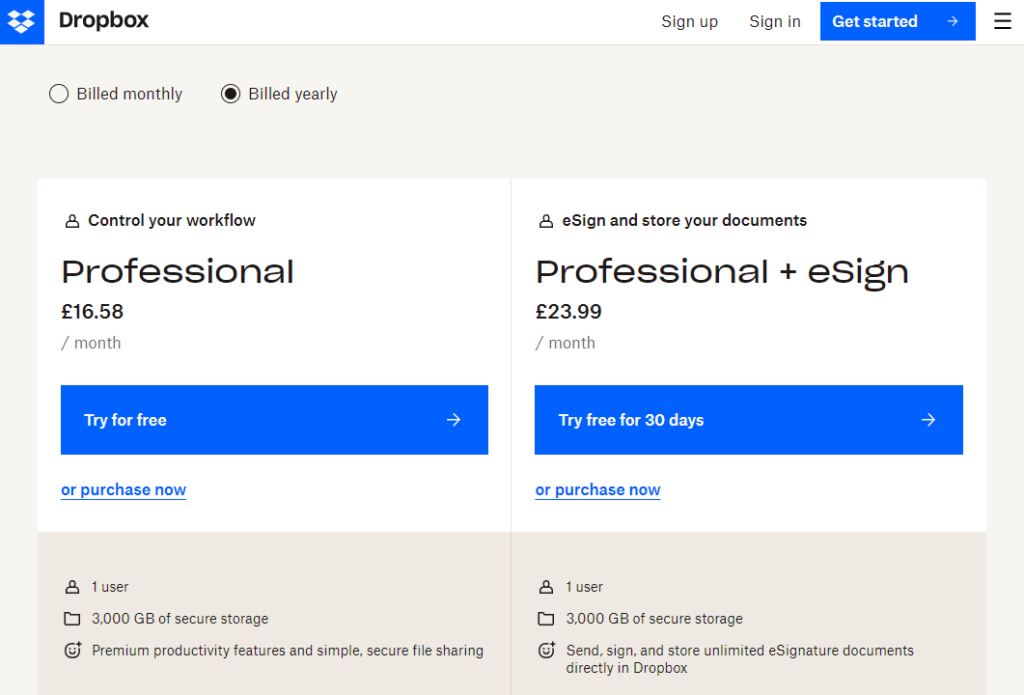
Alternatively, you would face some restrictions if you store documents or digital assets in a cloud storage platform like Dropbox or Google Cloud. For instance, Dropbox allows you to add a maximum of 6 users to its Dropbox Family Plan(if you’re in the US).
These storage services have high monthly charges, something you won’t have to deal with if you use WordPress.
WordPress is open source
WordPress is open-source, so it places no limits on how you can customize it or extend its functionality to fit your needs. For this reason, you can add a DMS plugin to your WordPress website to expand its document management capabilities. After adding it, you can customize it to suit your business.
WordPress is user-friendly as a content management system
Once familiar with the WordPress dashboard, it’s straightforward to use. You can access and modify everything from the dashboard. This includes the media library. You can upload files to the media library and make them available to users without writing any code. Plus, you can do it effortlessly via drag and drop.
It keeps your DMS and website in one place
With WordPress, you can have one piece of software to handle your document management system and website. This makes it easy to share your DMS with your colleagues or team members and govern access to these files.
Now you know why WordPress is suitable for document management, let’s see how you can create a document management system in your WordPress website.
How to create a WordPress document management system
You can create a document management system using the WordPress media library. But, it lacks a lot of features needed for an effective DMS. The WordPress media library allows you to upload files and automatically classify them solely based on the file format. Images, videos, and other documents will be in separate tabs, and that’s pretty much it.
- It lacks a comprehensive way of classifying files beyond their formats. So if your business handles multiple files, you’ll find it insufficient.
- It also lacks a method of protecting the documents, as anyone accessing your WordPress admin area can access uploaded files. This is not ideal for records that contain personal identifying information, like addresses or other important documents.
- It has limited searchability. It lacks filters to help to improve search results, so you have to know exactly what you’re looking for to use it.

Because of all this, the WordPress media library alone can’t cut it as an efficient WordPress document management system. Fortunately, you can install a WordPress document management plugin that handles all the above while offering so much more.
The best WordPress document management system plugin, Filr
You can create a secure, flexible, and user-friendly WordPress document management system using Filr. Filr is the best document management plugin for WordPress users, which allows you to easily upload, store, and share your documents with other users.
With Filr, you can organize your WordPress site’s documents and make them easily accessible to relevant users. That’s not all. You can deploy various security measures to ensure the most critical files are well-protected.
Filr – WordPress Document Library Plugin
Easily upload, store and share files in WordPress. Secure, flexible, and user-friendly document libraries for your next project.
Filr allows you to:
Create, manage, and organize any document library
Whether you’re a large firm dealing with multiple files or a startup, Filr enables you to create simple and complex document libraries in WordPress. You can upload your files in bulk to save time or individually.
Filr supports a wide variety of file types, including .jpg, .csv (for ecommerce/WooCommerce websites that want to import their inventory), .pdf, etc.

Once you’ve uploaded your files, Filr allows you to manage them from a single screen. You can do basic things like organizing your files into folders or subfolders and managing the files within those folders. Or step it up by implementing complex access policies, like limiting access via user role/email, limiting the number of downloads, and setting an expiration date.
Secure your document library in different ways
Filr has several built-in fixtures which you can use to secure your document library including:
- Using an index.php file on the root directory of your uploads to restrict the download of your uploaded files.
- Using the .htaccess configuration file to control access permissions helps you selectively share files.
- Password-protect ZIP (compressed) files to allow only specific users to access. This is especially useful for important documents which only selected users should access.
- Use encryption on file names and URLs to deliver content securely to online users.

Display your document library and make your files easily accessible
After creating your document library, Filr enables you to display it anywhere on your website in a table using a shortcode. This table is fully customizable. You can change the colors, and font, modify the date format, etc., to fit seamlessly with the rest of your website.
To make your files easily accessible, you can add filters and other sortable features to help your users find the needed files. This helps improve search results and allows users to find files much faster.
Let users upload files directly from the front end
With Filr, you can allow users to upload and manage files into the document library table displayed on the front end of your website. As a result, you won’t have to give each user access to your WordPress backend. This way, you can improve your security and access control.
As the site owner, you can restrict access to the uploader or files by user role or email and manage the publishing status. You’ll also get notifications when a new file gets uploaded.
Now that you know what Filr can do, we can create a document management system for your WordPress website.
How to create a WordPress document management system with Filr
You can create and display a WordPress document management system in 4 simple steps. Let’s go through this process step-by-step.
Step 1: Install the WordPress plugin Filr
To get started, you’ll first need to install the pro version of Filr from: wpdocumentlibrarycom
After you’ve completed the purchase, you will receive an email containing the extension and the license key. Click on the extension download link to download it into your computer.
To install Filr on your WordPress website, follow these simple steps:
- Go to Plugins > Add New on your WordPress dashboard and click the Upload Plugin button.
- Select the ZIP file of the extension you previously downloaded and click Install.
- When the installation is done, click on Activate Now.
- Enter the license key and click Agree & Activate, and that’s it.
Step 2: Create a document library
To create a document library:
- Hover on Filr and click on Libraries.
- Fill in the details of your library, like the name, description, etc., and click the Add New Library button.

In just two steps, you’ve already created a new document library. On the right, under the Shortcodes section, you will see a shortcode you can copy. We’ll use it later to display the document library.
Step 3: Upload documents to your library
You’ve created your document library, but there is no content. You can upload documents to it by following these steps:
- Go to Filr > Add New on your WordPress dashboard.
- Name the file you want to upload.
- You have two options to upload files on the uploader:
- Drag and drop – you can select one or multiple files (bulk upload), drag them, and drop them on the uploader.
- Browse files – you can click on this and select the files you want to upload from your computer.
- After uploading your files, there are a few settings that you can make under the file management section.
- You can use the upload as a new folder instead of a file.
- You can also check the document category to which you want the upload to belong.
- In the same section, you will find advanced options that allow you to set an expiration date for the file, encrypt it, and restrict the number of downloads.
- You can also determine who gets to access this file by email or user role in this section.
When you’re done with your changes, click the Publish button.
Step 4: Display your WordPress document management system
Up to this point, you’ve created your document library and added files. Now we want to display it on the front end of your website.
Here’s how you do it:
- Create a new page by hovering on Pages and clicking on Add New. Give this page a name.
- Paste the document library shortcode you copied on this page’s content area.
- Click Publish, and now this document library will be displayed from the front end of this page.
You can also make some settings to modify the appearance of this document library.
To do this:
- Go to Filr > Settings > Libraries. Here are the settings you can make in this section:
- Change the color, background styles, and borders.
- Select the rows you want to appear and the order in which they appear.
- Additional settings like – disabling search and pagination, renaming the download button, and so on.

- Click Save Changes once you’re done.
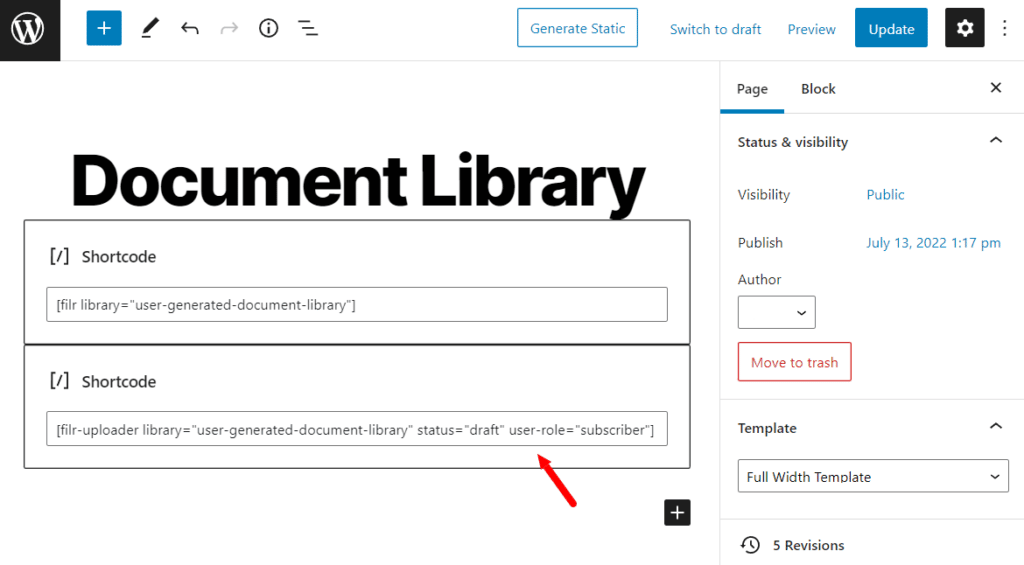
If you want o allow non-logged-in users to add documents to your DMS, you can do this by following these steps.
Create your WordPress document management system today
Creating a WordPress document management system is essential for businesses that handle a lot of files and other digital assets. And if you can do it on your WordPress website, it makes file and user management easier and more streamlined.
Filr enables you to create a document management system in WordPress, add files to it, manage your files, and secure them. Also, it has built-in features to give you control over how your DMS is displayed from the front end.
With Filr, you can create flexible, easily accessible, and secure document libraries in WordPress.
Filr – WordPress Document Library Plugin
Easily upload, store and share files in WordPress. Secure, flexible, and user-friendly document libraries for your next project.
-
Version:
How to Create a WordPress PDF Library
Release-Date:
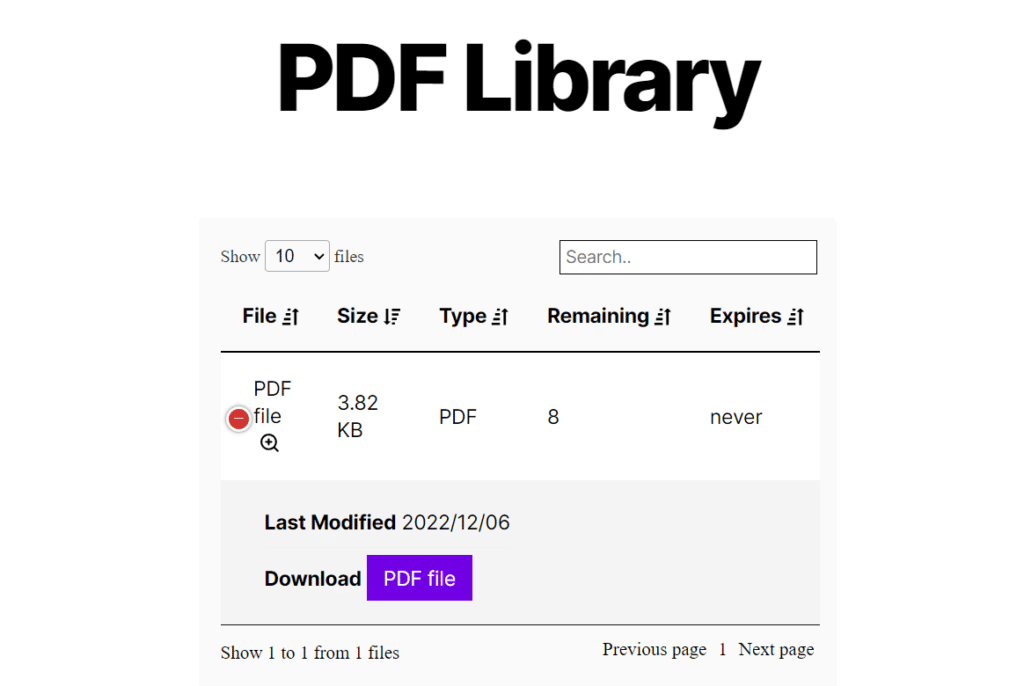
A WordPress PDF library allows you to create and store PDF files on your WordPress site in a much more accessible way.
If your site includes downloadable files such as ebooks or other PDF documents that need to be kept private or secure, they can be stored on your website, where you can have more control over them.
Creating your own WordPress PDF library is easy with the right tools. So in this article, we’ll show you how to create your own PDF library with the help of the best WordPress document library plugin Filr.
Filr – WordPress Document Library Plugin
Easily upload, store and share files in WordPress. Secure, flexible, and user-friendly document libraries for your next project.
But first, let’s address what a WordPress PDF library is.
What is a WordPress PDF library?
A WordPress PDF library, in its basic form, is a place to store and organize the PDF files on your website.
It can either be an internal library that you use personally to store and organize your PDF files. One that you either use on your own or share with logged-in users.
Or, it can be a PDF library that you display on the frontend of your WordPress website. This library will be filterable and sortable so people viewing your website can find the PDFs they’re looking for in a more user-friendly way.
It’s a great way to keep your content organized and allows you to share it with others with ease.
Why you might need a WordPress PDF library
When publishing content in WordPress, it can be hard to keep track of all your media files – especially if you create a lot of them.
The WordPress media library can get pretty messy and hard to use because of this. After all, as a WordPress user, you’ll be uploading images, videos, PDFs, and more, all to the media library. Which makes finding and sharing files quite difficult.
But with a WordPress PDF library, you’ll have much more control over these files. You’ll be able to:
- See and manage your PDF files in one location (separate from the WordPress media library).
- Create folders and manage files so users can find your PDFs easily.
- Control the number of times a user can download your PDFs.
- Create encrypted URLs and add extra security features, so your files and your WordPress website stays secure.
- Allow non-logged-in users or specific user roles to upload files to your PDF library from the frontend of your website.
- And so much more.
A WordPress PDF library is a great resource for sharing PDF documents with clients, employees, people who have signed up for your membership site, and so much more.
So now we know what a WordPress PDF library is, and the benefits of creating one. Let’s walk through how to add one to your WordPress website in just a few steps.
How to create a WordPress PDF library
Creating a WordPress PDF library doesn’t need to be complicated, but we do need the right tools to get it done.
On its own, WordPress only has the media library to organize files. So to create a user-friendly and secure PDF library, we’ll use the WordPress plugin Filr.
Filr – WordPress Document Library Plugin
Easily upload, store and share files in WordPress. Secure, flexible, and user-friendly document libraries for your next project.
How the document library plugin Filr works
Filr works by allowing you to upload any media file to your WordPress website and categorize them in a much more user-friendly way.
Once uploaded, you’ll be able to:
- Organize and add files to the folders you create.
- Set expiry dates and restrict the number of downloads.
- Restrict files by email or user role.
- Keep your files secure with secure and encrypted URLs.
Then once you’ve uploaded your files, you’ll be able to manage them either in the backend of your WordPress site, or on the frontend with a dedicated document library that you can embed on your site and customize.
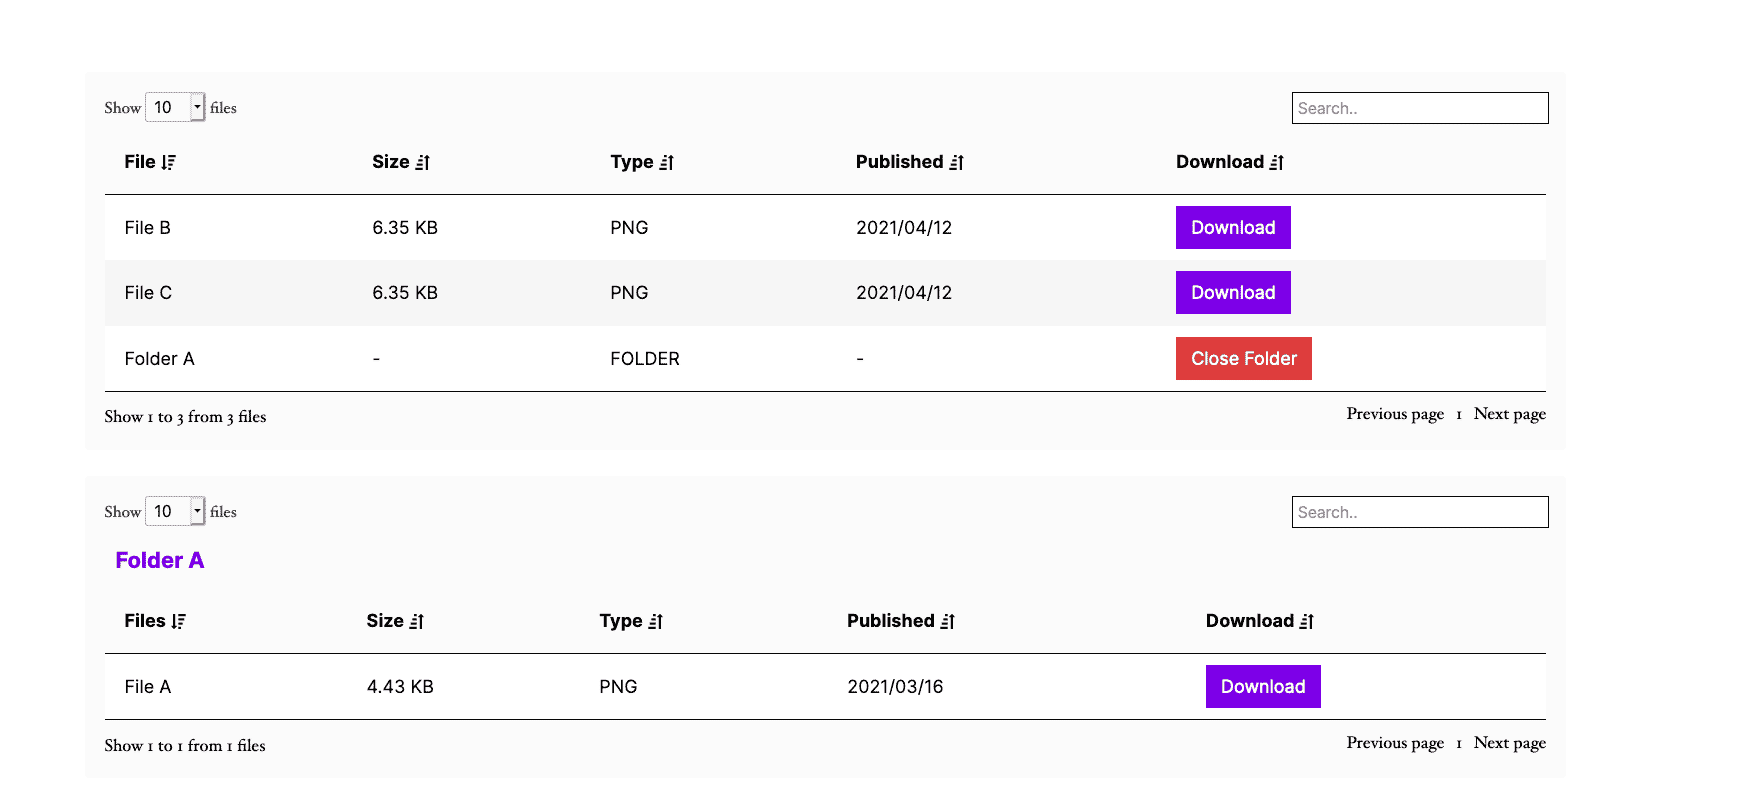
This document library will allow users to easily search, filter, and view your PDFs. They’ll also be able to preview the PDF with the built-in PDF viewer and download PDFs with a download link/button.
As a bonus, you can allow specific user roles or website visitors to upload files to your document library and set restrictions for that too.
So now we know how Filr works, let’s create your WordPress PDF library with it.
Create a WordPress PDF Library with Filr
The following tutorial will teach you how to create your own WordPress PDF library using Filr.
Filr’s setup is straightforward, and you can use it to create a PDF library that’s as simple or complicated as you need it to be. So let’s get creating.
Step 1: Install the document library plugin, Filr
We’ll first need to download the premium version of the plugin Filr: wpdocumentlibrary.com
Filr – WordPress Document Library Plugin
Easily upload, store and share files in WordPress. Secure, flexible, and user-friendly document libraries for your next project.
After doing so, you’ll receive an email with the Filr plugin and a license key for activating it. Click on the file extension to download the zip file to your computer.
Then follow these three steps to install Filr:
- Go to Plugins > Add New from your WordPress dashboard and click Upload plugin at the top of the page.
- Select the zip file you’ve just downloaded, and once done, click the Activate now button.
- You’ll be prompted to enter a license key to activate the Filr. Click Agree & Activate the license to install the plugin successfully.
Now we have Filr installed. We can get to work. Let’s create your WordPress PDF library.
Step 2: Create a PDF library
The first thing we’ll need to do is create the PDF library itself. This is where all your PDF files will sit.
With Filr, you can create as many of these as you like. So if you want to organize other types of files on your WordPress website, you could create different libraries for each.
Or, should you want different libraries for different purposes, you can create new ones for each.
To create your first PDF library, take the following steps:
- From your WordPress dashboard, go to Filr > Libraries.
- On this page, you’ll see a table containing all your libraries and an area to create a new one. Enter a name for your new dPDF library and a brief description.
- Next, click the Add New Library button.
- On the right, you’ll see your new library has been added to the table. A also appears shortcode next to the library that you can copy. We’ll use this shortcode later to display your PDF library on the front end of your website.
The next step is to upload your PDF documents to your document library.
Step 3: Upload PDF documents to your document library
To upload a PDF file to your new document library:
- From your WordPress admin dashboard, go to Filr > Add New on the sidebar.
- Give the PDF file a name or title – you can add any file type to the uploader, but we’ll upload a PDF for this example.
- Next, drag and drop a file into the file uploader. Or, you can click the Browse file button to upload a file.
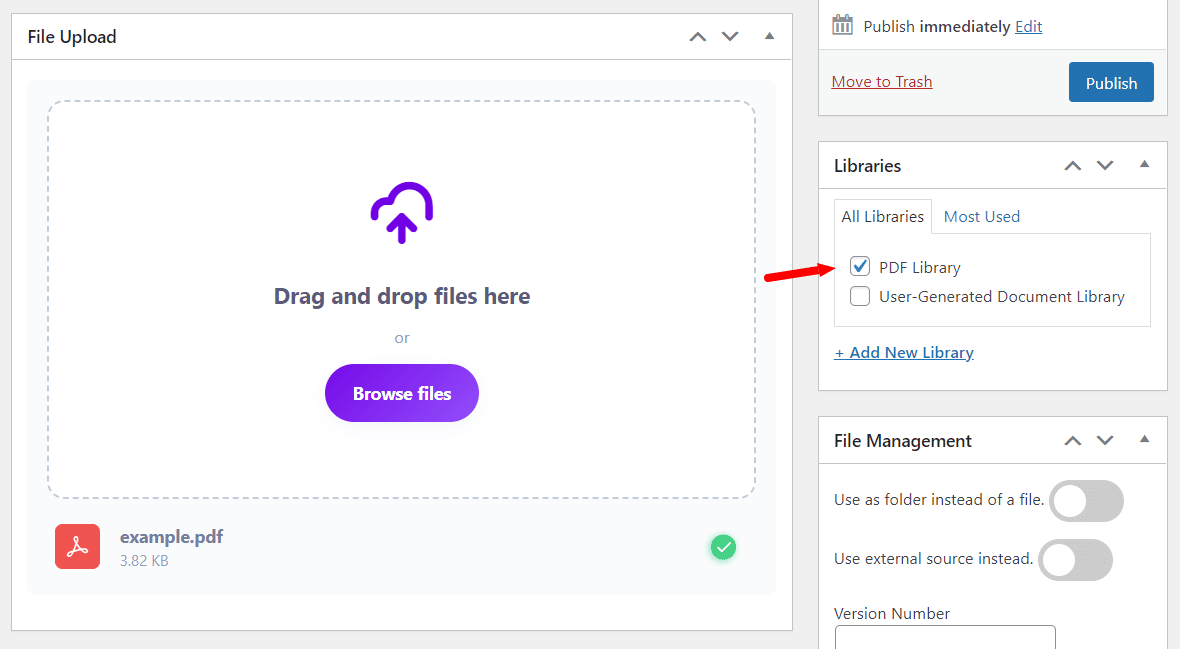
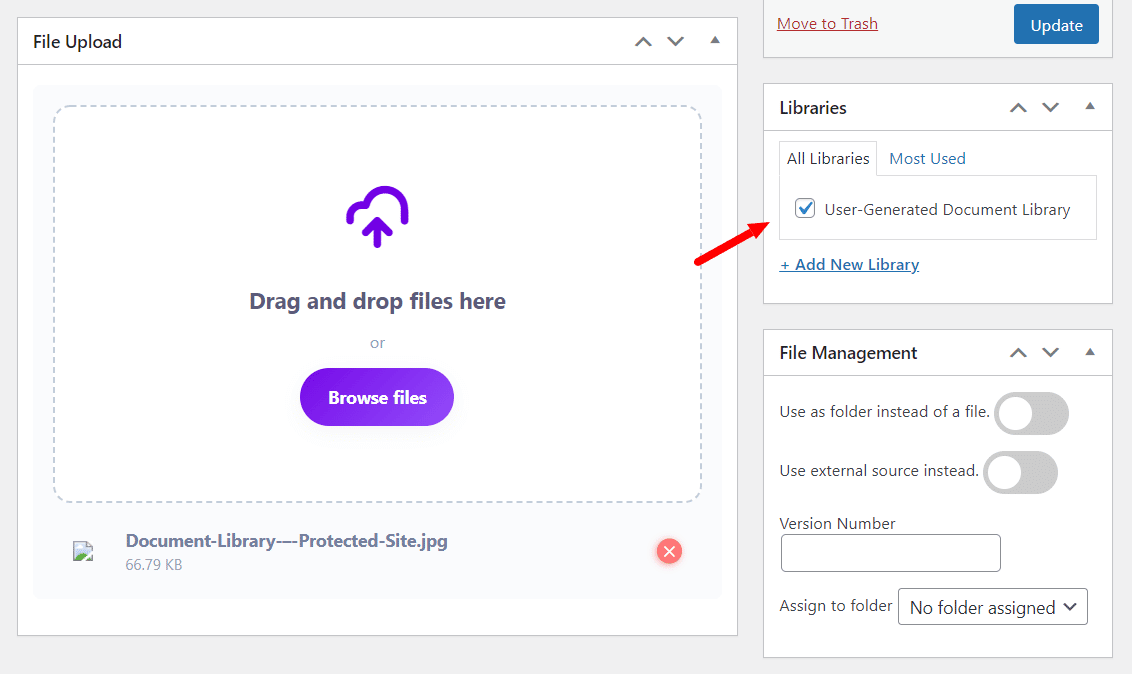
- To add this file to the library, you just created, click the checkbox next to the library name in the Libraries section.

- In the File Management section, you can:
- Create a folder instead of using this as a file – for even more organization.
- Use an external file source instead – great if you want to link to PDFs that aren’t hosted on your website (for example, on Dropbox or Google Drive). You’ll also be able to add the file size here, so users know what they’re downloading.
- Add a version number.
- Assign this file to a folder.
- In the Advanced Options section, you can:
- Set an expiration date.
- Limit the number of downloads.
- Encrypt the file name.
- You can also restrict file access to the user by email or role in the User Options section.
- Once you’re happy with your uploaded PDF, scroll up to the top of the page and click the Publish button.
Repeat this process with all your PDF library files – you can add as many as you like.
Now we’ve uploaded our files. We need to display our PDF library on the frontend of our WordPress site.
Step 4: Display your PDF library
Displaying your WordPress PDF library is pretty straightforward with Filr.
With Filr, you’ll be able to use a shortcode to add the library to any WordPress page or post so you can display PDFs with ease.
To display your PDF library, take the following steps:
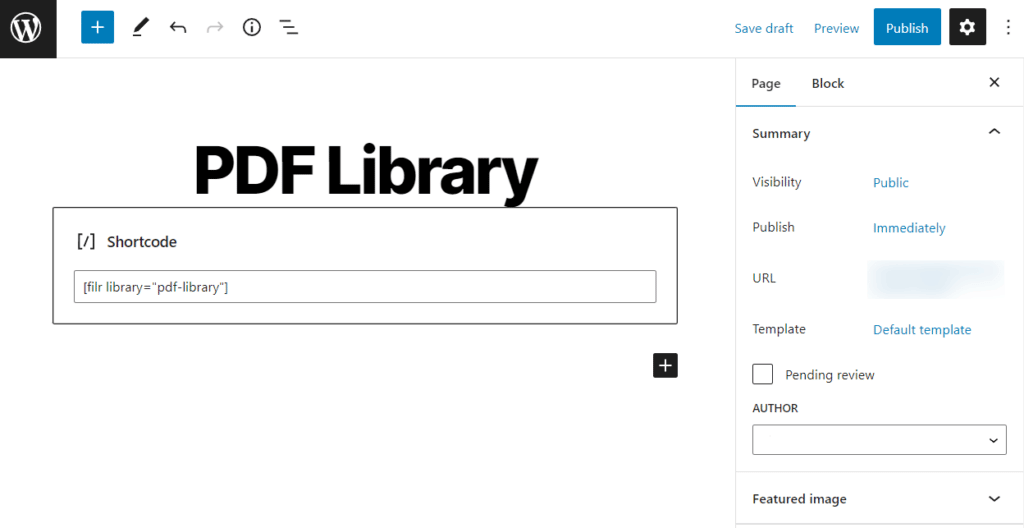
- From your WordPress dashboard, go to Pages > Add New.
- Next, paste the document library shortcode you copied earlier into the Gutenberg content area. To find this again, go to Filr > Libraries and copy the shortcode for your PDF library.
- Don’t forget to give this page a name and then click Publish.
Step 5: Customize your PDF library’s style
Your basic PDF library is set up and running, but there are a few things we can tweak to get its design to fit in with your website seamlessly.
To do this, take the following steps:
- Go to Filr > Settings from your WordPress dashboard and click the Libraries tab. From here, you can:
- Change the color, border, and background styles for headings, fonts, buttons, and more.
- Choose which rows appear within your document library and reorder them.
- Rename the download button, deactivate the search box and pagination, set a custom date, activate document preview, and more.
The last thing we’ll need to do is secure your PDF library. This will ensure that your site is protected, even while you share your PDF documents online.
Step 5: Secure your document library
To secure your PDF library and the files within it, take the following steps:
- From your WordPress dashboard go to Filr > Settings > Status.
- Filr offers three types of protection on this page, depending on your website’s server.
- No protection mode, which is Filr’s default option.
- Index.php. This protection setting allows you to create an index.php file on the root of your uploads directory. Enabling this option will hide all the content in your download directory.
- htaccess restricts people from browsing your uploads directory and returns a 403 code (Forbidden Access) page.

We recommend using one of these types of protection to secure your library.
After securing your library, you can also give other users access to add files to your PDF library using Filr’s frontend document uploader.
To see how to do this, check our How to create files on the frontend of your site doc.
That’s it. Your PDF library is now up and running on your WordPress site. Now all you have left to do is share it, or get to organizing.
Create a WordPress PDF library for your website today
It’s a good idea to create a WordPress PDF library if you have a lot of documents that need to be shared and accessible by others.
Having all your PDFs in one place will make it easier for people to access them when needed and help the organization stay organized.
With Filr, you can be your own document manager and make your PDF document management just that bit easier.
Filr – WordPress Document Library Plugin
Easily upload, store and share files in WordPress. Secure, flexible, and user-friendly document libraries for your next project.
-
Version:
WordPress Digital Asset Management: The Ultimate Guide
Release-Date:
In this guide, we’ll walk you through how to use your WordPress website for digital asset management.
We’ll also see talk about some of the best WordPress digital asset management plugins that can help you to take your WordPress media library to the next level.
But first, let’s address one thing.
What is a digital asset?
A digital asset is any file or content you’ve created and stored on your website. It could be a document(pdf, excel, SVG, etc.), an image, an audio file, a video file, or any other file containing usage rights.
A digital asset management system (DAM) enables you to securely store, edit, publish, and manage access to these digital assets easily and from a single location.
We now know the basics, but let’s get a little more specific. Let’s start by understanding what WordPress’s digital asset management is.
What is WordPress digital asset management?
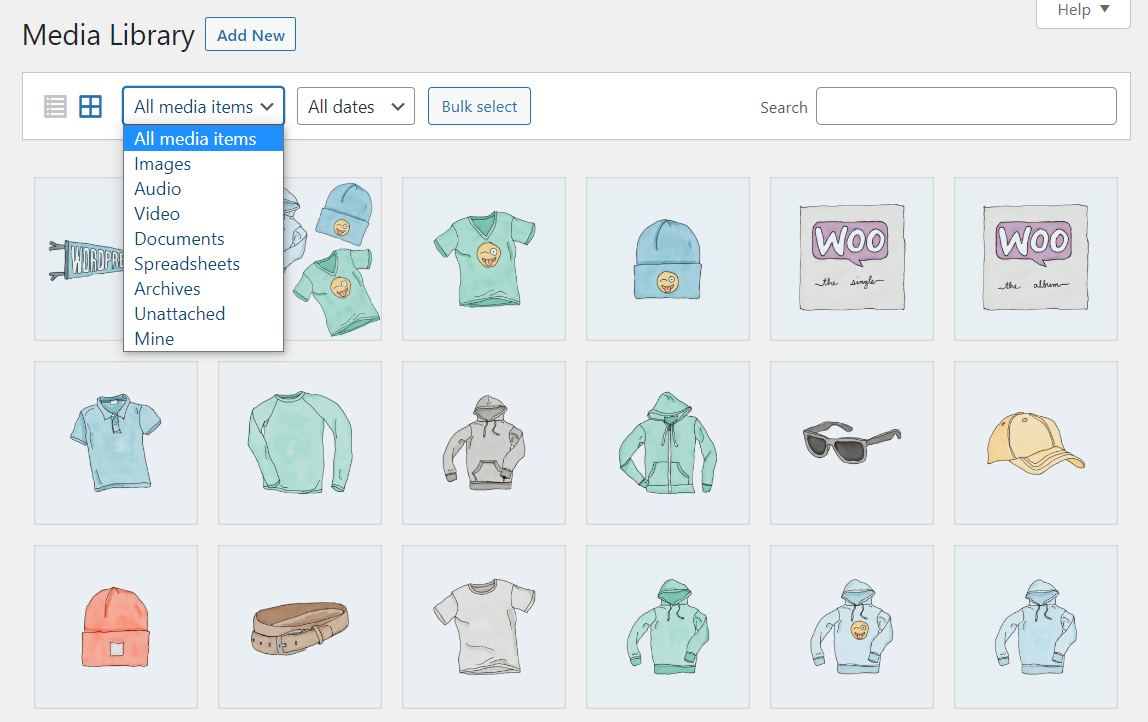
WordPress has the media library as its DAM system. You can look at the WordPress media library almost like its own digital asset management software.

This media library is a central location that shows all the media files you upload to your website. You can access it directly from your dashboard and see the files displayed in a grid or a list.
The WordPress media library lets you sort content via file type and date, and you can search through the media library for specific content.
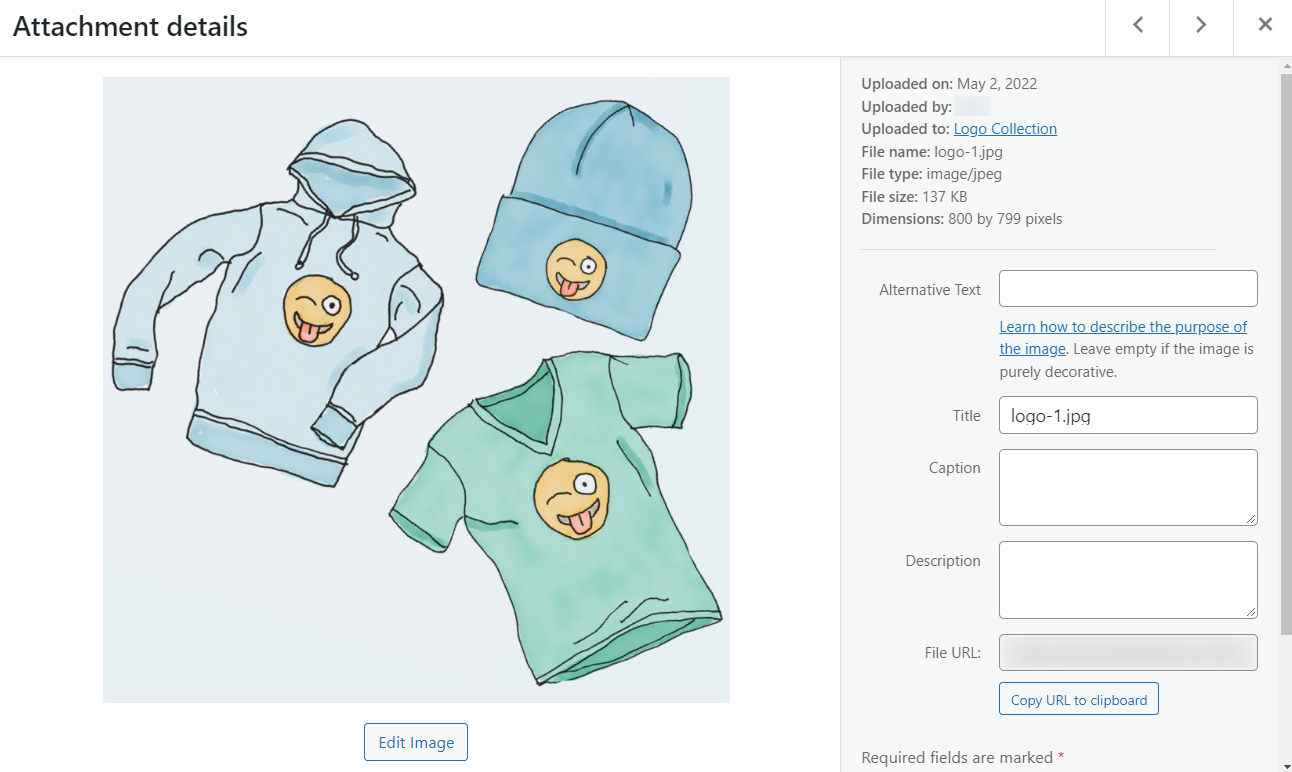
It also stores file details which you can access by clicking on the files. This includes the name, who uploaded it, and at what time, dimensions, etc.

For images, WordPress gives you an option to edit the image. You can also add a file directly from your device to your WordPress website and include a title, description, alternative text, and caption.
The media library makes it easy for users to access digital assets. All you have to do is go to Media Library from your WordPress dashboard and search for the specific file you want. It’s ideal for small businesses with fewer media files.
If you’re looking for a digital asset management system or DAM solution, you might be wondering: why WordPress? Well, let’s see why you should use WordPress as your digital asset management solution.
Why use WordPress for digital asset management?
Apart from enabling you to easily store and retrieve files from your media library, WordPress is a great option for digital asset management because of the following benefits.
It’s open source digital asset management
WordPress is open-source software that lets you freely modify and extend it to fit your needs. This means that you’re not reliant on a third-party provider’s limits to what you can do with your website.
Due to this flexibility of WordPress as a platform, you can easily integrate it with plugins to boost your digital asset management system capabilities. This means you can use any third-party digital asset library of your choice because it is open source.
It’s cost-effective
You might be shocked by the prices if you choose to have your digital assets stored in personal cloud storage services like Dropbox or Google Cloud Storage.
This is because these services usually charge monthly and per storage unit. And these charges add up to be extremely high per year.
With WordPress, you don’t have to worry about this. It’s cost-effective, and once you purchase your hosting plan, you’re set for the whole year. You can use up your storage without worrying about incurring additional charges.
It keeps it all in one place
As business owners, we’re used to having multiple pieces of software, each doing something specific. But by having your website and digital asset management in one place, you’ll make things so much easier.
WordPress digital asset management provides a single location for all your digital assets. This means all business colleagues, users, team members, and even customers can simply log in to that location and access your files or brand assets. Your digital assets will only be valuable if everyone in your business knows where to find them.
This makes it easy to manage your assets and integrate them easily into your daily operations while doing this internally.
As a content management system, WordPress is easy to use
Once you get over the initial learning curve, WordPress is extremely easy to use. You can access the media library directly from the dashboard as the site owner or admin. You can create and manage your media library without writing any code. And with just a few clicks, you can add new files to the media library and make them available to WordPress users in no time.
Why you should use a WordPress plugin for your digital asset management
A successful digital asset management system should give you control in creating, storing, organizing, finding, retrieving, editing, and sharing your digital assets from one place in a secure way.
While the WordPress media library enables you to do most of the above, it severely fails when organizing your files in a comprehensive format.
The WordPress media library lacks an accurate method for classifying the digital assets you upload to it. It only allows you to upload digital files and automatically classifies them as videos, audio, images, or documents. If you handle many files, you will certainly find the WordPress media library doesn’t cut it.
Fortunately, you can install various WordPress plugins that can turn the default WordPress digital asset management into an organized and secure system that can help you efficiently manage your files. And in the next section, we’ll talk about some of WordPress’s best digital asset management plugins.
The best plugins for WordPress digital asset management
To add more capabilities to WordPress’s digital asset management and control how you organize and share your files, you can install these plugins on your WordPress website.
A document library built with Filr The top WordPress digital asset management plugin, Filr
Filr is a world-class digital asset management plugin for WordPress. It combines robust digital asset management and impenetrable security features in a clean and uncluttered interface.
It gives you complete control over who you want to access your files and how you want your media library to be displayed on your WordPress website. And the best part is, it allows you to do all this easily.
Filr – WordPress Document Library Plugin
Easily upload, store and share files in WordPress. Secure, flexible, and user-friendly document libraries for your next project.
Filr is the best digital asset management plugin for WordPress because it enables you to do the following.
Easily create and manage well-organized document libraries
Filr makes it easy to create a well-organized document library and add various files to it from your WordPress dashboard. You can classify extensive lists of digital files such as audio, videos, images, and documents and assign files in folders to easily track them.

It also allows other users to upload and manage files directly from the front end of your website.
Secure your documents in multiple ways
Filr provides multiple options to keep your files secure. You can:
- Secure your files with a PHP (index.php) on the root of the uploads directory to protect downloads. Or rather, to check all permissions and restrictions before allowing any downloads.
- Control access permissions to your digital files library with .htaccess protection.
- Password-protect ZIP files or encrypt file names.
- Create encrypted URLs to securely deliver content online to users on any browser. This will also block browsers from accidentally indexing your files.
- Set file expiration by date and number of downloads, or restrict file access by email or user role.
- Restrict access of frontend uploaders by email or user role, manage their publishing status, and get notified once a new file is submitted.
For the files that you want to be readily available, you can opt to place no protection on them.
Design your library’s appearance your way
Filr allows you to modify your document library table’s color, border, font size, and background that matches your brand and web theme.
Likewise, you can decide how you want to display a library. Filr lets you:
- Modify the date format.
- Reorder rows. Or, choose which rows to activate or deactivate rows.
- Provide pagination to display multiple files within a library.
- Add alternative text for when a library is empty, rename the download button, and show expired file downloads.
Manage files in external storage
Filr allows you to make files external, store them, and manage them in external storage systems like Dropbox and AWS (if you require them).
Plus, you’ll be able to display those external files within your WordPress website.
Make your library’s files easily available
You can create a sortable list of files and a document library. This will allow your users to sort, filter, and search through your library’s folders and subfolders to find the list of files they need.
Filr – WordPress Document Library Plugin
Easily upload, store and share files in WordPress. Secure, flexible, and user-friendly document libraries for your next project.
We recommend Filr if you’re looking for the best digital asset management plugin for WordPress. But here are a few other digital asset management plugins you can browse depending on your requirements.

Brandfolder – Digital Asset Management Simplified
Brandfolder is a digital asset management tool that helps businesses store, manage, and manipulate their assets from a single location. You can create and customize different projects, upload images and videos, sort your files by date or size, and even organize them into folders the way you like.
Brandfolder uses its AI, Brand intelligence, to automatically organize your digital assets within Brandfolder. Brand AI also helps you monitor how your files are performing, who’s using them, and their location. Likewise, Brandfolder is also cloud-based, meaning collaboration with team members is made easier right from a shared folder regardless of location.
Key features:
- You can easily edit your Brandfolder directly from WordPress.
- You can simply upload/drag and drop multiple files in Brandfolder, and it will automatically organize them in folders.
- You can store, access, and share unlimited digital assets in all file formats.
- Offer bulk editing features and customization, all of which are made easier with their Brand Intelligence.
- You assign different user permissions to internal and external users for easy access and asset management.
- Brand Intelligence can track all your digital assets.
- Integrate with various applications like WordPress, Shopify, Google, Opera Mini, Hubspot, and more.
Download Manager
Download Manager is a WordPress digital asset management plugin that enables users to manage, track, and control file and document downloads from your WordPress website.
You can create custom download post types in your WordPress admin, where you can upload your digital documents and downloadable files and include all the information about your digital assets. It includes limited viewing, multiple domain support, password protection, and more.
Key features:
- You can drag and drop to easily attach new files, create downloads, and delete options in your WordPress admin.
- With custom post type and taxonomy, you can easily add downloads and create filterable data you want to use to group your data.
- You’ll be able to restrict access to your files based on user roles.
- Set up download limits for different user roles or specific periods, for example, in one day.
- Support for Google, Dropbox, Box.com, and OneDrive platforms.
- You can control who can access your download.
- Prevent malicious users or bots from accessing your files using CAPTCHA lock and IP blocking features.
- You can password-protect your files and documents.
- Video file Download Protection allows users to view your video but blocks download.
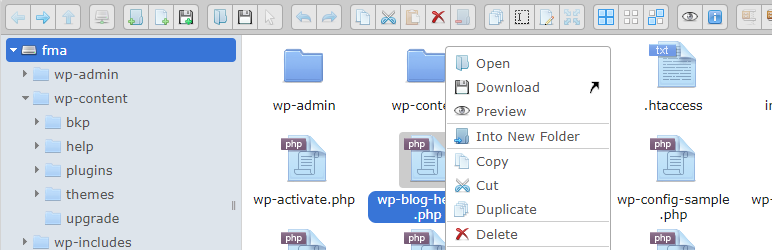
Advanced File Manager
Advanced File Manager is a WordPress plugin that enables you to create and manage your files and folders. You can easily grant admin permissions to users to handle multiple file operations such as upload, edit, copy, and delete files.
It features upload/edit files, front-end access, multiple themes, upload notifications, folder sharing, document viewer, PDF viewer, cross-browser support, Image viewer, and many more. It eliminates the need for FTP, which means the WordPress root directory can be fully edited.
Key Features:
- Use an easy drag-and-drop file upload. You’ll have options to cut, copy and paste the file manager.
- Automatically generate folders for all users with auto folder creation.
- With their image editor, you can resize and crop image files by setting height, width, grid, and quality.
- You can create thumbnails for your image files and show icons for major files.
- Use shortcodes to show your file manager on the front end of the website.
- Customize created file manager to fit your needs.
- You will get email notifications whenever files are uploaded.
- Assign user restrictions for specific users/user roles.
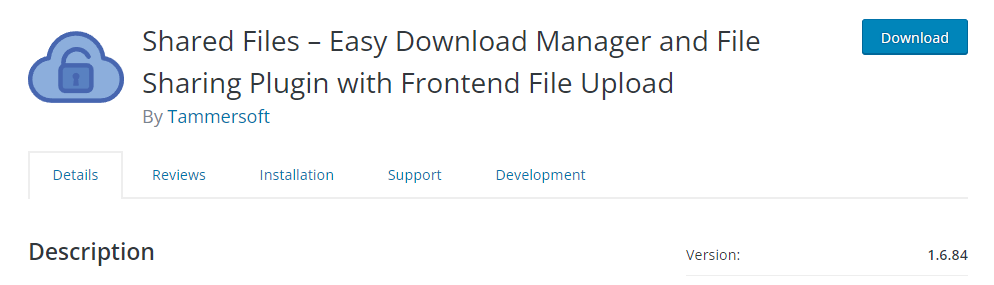
Shared Files – Easy Download Manager and File Sharing Plugin with Frontend File Upload
Shared Files is a straightforward option for those who want to manage and share your WordPress media library. This WordPress file management plugin lets you list and manage files on a WordPress site.
It works by uploading files straight from your WordPress admin and using a shortcode to create a simple button anyone can click to download your file.
Create a list of files with shortcodes or group files in categories to make it easier for your team and site visitors to access and download. All your shared files can be used by anyone you grant access to.
Key features:
- Add files directly from the WordPress admin and organize them to make it easier for users to locate and download.
- Use generated shortcodes to create download buttons within your WordPress website.
- You’ll be able to set expiration dates.
- You can limit the number of times a user downloads a file. It is easy to track the number of downloads to see which file performs best.
- Receive notifications when a file is downloaded.
- Preview digital files in any browser.
- Share files from cloud storage platforms like Google Drive and Dropbox.

Folders – Unlimited Folders to Organize Media Library Folder, Pages, Posts, File Manager
Folders is another excellent WordPress DAM plugin. It offers you a quick way to organize all WordPress pages, posts, and media files in folders on your website. You can easily create new folders, label them, and then select digital assets to add to newly created folders.
Key features:
- You’ll be able to create unlimited folders and organize your digital assets.
- Select specific pages, posts, and media files and drag and drop them into a new folder.
- Supports custom post-types, including WooCommerce, Elementor, Shopify, and more.
- You can view important file information like file name, file size, and date while hovering on file thumbnails.
- Offer bulk editing features and customization (change color, font, settings, and more).
- Using dynamic folders, automatically filter your digital files based on author, date, and file types.
- It’s easy to replace files without changing dates, moving the new file to the latest uploads folder, replacing all old links, and more.
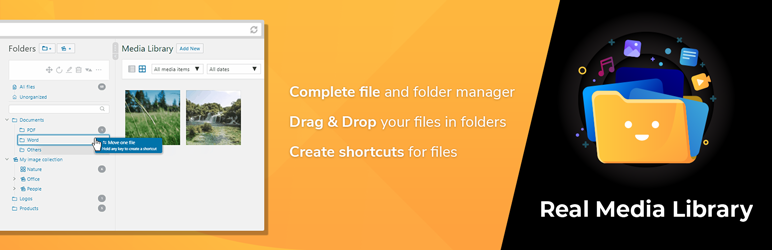
Real Media Library: Media Library Folder & File Manager
You can go for the Real Media Library if you need a solution to organize large amounts of media files into folders, collections, and galleries on your WordPress site.
It allows you to upload disallowed file types and update galleries without spending much time.
Key features:
- You can create(unlimited folders in the free version), rename, and delete folders.
- Use bulk selection to organize your files efficiently in folders. You can also group files based on date, size, and author.
- Create shortcuts for adding files in multiple folders.
- Create galleries within folders.
- Create dynamic galleries from a folder with shortcodes or Gutenberg block. This will be automatically updated if you move files in your media library.
- It has a filter for inserting media dialog.
- Compatible with the most popular page builders, all major themes, and additional plugins.
- Customizable folders, collections, and galleries.
Use WordPress for digital asset management today
WordPress is well-set up for digital asset management, but its built-in media library is very limited.
If you want to better organize the media assets in your media library and decide who can access them, you need to install a plugin.
Filr is the best digital asset management plugin for WordPress. With its powerful asset management and security features, it allows you to generate secure, easily accessible, and versatile document libraries on your WordPress website.
Filr – WordPress Document Library Plugin
Easily upload, store and share files in WordPress. Secure, flexible, and user-friendly document libraries for your next project.
-
Version:
How to Create a WordPress Document Library (in 5 Easy Steps)
Release-Date:
In this article, we’ll show you how to create a WordPress document library for your WordPress website in 5 easy steps with the help of a document management plugin, Filr.
But first, let’s address what a document library using WordPress actually is.
What is a WordPress document library?
A WordPress document library enables you to organize and manage your WordPress site’s documents and other digital resources in the form of a sortable table. By using a document management plugin, instead of the default WordPress media library, you’ll make your documents easily accessible to your employees or site visitors.
Let’s say you’re an independent software vendor. New customers or the non-tech-savvy ones will require instructions on how to use your services. You might have stored this information in your documents or other digital resources, but without a document library, they will have difficulty finding it.
Fortunately, you can ensure this doesn’t happen by setting up a document library on your WordPress website using the plugin Filr. And in this post, we’ll show you how you can easily use Filr to create a WordPress document library for your site.
First, let’s understand what the WordPress plugin Filr is, and how it can help you display documents with ease.
Introducing the best WordPress document library plugin, Filr
Filr is the best WordPress document library plugin out there. It will help you build a secure document library on your WordPress website.
Filr
Easily upload, store and share files in WordPress. Secure, flexible, and user-friendly document libraries for your next project.
With this plugin, you can organize your site’s important documents in a clear and organized file manager. You can then make them easily available to your employees, clients, and customers in searchable and sortable folders with filters.
Import documents individually or a list of documents in bulk to store them in your document library. Set an expiration date, limit the number of downloads, and set file name encryption to secure your document library.
Filr also allows you to customize your document library’s appearance and table layout to match your website’s theme and design.
But that’s not all. With Filr, you can:
Create a simple or complex document library
Whether you have a small or large business, you can create any type of document library for your business.
Upload files individually or in bulk, and create folders and subfolders to suit you. You can also go a step further to manage file availability and add a layer of security via encryption.
Flexible file types
You can add different file types and formats to your WordPress document library using Filr. Use the WordPress uploader in the WordPress Admin area to upload files, so you don’t have to learn anything new.
These files can be images, videos, audio, documents, eBooks, spreadsheets, images with metadata, and even file attachments with metadata, in a wide variety of file formats. Plus, you can even add external files and URLs.
Use Filr to create a knowledge base, audio library, resource library, premium content, and more.
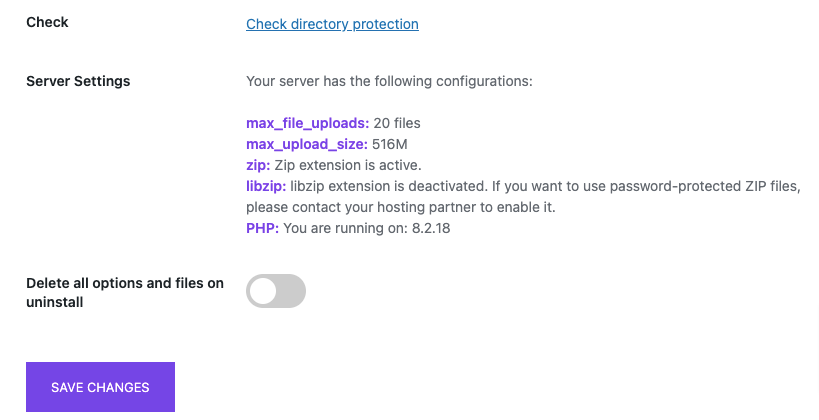
Filr will tell you all your server file upload limits, so you can be sure you upload the right file size.
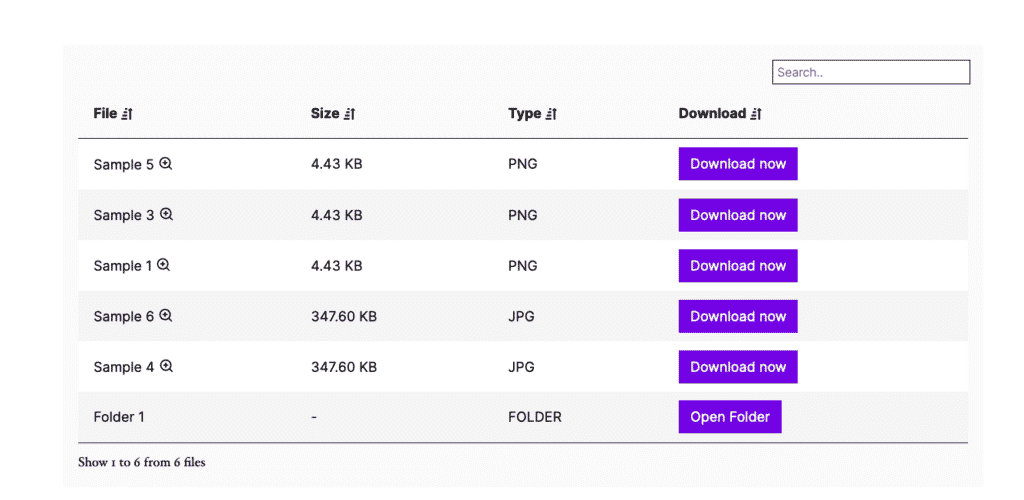
Searchable, filterable, and customizable
The whole point of having a document library on your WordPress website is to make your documents and digital resources easily accessible.
Filr delivers on this with its sort, filter, and searchable features, making files in your library easily accessible to those needing them.
It also allows you to customize the rows and columns in your document library table. You can also add a filter dropdown where your site visitors can quickly choose a category or a tag to filter. Include a document preview, allow users to download files with download links, show the file modified date, and more.
Customizable appearance and compatible with your WordPress theme
Filr allows you to easily customize the appearance of your WordPress document library to match your website’s theme and design.
You can customize everything from the colors, borders, and background of your document library table. In addition, you can:
- Choose which rows to include and exclude and reorder them.
- Set a custom date format to use in your library.
- Add an alternative message for empty libraries to give your users more information.
This way, your site visitors can easily use and interact with your document library.
Make your document library secure
Filr enables you to secure your document library by creating a PHP file(index.php) on the root of your uploads directory. This hides the content of your whole download directory from any searches.
You can go a step further to lock down the document library with passwords and secret keys. Plus, you can keep users logged in until they save a specific file.
Filr also lets you set up an htaccess file that allows you to control the access permissions in your document library. This way, you can specify how many levels of access each type of file or folder has from the general public. You can also restrict which groups of people can access it and return a 403 code (Forbidden Access) in case of an unauthorized party attempts to access it.
With Filr, you’ll be able to securely deliver content online to our site visitors on any browser with encrypted URLs and even implement additional security checks to make sure downloads happen safely. Encrypted URLs for each document library can then be sent securely over secure protocols such as HTTPS.
So now we know why Filr is a great option for your WordPress document library, let’s get it set up and running with the following tutorial.
How to create a WordPress document library
To create a WordPress document library for your website, you will need the following:
- A WordPress website set up and running.
- The Filr WordPress document management plugin.
- A few media files to embed, such as images, audio, video, and/or docs.
Step 1: Install the document library plugin, Filr
To set up your WordPress document library, we’ll first need to download the premium version of the plugin Filr:wpdocumentlibrary.com
Filr – WordPress Document Library Plugin
Easily upload, store and share files in WordPress. Secure, flexible, and user-friendly document libraries for your next project.
After doing so, you’ll receive an email with the Filr plugin and a license key for activating it. Click on the file extension to download the zip file to your computer.
Then follow these three steps to install Filr:
- Log in to your WordPress dashboard and click Plugins > Add New > Upload plugin at the top of the page.
- Select the zip file you’ve just downloaded to upload. Next, click the Activate now button.
- You’ll be prompted to enter a license key to activate the Filr plugin. Click Agree & Activate the license to successfully install the plugin.
Now, let’s create a document library with our newly installed and activated Filr plugin.
Step 2: Create a document library
To create a library in Filr go to the Filr > Libraries then:
- Enter a name for your new document library and a brief description of your file library.
- Next, click the Add New Library button.
- On the right side of your screen, you’ll see your created library and a shortcode next to the library that you can copy. We’ll use this shortcode later to display your document library on the front end of your website.
That’s it. You can create as many libraries as you want at this stage. Next, we’ll upload files to your document library.
Step 3: Upload documents to your document library
To upload a file to your new document library:
- From your WordPress dashboard, go to Filr > Add New on the sidebar.
- Give the file a name or title.
- Next, you can drag and drop one or multiple files (bulk upload) into the file uploader. Or, you can click the Browse file button to upload a file.
- You can organize the files into the appropriate library in the library’s section on your screen’s right-hand side. Check the document category you want to upload the file into.
- Alternatively, in the Advanced options section, you can:
- Set an expiration date.
- Limit the number of downloads.
- Encrypt the file name.
- You can also restrict file access to the user by email or role in the user options section.
- Click the Publish button to publish your document library.
Step 4: Display your document library
To display your document library, take the following steps:
- From your WordPress dashboard, go to Pages > Add New.
- Next, paste the document library shortcode you copied earlier into the content area.

- Don’t forget to give this page a name and then click Publish.
We’ll need to adjust some settings to change what’s displayed within the document library.
To do this, take the following steps:
- From your WordPress dashboard, go to Filr > Settings and click the Libraries tab. From here, you can:
- Modify the color, border, and background styles.
- Choose which rows you want to appear within your document library and reorder them.
- Rename the download button, deactivate search and pagination, set a custom date, and more under additional settings to display a document library unique to your website and publish.
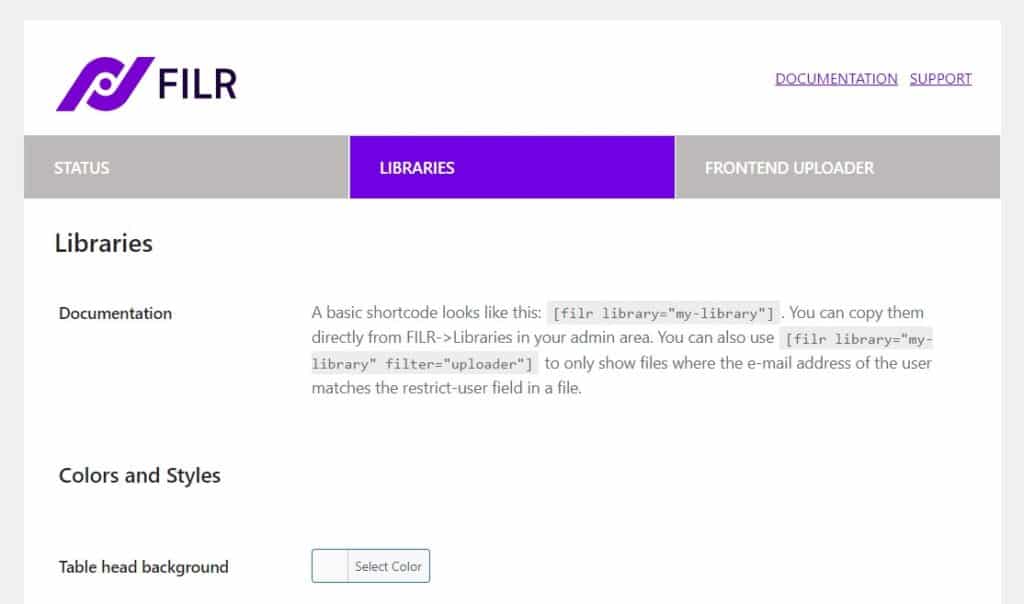
Finally, it’s time to secure your document library.
Step 5: Secure your document library
From the WordPress dashboard, click Filr, then navigate to Filr > Settings > Status. Filr offers three file protection options based on your server type.
- No protection mode, which is Filr’s default option.
- Index.php. This protection setting allows you to create an index.php file on the root of your uploads directory. Enabling this option will hide all the content in your download directory.
- htaccess restricts people from browsing your uploads directory and returns a 403 code (Forbidden Access) page.
Also, Filr has an integrated tool that allows you to check your server configuration and compatibility with Filr. If you encounter errors, you can contact your hosting provider to activate the tools you need to use Filr.
You can view your protection settings by clicking ‘check directory settings’. When you’re done, click Save Changes to secure your document library.
After securing your library, you can also give other users access to add files to your document library using Filr’s frontend document uploader.
Allow users to upload files to your document library
You can use Filr’s frontend uploader to allow other users to upload files directly from the front end of your website.
Step 1: Add the file uploader to your document library page
The frontend uploader comprises a shortcode called filr-uploader, which you can use to further customize the usage of your frontend uploader.
In our case, to add a Filr uploader to your document library:
- Go to Filr > Libraries on your WordPress dashboard.
- Copy the slug of your specific document library from the library table.
- Use the shortcode
[filr-uploader library="my-library"]where ‘my-library’ is the slug of the document library you’ve just copied. - Add this shortcode to your document library page to specify the library your users can upload their files to at the front end of your website.
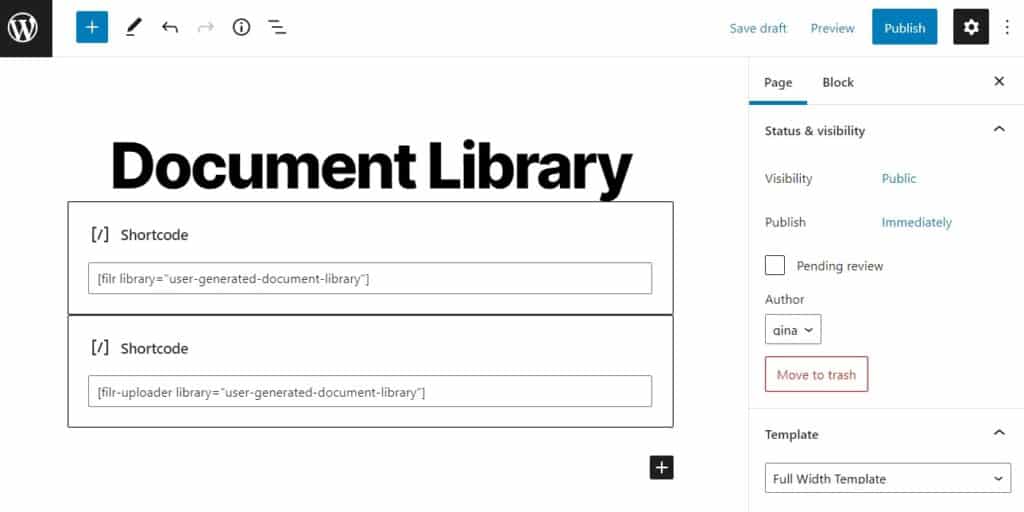
- Click the Publish or Update button at the top of the page once you’re happy, and visitors will be able to upload and download documents from your document library.
There are some parameters the Filr uploader offers to allow you to customize this:
- You can use the status parameter
[filr-uploader status="draft"]when you want to do a quick manual review before publishing files to a library. - Restrict users’ ability to upload files by specifying their role using the user-role parameter
[filr-uploader user-role="subscriber"]thus blocking upload for unauthorized users. - User-email parameter
[filr-uploader user-email="[email protected]"]. This allows you to give users access to your library by email. You can add multiple emails by separating them by a comma.

We’re almost done. Next, we can proceed to customize the look and feel of your Filr uploader.
Step 2: Adjust your settings
To modify your Filr uploader settings, go to Filr > Settings > Frontend uploader. Here you can:
- Modify the headline, limiter text, and button labels, and custom the icon using Unicode.
- Select the branding colors for the buttons and the icon.
- Activate a reload following a successful file upload.

After all these tweaks, it’s time to view your document library and test it.
Step 3: View your document library
To view your document library, navigate to the front end of your WordPress website and test it out by adding a few files. Users will be able to upload files by dragging files into a specific library or browsing files they want to add.
Your site visitors can now browse, sort, and filter through your document library and download the specific file/s they want.

Create your WordPress document library today
A document library for your WordPress website enables you to organize your site’s documents and other digital resources and make them easily available to your clients, customers, and employees.
The default WordPress install doesn’t allow you to do this, but you can achieve it with the help of the Filr plugin.
Filr allows you to:
- Create and display a secure WordPress document library.
- Customize your library’s look.
- Regulate access to the files in your library.
- Allow users to add files to your library.
Filr
Easily upload, store and share files in WordPress. Secure, flexible, and user-friendly document libraries for your next project.
-
Version:
How to Build a B2B Content Library
Release-Date:
If you deal business to business (B2B), you need to have a B2B content library to store media assets, documents, and files.
Not only does it make it easier for users to find what they’re looking for, but it also makes it easy for prospective clients to download information resources. As a B2B company, having a B2B content library can help you keep operations smooth and reduce back and forth over email.
With this in mind, in this tutorial, we’ll take a look at what a B2B content library is and how you can create one for your WordPress site using the Filr plugin.
What is a B2B content library?
For those unfamiliar, a B2B content library is a content library that contains media assets that businesses use for promoting products and services to their target audience. A B2B content library typically contains media assets like images, videos, podcasts, e-books, and other useful information resources too. Some B2B companies may also use a B2B content library for publishing a media kit or PR kit.
Businesses that sell products and services to other businesses need a B2B content library in order to manage their marketing and outreach operations more efficiently. A B2B content library is also suitable for B2C brands that deal with other organizations such as online magazines. For example, you can add a media kit, information about your readership, and a document containing advertising rates for prospective advertisers to download.
How to create a B2B content library in WordPress using Filr
With Filr, you can easily create a B2B content library in WordPress. Your front-end B2B content library will feature a neat table layout listing media assets along with direct download links.
Here’s what you need to create a B2B content library for your company:
- WordPress website
- Some media assets (images, video, audio files, or documents)
- The Filr plugin
Step #1: Install the Filr plugin
A WordPress content library plugin, like Filr, enables businesses to upload media assets to their website and make them available for download on the front-end. Filr also provides additional features like file encryption and file expiration which means that you can secure your B2B content library from unauthorized access.

The first thing you need to do is get the Filr plugin. You’ll receive the plugin files and a license key. Install the plugin on your WordPress website and activate the license key to continue.
Step #2: Create a library for B2B content
Filr organizes files into categories called Libraries. A Filr library helps you sort your media assets saving users tons of time when they need to find a specific file from your B2B content library.
There are plenty of different ways you can create libraries to organize your B2B content library media assets.
- You might consider creating libraries based on the type of content you want to make available for download. Your libraries could then be Images, Videos, E-books, Podcasts.
- You can also create libraries based on the advertising channel the media is intended for such as PR, Social Media, Email Marketing, or Business Website. For instance, if you’re looking for the banner for your upcoming Facebook ad, you will simply look in the Social Media library.
In order to create a library in Filr, go to Filr > Libraries from the WordPress admin panel. Give your library a name and a description and click the Add New Library button.
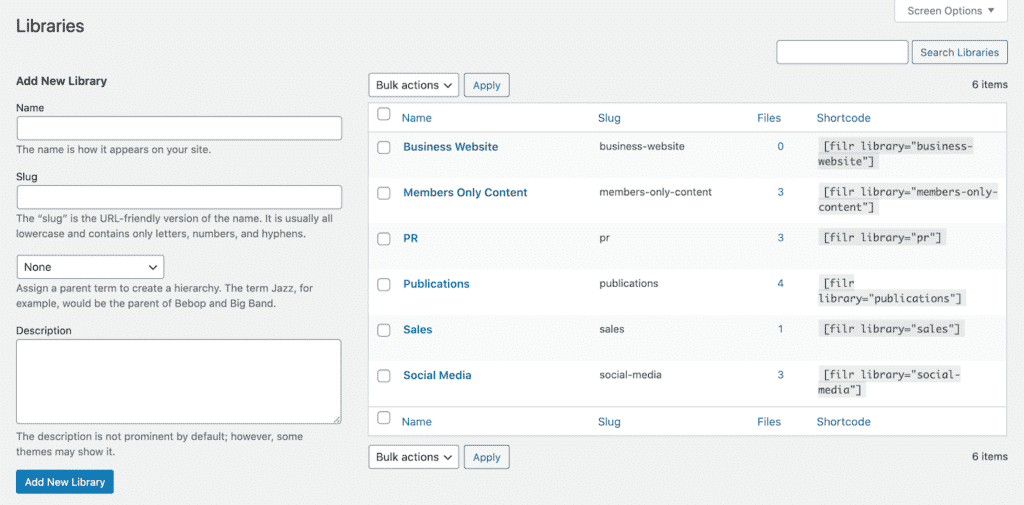
Copy the shortcode that appears on the right side of your screen (under the Shortcode column next to the library you just created) to your clipboard. We’ll use this in the following steps to display the B2B content library on the front-end.
Using Filr, you can create as many libraries as you’d like for your B2B content library.
Step #3: Add your B2B content
Next, it’s time to upload the B2B media assets to your WordPress website. As we mentioned earlier, Filr lets you upload all sorts of files and documents to your B2B content library including images, videos, documents, design files, and much more.
Go to the Files directory and click the Add New button. Give the file a name and upload the media assets to WordPress using the File Upload meta box.
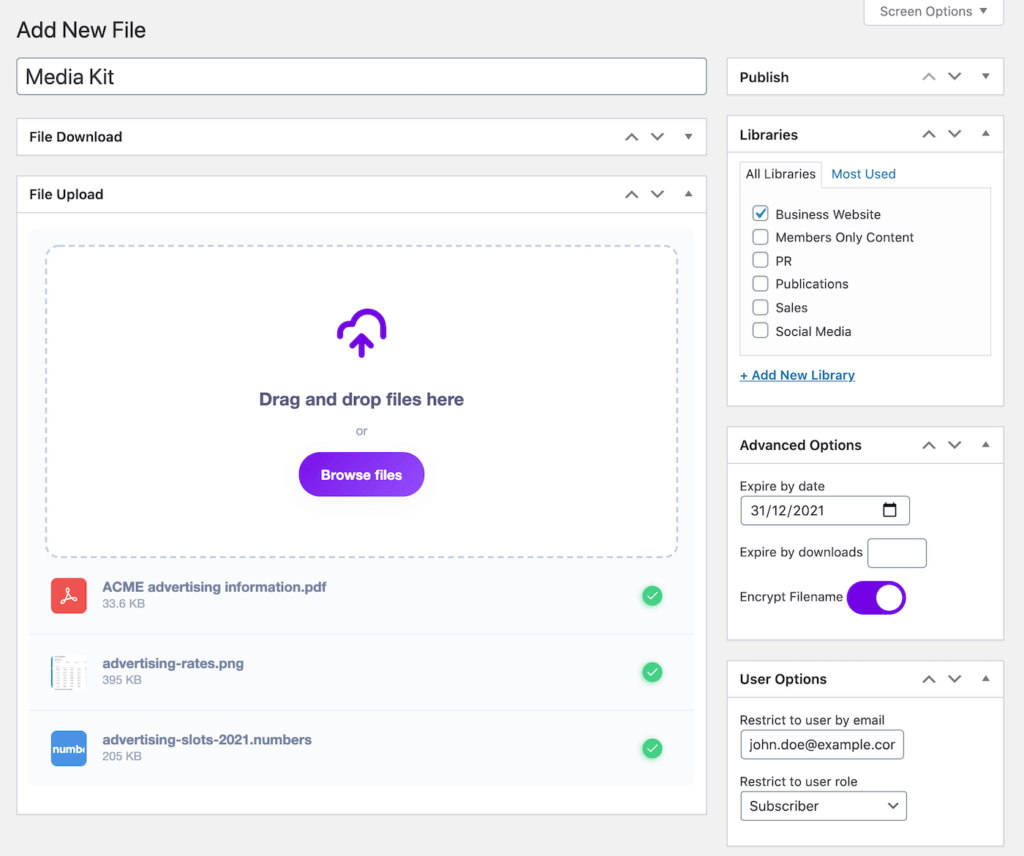
You can upload multiple media assets to a single file if you’d like users to be able to download it in one go. In other words, the files will be archived as a .zip that users can download in a single click.
Once that’s done, organize the files into the appropriate library using the Libraries meta box on the right-hand side of the page. You can also use the Advanced Options to:
- Expire by date
- Expire by downloads
- Encrypt filename
In addition to this, the Filr B2B content library plugin has built-in options that let you restrict user access to the files in your content library. You can restrict access to users by email or by user role. Use the User Options meta box to restrict access to content.
Click the Publish button to continue.
Step #4: Publish the B2B content library
Go to Pages > Add New from the WordPress dashboard to create a new page to publish the B2B content library on. If you’re using Gutenberg, search for the Shortcode block and add it to the text editor.

Next, paste the shortcode you copied to the clipboard in it. Finally, click the Publish button to publish your B2B content library on your WordPress site.
It should look something like this on the front-end:
Now, whenever someone accesses the page, they’ll be able to view your B2B content library and download the media assets they need by clicking on the name of the file under the Download column.
Step #5: Customize the B2B content library (optional)
The Filr plugin makes it incredibly easy to change the style, columns, and colors of your B2B content library.

To do this, go to Filr > Settings > Libraries from the WordPress admin panel. From here, you can modify your B2B content library’s color and styles, the columns that appear in the table, date format, and more.
Bonus: Publish multiple content libraries
After building your B2B library on your WordPress website, you can publish multiple B2B content libraries on different pages to enhance usability. To do this, simply paste the shortcode of the library on the page you want to publish it on.
In addition to this, you can also split your content library into two content libraries on the same page to make it even easier for users to find what they’re looking for. All you have to do is add multiple library shortcodes to the same page.
Conclusion
Using Filr, you can create a B2B content library that makes it easy for team members, clients, and advertisers to download media assets. It’s essential for companies that are looking for an easy way to store their B2B media assets on their website in a secure and organized way.
Filr
Easily upload, store and share files in WordPress. Secure, flexible, and user-friendly document libraries for your next project.
-
Version:
How to Create a Media Assets Library for Your Agency
Release-Date:
As a business owner, organizing your media assets becomes challenging as your agency starts to grow. One way to keep everything organized would be to create a media assets library.
This way, your team members will have all of the media assets available to them in a centralized hub. You can also secure it so it’s accessible only to authorized staff members.
In this guide, we’ll take a look at what a WordPress media assets library is and how you can create one for your agency in a few simple steps.
What is a media asset library?
Before we jump into creating a media assets library for your business, let’s take a step back to see what a media assets library actually is and how it helps businesses stay organized.
A media asset library is a hub for all of your brand’s media assets. These can be images, videos, ads, logos, and banners.
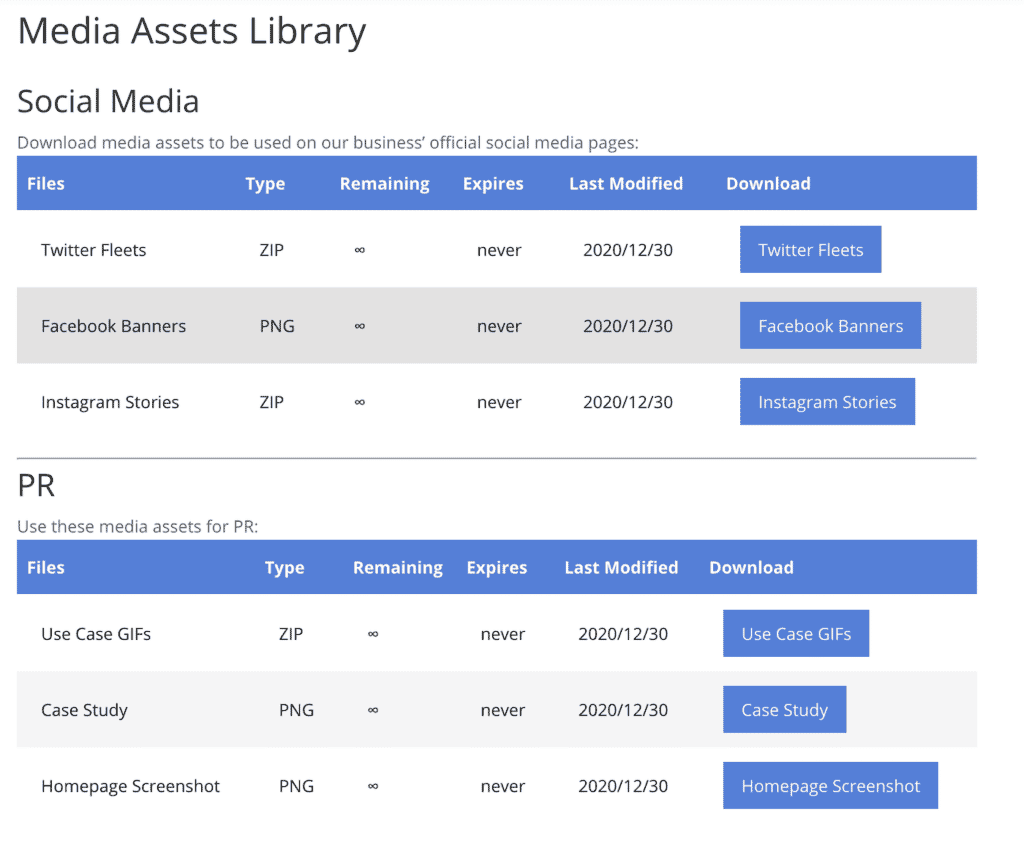
Most agencies don’t have a centralized hub for their media assets which can potentially lead to mismanagement. It makes it difficult for marketers to quickly find a specific image or video they need to post.
By creating a media assets library, you can stay organized. This way, finding media assets of different sizes and formats that you might need for specific placements – like for Instagram Stories or Facebook banners – becomes easy and hassle-free.
You can also download multiple media assets in one go from your media assets library which is particularly useful if you need access to a set of media assets. For example, if you need your brand logo and the latest promotional ads for an email marketing campaign.
Having a WordPress media assets library is important for agencies looking for a way to better manage their media assets for different channels such as social media, digital marketing, and PR.
How to create a media assets library in WordPress using Filr
Filr is a WordPress plugin that lets you build a media assets library for your agency.
You can use it to create a clean table layout listing all of your media assets (along with download links) for users. The plugin lets you upload individual files or multiple files to your media library at a time.
Here’s what you need to create a media assets library in WordPress:
- A WordPress website
- Some media assets (like images, videos, or media kits)
- The Filr plugin
Step #1: Install the Filr plugin
The Filr plugin for WordPress enables users to upload media assets to their website and display them on the front-end in an organized way. In addition to this, it also provides additional features like file encryption and file expiration which help prevent unwanted access to your organization’s media assets.

The first thing you need to do is get the Filr plugin and install it on your WordPress website. Once it’s installed, click the Activate button to get started.
Step #2: Create libraries for your media assets
By creating libraries for your media assets, it makes it for users to find what they’re looking for. As an agency, you might consider creating libraries named PR, Social Media, and Digital Marketing to sort and keep track of all of your media assets.
So, for example, if you need to replace an ad you posted on your Instagram business page, you will find the relevant material under the Social Media library you created.
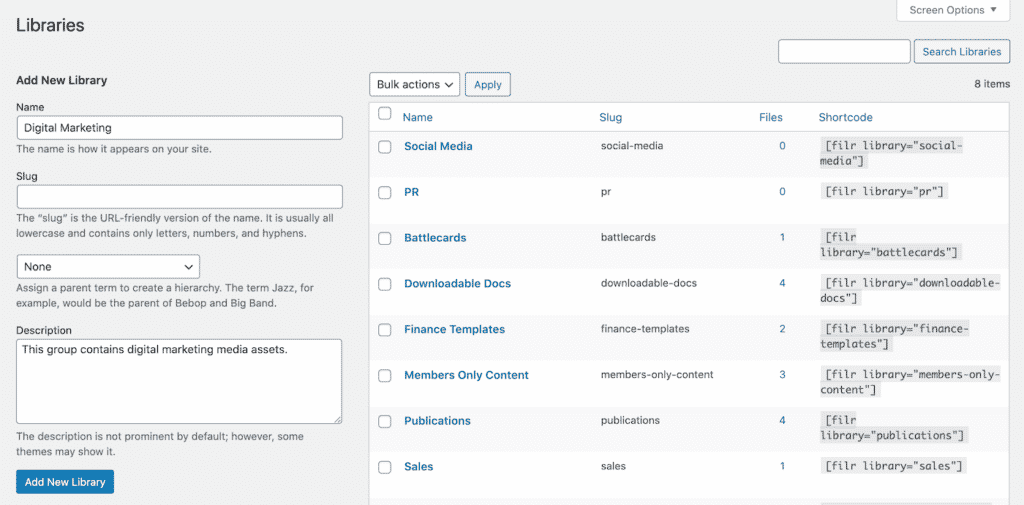
To create a new library, go to Filr > Libraries from the WordPress admin panel. Enter a name and description for your library and click the Add New Library button to continue. It will appear on the right-hand side of your screen along with a shortcode that lets you display all of the files sorted under that library on the front-end. For now, copy the shortcode to your clipboard.
Step #3: Add your media assets
The next step is to start adding media assets to your WordPress site.
To do this, go to Filr from the WordPress dashboard and click the Add New button. Give your file (or files) a name and upload the media assets using the File Upload meta box.
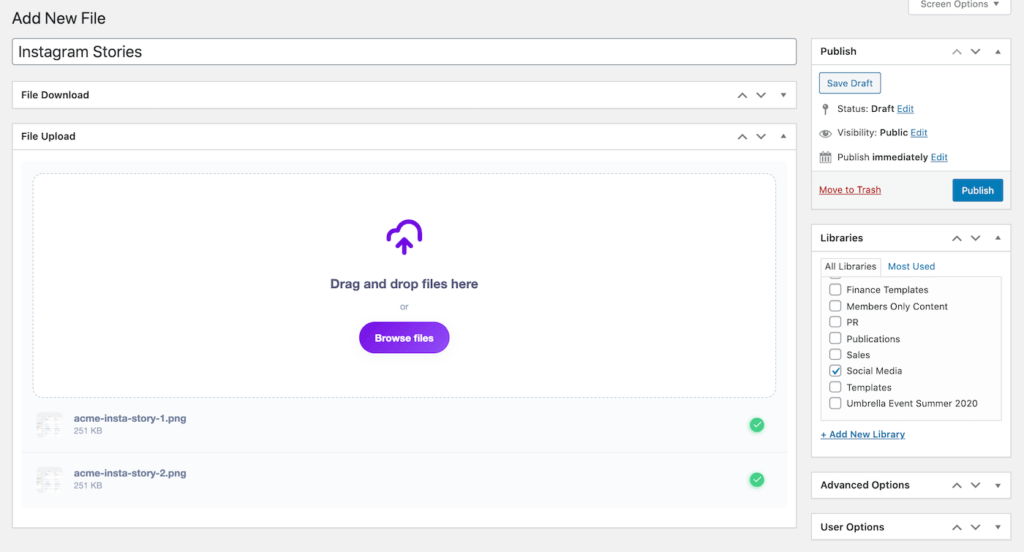
Once that’s done, organize your media asset files to the appropriate libaray using the Libraries meta box on the right-hand side of the page.
Finally, click the Publish button to proceed.
Step #4: Publish the media assets library
Now that we’ve uploaded all of the media assets, we can publish the media assets library on the front-end.

Go to Pages > Add New from the WordPress dashboard to create a new page. Next, we’ll use the shortcode we copied to our clipboard. Add a new Shortcode block to the text editor and paste the shortcode in it. Click the Publish button to publish your media assets library on your WordPress site’s front-end.
It will look something like this:
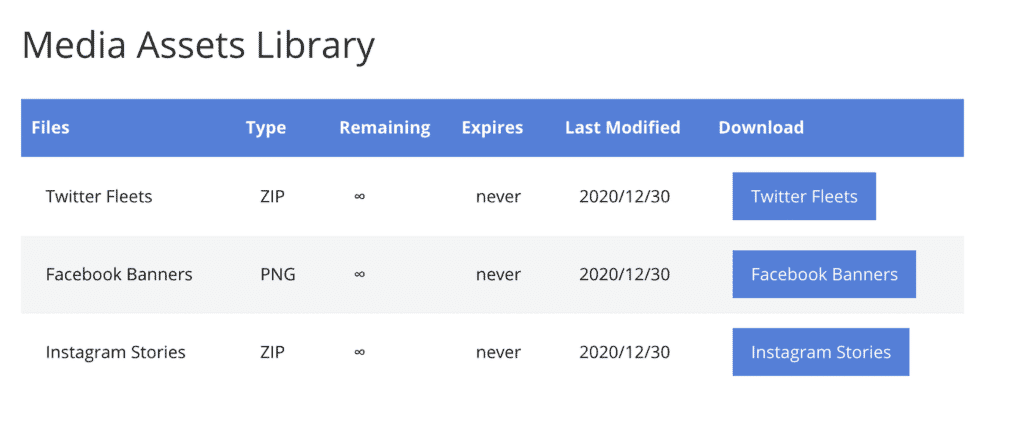
Users will be able to see and download all the files by clicking on the file name under the Download column in the table.
Filr lets you change the style and colors of your WordPress media assets library. Head over to Filr > Settings > Libraries and customize the media assets library.
You can also publish multiple libraries on a single page. All you have to do is paste the shortcodes of the libraries you want to publish in the text editor. It might look something like this:
After successfully publishing your media assets library on your WordPress website using the Filr plugin, you need to secure your media assets so that only your team members have access.
The easiest way to do that is by using Passster – a WordPress content protection plugin. Passster enables you to restrict access to your content in a variety of different ways including password protection, CAPTCHAs and reCAPTCHAs, role-based access control, and unlocking via a link. Check out the 6 Different Ways to Restrict Content in WordPress for step-by-step instructions.
So, when an authorized user accesses the media assets library, they’ll be able to find what they’re looking for and download it to their machine.
Wrapping up
By creating a media assets library for your agency, you can make it easy for marketers and team members to quickly find what they’re looking for. You can organize them based on the types of media assets you create or your marketing strategies.
The easiest way to do this in WordPress is by using the Filr plugin.
Using Filr, you can create a WordPress media assets library in four simple steps that users can access and download media assets from – individually or in sets.
Filr
Easily upload, store and share files in WordPress. Secure, flexible, and user-friendly document libraries for your next project.
-
Version:
How to Create a WordPress Publications Library
Release-Date:
If your organization has a public-facing WordPress website, it’s important to keep your website’s content organized. This is especially true if you’ve stored hundreds of publications like case studies, research papers, and other documentation that visitors, staff, and team members need quick access to.
With the right online publications plugin, you can easily improve the file organization workflow on your WordPress site and make it easier for your site users to find, view, and download publications.
In this post, we’ll take you step-by-step through the process of creating a publications library for your WordPress site.
What is a publications library?
A publications library is basically a list of publications linking to full content that is downloadable. It enables companies and organizations to easily store their publications in an organized, digital form.
Inexperienced users often make the mistake of setting up their WordPress publications library as static content. This may work well if you have, let’s say, only a handful of links to PDF downloads and you want users to be able to download directly from your site’s pages or posts.
But if you want to store hundreds of publications in your WordPress library, you’ll need a simple and efficient way to upload, manage, and share these publications with your site’s users. Otherwise, it will be difficult for you to keep everything organized on the back-end not to mention the trouble your site visitors will face trying to find the publications they’re looking for.

The solution is to create a publications library where publications are stored and organized in an easy way. It will also allow your site users to download multiple documents in one go.
If your organization has a public-facing website, a publications library lets you disseminate resources such as company policies, documentation, research papers, and case studies to staff and site visitors. Similarly, you can make certain publications available only to specific site members and provide users with different levels of access.
Now that you know the benefits of setting up a publications library, let’s create one for your WordPress website.
How to create a publications library in WordPress using Filr
In this section, we’ll show you how to build a publications library in WordPress using the Filr plugin.
You can use it to upload one or more files to your publications library. The Filr plugin lets you create a clean, front-end table layout listing all of your publications along with download links. This way, your site’s users can download them all at once in a single click or one at a time.
For this tutorial, we’ll assume you already have a WordPress site and some publications that you’d like to add to it.
Step #1: Install the Filr plugin
Filr is a WordPress plugin that helps organizations easily add, protect, and make files and documents available to users.
The plugin lets you upload and display documents on your site’s pages in a secure way. Additionally, the Filr plugin comes with a number of file protection features like file encryption and file expiration based on the number of downloads or by specific dates. This way, you can make sure that unauthorized can’t access your publications.
Get the Filr plugin and install it on your WordPress site, if you haven’t done so already. Once that’s done, click the Activate button to proceed.
Step #2: Create publications libraries
We’ll start by creating a new library which will be used to organize the publications. This will help you sort your publications while keeping everything organized on the back-end.
For example, if you want to modify a set of files or restrict users from downloading them, can quickly find them if you know which library they are sorted under. This will also enable you to easily keep track of hundreds of publications stored in your WordPress library.
To create a new library, go to the WordPress dashboard and navigate to Filr > Libraries. Enter a title for your library and give it a brief description. When you’re done, click the Add New Library button to proceed.
A new library will automatically appear on the right-hand side of the screen along with a shortcode.

We’ll use this shortcode in Step #4 to display the publications library on the front-end of your WordPress website. For now, copy the shortcode to your clipboard.
Step #3: Add your publications
Filr is a handy WordPress plugin that offers a simple way to create a publications library in WordPress. It helps you:
- Upload one or more publications straight to a secure folder on your WordPress website.
- Group publications based on libraries enabling you to easily manage and track publications on the back-end.
- Set publications to expire on a specific date or after a set number of downloads.
- Prevent users from directly accessing publications using filename encryption.
Now that you’ve already created a lbirary to sort your publications into, the next step is to upload the publications to your WordPress site.
Navigate to Filr > Add New and enter a title for your files. In the File Upload meta box, upload the publications you want to share with your site’s users. You can select the library you created in Step #2 from the Library meta box on the right-hand side of the screen to organize them.
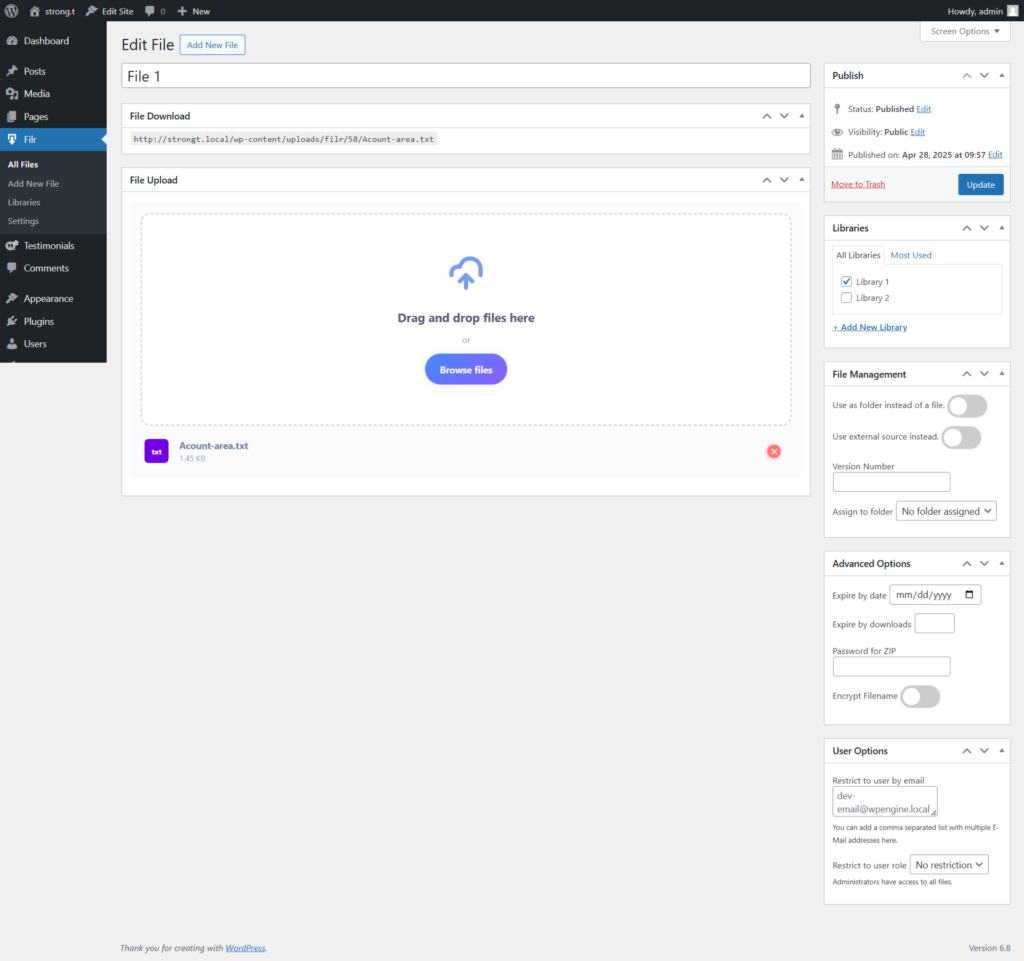
In addition to this, you’ll be able to expire publications either by date or the number of downloads. Filr also lets you activate filename encryption by toggling the Encrypt Filename option on.
Click the Publish button to continue.
Step #4: Display the publications library on the front-end
Finally, it’s time to display the publications library on the front-end of your site. For this, create a new page by going to Pages > Add New. Paste the shortcode you copied to your clipboard in Step #2 to a new shortcode block in the text editor as shown below:

Once you’re done, click on the Publish… button. A publications library will automatically be generated on the front end of your WordPress website. It should look something like the screenshot below:

Users will be able to download all the files at once by clicking the button with the file name.
The Filr plugin also allows you to customize the appearance of your publications library. You can change various settings including colors and styles, as well as the rows that appear on the front-end by going to Filr > Settings > Libraries from your WordPress dashboard and clicking on the Shortcode tab.
Bonus: secure your publications library
Filr offers a number of ways to secure a WordPress publications library. This is especially useful for organizations looking to restrict unauthorized users from accessing and viewing their publications.

Out of the box, Filr comes with three different file protection options:
- No protection. Filr’s default protection setting allows organizations to share publications on their website without any restrictions.
- Index.php. This protection setting lets you create an index.php file on the root of your uploads directory. Enabling this option will hide all the content in your download directory.
- .htaccess. This protection setting restricts users from accessing your uploads directory and redirects them to a 403 code (Forbidden Access) page.
You can configure these file protection settings by navigating to Filr > Settings from the WordPress dashboard and clicking on the Status tab.
Check the radio button next to the protection setting you wish to apply to your publications. You can view the protection status by clicking the Check directory protection link. When you’re done, click the Save Changes button to continue.
Passster is a WordPress content protection plugin that lets you secure your WordPress publications library in a variety of different ways. You’ll be able to restrict content access using password protection, unlock via link, CAPTCHAs and reCAPTCHAs, and role-based access control.
For instructions on how to do this, be sure to check out our article on 6 ways to restrict content in WordPress.
Create your WordPress publications library
Managing and securing publications on your WordPress website is incredibly easy with the Filr plugin. You can use this plugin to create a secure publications library for your WordPress site and allow your site users to access and download these publications.
Filr
Easily upload, store and share files in WordPress. Secure, flexible, and user-friendly document libraries for your next project.
-
Version:
10 Best WordPress File Viewer Plugins for PDFs and Documents
Release-Date:
Whether you’re an online instructor or a WooCommerce shop owner, you need to effectively communicate your ideas to your audience.
For instance, you might want to share course material with your students or publish a review of products on your website. By default, WordPress lets you upload PDFs and documents to the Media Library but it doesn’t give you a reader-friendly interface to present them to visitors in an effective way.
You need a file viewer plugin for your website if it features a lot of text-based content – whether it’s in the form of blog posts, books, magazines, or booklets.
In this article, we’ll run the rule over some of the best WordPress file viewer plugins that will enable you to upload and embed your documents in WordPress and share them with other people.
#1: Filr

Filr is a handy WordPress file viewer plugin that helps you quickly add, protect, and share files and documents through your WordPress website. This plugin lets you display documents on your site pages using shortcodes. It has a number of file security features including file encryption and file expiration on set dates or number of downloads.
Key features:
- Using Filr, you can allow users to download files and documents in two ways: offer single file downloads so users can choose which file to download one at a time or zip multiple files into a single archive file and let them download all of the files at once.
- Filr enables you to group documents into libraries and easily manage them on the back-end.
- You can add any number of files directly from your website’s and create a front-end document library to organize them.
- You’ll be able to restrict site users from viewing documents on your site and only allow authorized people to access them.
Filr – WordPress Document Library Plugin
Easily upload, store and share files in WordPress. Secure, flexible, and user-friendly document libraries for your next project.
#2: Embed Any Document
The Embed Any Document WordPress plugin helps you add and embed your PDF, Excel, PowerPoint, and Word documents directly on your WordPress site. You don’t need to install a browser plugin like Acrobat Reader or Flash.
Key features:
- It offers a clean and intuitive user interface.
- Embed Any Document supports all popular document file types including Microsoft Word, Microsoft PowerPoint, Microsoft Excel, Adobe Portable Document Format, text files, and TIFF Images.
- You can choose between Microsoft Office Online and Google Docs Viewer to display the documents on your website. And, if one service is down, you can easily switch to the other one.
- Embed Any Document comes mobile-ready out of the box and offers cross-browser compatibility.
Price: Free
#3: PDF Embedder

PDF Embedder is a popular WordPress file viewer plugin that lets you upload PDFs and embed them directly into your website pages. The plugin is easy-to-use and offers a lot of flexibility if you want to change your document’s appearance.
Key features:
- PDF Embedder automatically resizes PDFs to their natural shape and size. Alternatively, you can manually specify the document’s size.
- The plugin only uses JavaScript to embed PDFs giving you more freedom over the appearance of your documents.
- Its drag and drop interface lets you quickly add files to your website with a single click.
- Its premium features include a download button in the toolbar, continuous scroll between pages, full screen mode, and tracking the number of downloads and views.
Price:
- Free version available
- PDF Embedder Premium costs $20 for single site license
#4: PDF.js Viewer

PDF.js Viewer is a WordPress file viewer plugin that helps you display your documents in a visually-appealing way. Your PDFs will be embedded in a stylish grey theme frame, and viewers can navigate documents using an intuitive document outline.
Key features:
- It uses Gutenberg blocks and shortcodes to embed documents in pages and posts.
- Its lazy load feature helps keep your site speeds up by only displaying portions of a document that has been navigated to.
- PDF.js works seamlessly with mobile devices and supports all languages.
- You’ll be able to secure your documents using passwords.
- Other useful features include customizable buttons, advanced search functionality, and advanced zoom settings.
Price: Free
#5: 3D FlipBook
3D FlipBook is a powerful WordPress document viewer that enables you to display your PDFs, images, and HTML pages as a flipbook. This plugin allows you to present your content in a reader-friendly way.
Key features:
- It’s an easy to use and responsive PDF viewer.
- This plugin is ideal for websites that feature books, magazines, brochures, cards, and booklets.
- Its flipbook reading functionality will also work seamlessly on mobile devices.
- 3D FlipBook simulates the real-world experience of reading books. Plus, you can customize the way flipbook pages deform as viewers turn them over.
- Other useful features include smart pan mode, PDF bookmarks, PDF search, and auto resolution.
Price: Free
#6: Flowpaper

This WordPress PDF viewer plugin offers a user-friendly document reading interface featuring a flipbook. Its backend controls are geared towards advanced developers who want a great looking PDF viewer. Flowpaper comes with a number of code customizations and storage limits that are suitable for advanced users.
Key features:
- You can display your documents in one of three ways. The first method involves hosting the files on another location and pasting in the link. The other two methods involve uploading your PDFs to WordPress or the Flowpaper cloud.
- Flowpaper supports the majority of browsers and devices.
- Viewers can choose between light and dark themes.
- The Flowpaper cloud only lets you upload PDFs that are 15 MB or smaller.
Price: Free
#7: PDF & Print

If you’re looking for a multi-purpose WordPress PDF plugin, PDF & Print is just what you need. It can quickly convert a blog post to the PDF format. This way, users can print your site pages by converting them to PDF directly from your WordPress site.
Key features:
- PDF & Print is an easy-to-use plugin that doesn’t require any coding skills.
- You’ll be able to display PDF & Print buttons for specific user roles.
- You can automatically add PDF & Print buttons to posts, pages, search results, custom post types, and archives.
- It lets you set and change PDF button actions including Download PDF and Open PDF in a new window.
Price: Free
#8: WooCommerce Product Files Tab
WooCommerce Product Files Tab is a popular document viewer plugin that lets you display additional information along with your PDF files. This way, you’ll be able to present more information to potential customers and increase downloads.
Key features:
- This plugin comes with easy-to-make back-end configurations.
- It supports both the WPML and Polylang plugins.
- WooCommerce Product Files Tab supports all popular file types including PDF, DOC, XLS, PNG, TXT, and ZIP.
Price: Free
#9: Inline Google Spreadsheet Viewer

Inline Google Spreadsheet Viewer is a useful WordPress file viewer plugin that helps you convert data saved in Google Spreadsheets, CSV files, and MySQL databases into a visual-friendly layout. This way, you’ll be able to sort and search through stored data or create great-looking interactive charts and graphs. In addition to this, you’ll be able to embed live previews of document file formats such as PDF, DOC, and XLS using Google Docs Viewer.
Key features:
- It is easy to use and allows you to quickly load large amounts of data from Google Spreadsheets.
- You’ll be able to customize the plugin to suit your particular needs.
- You can easily embed Google Spreadsheets, app scripts, and CSV files in WordPress pages or posts as HTML tables or interactive charts and graphs.
Price: $10
#10: Elfsight File Embed
Elfsight File Embed is a powerful WordPress file viewer plugin that helps you quickly integrate over 20 file formats on your website. Site users will be able to download the documents, view the documents directly from your website, or open them in a new tab.
Key features:
- You can name individual files, upload your own pictures or icons, and select file layout variants to view documents on the website.
- It supports all popular document file formats including PDF, DOCX, JPG, and JPEG.
- You can add files to your site in one of three ways i.e. by directly uploading files, by adding their URLs, or by selecting them from recently uploaded files.
Price: Free
Conclusion
We looked at various PDF and document file viewer plugins for WordPress and covered their standout features. By using the right file viewer plugin for your website, you can easily make documents and PDF files available to your site’s visitors in an easy-to-read and printer-friendly way.
Check out our roundup of the 7 Best Document and File Management Plugins for WordPress in 2020 for even more plugins.
Filr
Easily upload, store and share files in WordPress. Secure, flexible, and user-friendly document libraries for your next project.
-
Version:
5 Best Digital Asset Management Plugins for WordPress
Release-Date:
Digital asset management (DAM) is a system that stores, catalogs, and distributes digital files such as images, video files, and audio files. A successful digital asset management system gives you the flexibility and control to efficiently create, upload, access, edit, and share digital assets with others through a centralized, secure location.
Digital asset management plugins for WordPress work similar to file storage services like Google Drive and Dropbox, however, they offer much more than file uploading and sharing features. WordPress also offers some basic digital asset management features that let you upload digital files from within WordPress which, for most business users, is just not enough.
Fortunately, you can easily upgrade your WordPress digital asset management system using a WordPress plugin that delivers all the digital asset management features you need to efficiently manage your files.
In this post, we’ll run the rule over some of the best WordPress digital asset management plugins that enable you to store, share, and organize your digital assets.
What is digital asset management?
By default, WordPress gives you access to a basic digital asset management system in the WordPress Media Library that you can use to upload files and documents. However, it doesn’t offer any cataloging, accessing, or sharing features that you’d expect to get with a traditional digital asset management system.
For instance, when you upload a digital asset to the WordPress Media Library, you can’t assign taxonomies or label files to ensure easy access in the future. These are all essential DAM features.
As a business owner, you need an excellent WordPress digital asset management plugin that lets you catalog your media files and share them with others in a secure way.
Now that you know why you need a robust DAM system for your WordPress website, let’s go over our handpicked selection of WordPress digital asset management plugins to help you find the one that best fits your needs.
5 Best Digital Asset Management Plugins for WordPress
Here, we’ll run the rule over some of the best digital asset management plugins that can help you improve how you store and manage digital files on your WordPress site and share them with other people.
#1: Filr

Filr is a robust WordPress digital asset management plugin that helps you store, protect, and share files through your website. It comes with powerful asset management and security features out of the box like filename encryption and file expiration based on specified dates or the number of downloads.
Once you’ve uploaded your files, you can display them using simple shortcodes. In addition to this, you’ll be able to block direct access to your files by configuring your custom file directory or adding global protection through the index.php or .htaccess file.
Key features:
- Filr enables you to prevent unauthorized users from accessing your digital assets and secure your digital files so only the right people can view them.
- You’ll be able to create a document library and upload any number of files directly to your WordPress site’s front-end.
- You can group your digital assets including videos, audios, and PDFs based on libraries and easily manage and track them on the back-end.
- Filr lets you distribute files through your WordPress site in two ways: offer individual downloads that allow users to download one file at a time or zip multiple files into a single archive file so users can download all of them in one go.
- You can customize the appearance of your file libraries by changing colors, borders, font sizes, and box-shadows.
- Restrict file access by the user (e-mail) or user role
- manage your files in folders in a modern and UX-friendly way
- provide a live search and pagination solution to display hundreds of files within a library
- password-protect ZIP files for maximum security, encrypt file names, and completely shut down external access to files
- Prevents uploaded files to be visible as an attachment by uploading only to secured folders and blocks Google and other search engines from indexing your files accidentally
Filr – WordPress Document Library Plugin
Easily upload, store and share files in WordPress. Secure, flexible, and user-friendly document libraries for your next project.
#2: File Manager
File Manager is a user-friendly WordPress digital asset management plugin that helps you organize and protect your WordPress files. It lets you add, modify, delete, access, and distribute files and folders directly from your WordPress site’s back-end.
In addition to this, File Manager is a great alternative to FTP and cPanel for transferring your data assets quickly and in a secure way. It also offers a number of integrations with other applications including Google Drive, Github, and Dropbox.
Key features:
- You can easily upload, copy, move, rename, create, edit, and delete files and folders on a remote server.
- File Manager lets you upload files of all sizes as well as create, archive, and extract files in rar, zip, tar, and gzip formats.
- You’ll be able to quickly view all file details and properties by right-clicking on a file and selecting ‘Get Info’.
- Its drag and drop upload interface helps you add one or more files directly from your desktop or Windows Explorer.
- The uploaded files including images, pdfs, and zip files can be viewed in your folders and can also be accessed from the native WordPress Media Library.
#3: Brandfolder

Brandfolder is a digital asset management tool that enables designers and creatives to manage and distribute their files and documents. Its intuitive, cloud-based, single location allows you to store all your digital files and share them with your team members and clients. Brandfolder supports integration with a number of applications including WooCommerce, Shopify, Gmail, HubSpot, Salesforce, Marketo, Canva, and Slack.
Additionally, Brandfolder uses AI to help you monitor how your files are performing by generating insights about file views, downloads, and shares. It also comes with powerful search functions so you’ll be able to quickly locate required assets.
Key features:
- You can easily edit your Brandfolders directly from the WordPress dashboard.
- Brandfolder’s privacy controls and user-level permissions let you secure your digital assets to ensure only authorized people have access to them.
- Its Media Library integration (Brandfolder Browsers) lets you quickly import files from your Brandfolders to be used in pages or posts.
- You’ll be able to embed your Brandfolder on widgets, menu bars, posts, and pages using its ‘Popup Embed’ feature.
- Using Brandfolder, you can track who’s using your digital files, where they’re being used, and what your best-performing digital assets are.
#4: Enhanced Media Library
This WordPress media management plugin is an excellent tool if you want to easily search and categorize your digital files. You’ll be able to quickly search through your library using categories and tags, and add filter-based categories to posts and pages using shortcodes.
Its intuitive and simple-to-use interface allows you to quickly organize your digital assets, add disallowed file types, and automatically update galleries every time new assets are uploaded to the library.
Key features:
- Enhanced Media Library lets you categorize your media files by creating your own taxonomies such as folders, topics, authors, countries, and projects.
- You can easily manage the plugin options like configuring filters to control which images are displayed.
- You’ll be able to reorder media files, edit their titles, filenames, and captions, and bulk select items to edit your Media Library faster.
- It enables you to create dynamic galleries and playlists based on a tag, category, or date. This way, whenever a media file is added or removed from the group, the gallery will be updated dynamically.
- This plugin lets you control which files can be uploaded to the Media Library. You can also filter media files using file type filters.
#5: Canto

Canto is a popular DAM solution that helps organizations centralize, manage, share, and secure their digital media assets. It is a simple yet powerful media management system that lets you quickly search through your image library, assign metadata to batch uploaded photos, and limit permissions on albums and folders. You can also create customizable sorting options to search through your Media Library alphabetically, by date, or file type.
It offers integration with applications such as WordPress, Google Drive, MailChimp, Slack, and Marketo.
Key features:
- It comes with a powerful facial recognition feature which means you no longer have to tag the same people over and over.
- Canto’s ‘Smart Albums’ feature helps you automatically sort your media files by keywords, tags, and file types.
- Canto lets you create three different user roles namely Administrators, Contributors, and Consumers – all with varying functions. This way, you can set permissions for roles as to who can upload, manage, view, edit, and/or remove content on your website.
- Canto lets you securely share your media assets with team members and clients. You can also set expiration dates on emails and share links to protect sensitive files while making them available for sharing and collaboration.
Conclusion
On its own, WordPress lacks native digital asset management features. However, by using the right digital asset management plugins, you’ll be able to access, catalog, and share your digital assets in a secure way.
Also, be sure to check out our roundup of the 7 Best Document and File Management Plugins for WordPress in 2020.
Filr
Easily upload, store and share files in WordPress. Secure, flexible, and user-friendly document libraries for your next project.
-
Version:
How to Create One-Time Download Links in WordPress (The Easy Way)
Release-Date:
If you sell downloadable content on your WordPress site, you already know how important it is to prevent unauthorized people from accessing the downloadable files. To secure your files you need a reliable tool that helps you protect them and gives you complete control over file downloads.
A simple way to do this is by creating one-time download links with an expiration so users won’t be able to download a file more than once using the same download link.
In this post, we’ll take you step-by-step through the process of creating one-time download links in WordPress. But first, let’s take a look at why it is important to implement file protection on your website.
Why you might need to create one-time download links
Unlike regular file download URLs, one-time download links permit users to download a file only once. After that, these unique links will automatically expire or terminate. In other words, the downloadable files will no longer be available.
The one-time download link is perfect to allow individuals to view files or documents once and expire the link once the item has been downloaded. This also lets you restrict users from sharing your download links in a public forum.
Here are some scenarios where you might need to create one-time download links on your WordPress website:
- Selling digital products. You can create one-time download links for selling digital products such as e-books, music, graphics, and templates. Customers will be able to download the digital product once upon purchase after which the link will expire.
- Selling online courses. You can create one-time download links for online course material like videos, PDFs, and templates. Students will be able to download the content once then the link will expire.
- Selling software licenses. You can create one-time download links for software licenses. For example, customers pay for a single license and the link becomes invalid once the item is downloaded.
Next, let’s look at how you can create one-time file download links on your WordPress website.
Filr: the easiest way to create one-time download links
Filr is a simple WordPress file management plugin that helps you upload, protect, and distribute files through your WordPress website in an easy way. It comes with a number of built-in file protection and encryption features such as file expiration based on the number of downloads or based on chosen dates and filename encryption. You can use this tool to display files on your WordPress website pages using shortcodes.

With Filr, you’ll be able to restrict user access to files on your site and make them available only to authorized users. It also lets you create a document library and upload files directly to your site’s front-end. Users can then access the document library and download the files they need whenever they’d like.
In addition to this, you can group files based on libraries which allows you to easily track and organize files on the back-end. Using its Expire by downloads feature, you’ll be able to restrict users from downloading the same file again using the same link.
How to create one-time download links using Filr
Here, we’ll show you step-by-step how to add one-time download links to your WordPress site that lets visitors automatically download any type of file with one click. For this tutorial, you’ll need your WordPress website and the Filr plugin for WordPress.
Step #1: Install and activate the Filr plugin
Filr offers a simple way to upload, secure, and share files in any format in WordPress. It gives you access to file protection and encryption features, enabling you to limit the number of downloads available to users or automatically expire file downloads on a certain date.
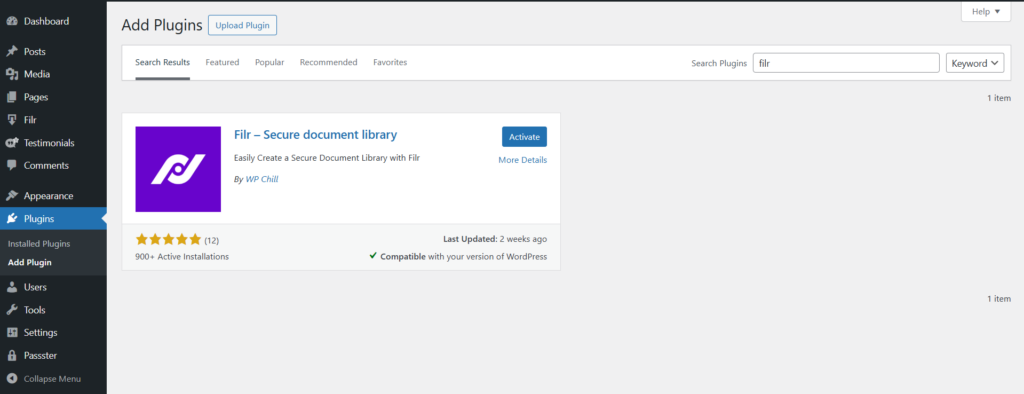
Its free version allows you to upload and display downloadable files on your website’s front-end in a table layout. You’ll need the pro version to make use of file and download management features.
Get the Filr plugin and install it to your WordPress site. Next, activate the plugin. You’ll notice that a new menu item called Files is added to the sidebar menu.
Step #2: Add files to WordPress
Once you’ve installed Filr to your WordPress site, you can start organizing your files and documents. This way, you’ll be able to easily manage your files and keep everything organized on the back-end. It will also help you keep track of the files and documents you share with site visitors.
Navigate to Filr > Libraries from the WordPress dashboard and enter a name and brief description for the new library.

Next, click the Add New Library button to continue. The new library will automatically appear on the right side in the library table along with a shortcode.
Copy the shortcode to your clipboard. We’ll use it later in the tutorial to display the downloadable files on the front-end of your WordPress site in a table layout.
The next step is to upload the files to your WordPress site. Filr offers a simple way to automatically add one or more files to a secure folder on your WordPress site instead of the Media Library. This helps you restrict unauthorized users from accessing your files and documents directly.
Filr offers two different ways to make files available for download:
- Individual files. Users will be able to download only one file at a time when they click the download button. You can use this option if you want to allow users to download a single file or you want to let them choose which files they’d like to download.
- Multiple files. With this method, Filr will automatically create a single .zip file of multiple files and create a direct download link. So, when a user clicks on the file archive, they’ll be able to download all the files in one go. You can use this option if you want users to download multiple files at once.
Head over to Filr > Add New and give a name to your files. Next, upload the file (or files) you’d like to share with your site users using the File Upload metabox.

Select the library you created earlier from the Libraries metabox on the right-hand side of the page.
Step #3: Create a one-time download link
The Advanced Options metabox lets you expire your files based on the number of downloads. Set this value to 1. You can also select the Encrypt Filename option to secure sensitive filenames.
When you’re done, click on the Publish button to proceed.
Next, we’ll look at how to display the downloadable files and documents on the front-end of your site so users can download them.
Navigate to Pages > Add New and enter a name for your page. Copy-paste the shortcode from Step #2 to a new shortcode block in the text editor.

You can customize the front-end file table’s appearance by going to Filr > Settings > Libraries.
Conclusion
Managing and securing digital content is incredibly easy with the Filr plugin. You can use this tool to enable only authorized users or paying customers to download restricted content using one-time download links.
Filr
Easily upload, store and share files in WordPress. Secure, flexible, and user-friendly document libraries for your next project.
-
Version:
2 Ways to Create Direct Access Links in WordPress
Release-Date:
Direct access links in WordPress are URLs that contain a special token. The token acts as a password that grants authorized users access to the post or page it links to. This is especially useful for anyone that needs to grant users access to password-protected content on their website in a user-friendly way.
Direct access links can contain passwords inside the link or have an encrypted password. This is a secure way to grant users access to password-protected content without requiring them to enter it manually.
In this tutorial, we’ll explain how you can create direct access links in WordPress – in two different ways. More specifically, we’ll show you how you can grant users access to restricted (or password-protected) content and how you can share downloadable resources in a secure way.
When you might need to create direct access links
Whether you’re an online business owner, freelancer, or solopreneur, there are many scenarios where you might need to create direct access links.
For example, you might need to provide customers or clients access to restricted content on your website. This could be hidden products in your WooCommerce store, your portfolio, or membership content.
In addition to this, you might need an easy way to make downloadable content and resources available to authorized users. For example, if you’re running a business, you might need to make sales battle cards and templates available to your sales department on the go. The easiest way to do this is by sharing direct access links with them.
Now, you might be wondering why you should create direct access links instead of simply password-protecting your site’s content.
For starters, sharing a direct access link to restricted pages and posts delivers a better user experience. In other words, users don’t have to keep track of the password(s) you share with them or enter them when they land on the page. All they have to do is click the link and they’ll have access to the content.
Aside from this, direct access links are easier to manage on the back-end, as well. Instead of keeping track of multiple passwords and password lists, you can simply create encrypted direct access links to share with users.
How to create direct access links in WordPress using Passster and Filr (2 different ways)
Here, we’ll show you how you can create direct access links in WordPress in two different ways:
- Method #1 explains how you grant users access to restricted content on your website. This can be WordPress pages, posts, or custom post types.
- Method #2 shows you how to create and share downloadable content with users in a secure way using direct access links.
You can learn about both approaches or use the jump links to skip ahead to the method you’d like to implement.
Method #1: Grant access to restricted content
The easiest way to create direct access links and grant users access to restricted (or password-protected) content in WordPress is by using the Passster plugin.

The first thing you need to do is get the Passster plugin and install and activate it on your WordPress site. Once that’s done, go to the page (or post) you’d like to create a direct access link for and open it up in the Edit screen.
You’ll notice Passster settings in the sidebar on the right-hand side of the page.
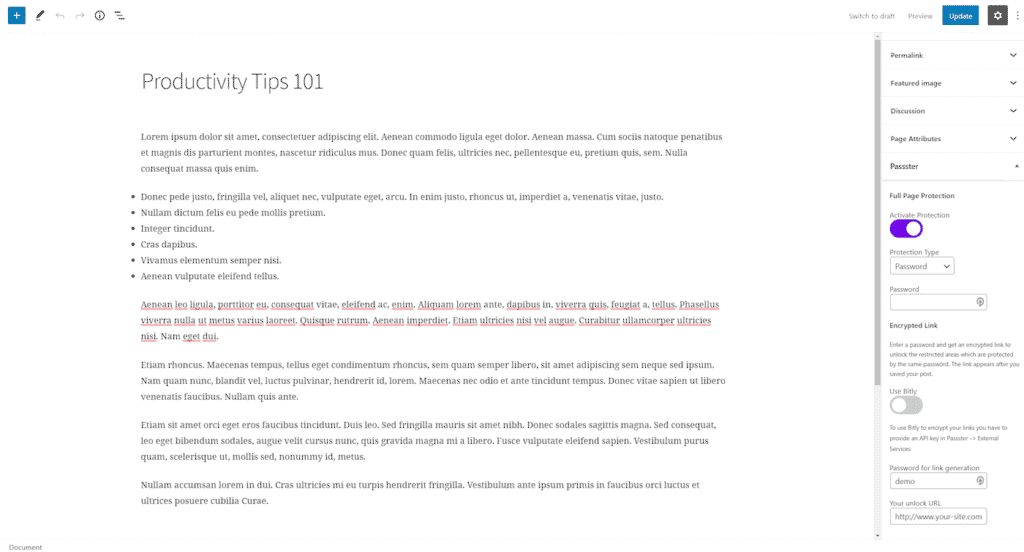
Toggle the Activate Protection button on and set the Protection Type to Password using the dropdown menu. Next, enter a password in the Password for link generation field. This is the password that will be used to create an encrypted direct access link to the page or post you’d like to grant access to.
Optionally, you can toggle the Use Bitly button on to use Bitly to encrypt your links. If you choose to use this option, you’ll need to head over to Passster > External Services and provide your Bitly API key.

The unlock URL (i.e. the direct access link) will automatically be generated for you when you save your post. It might look something like this: http://www.your-site.com/productivity-tips-101/?pass=ZGVtbwjk. Users with the correct direct access link will be able to view the content on the page without having to enter a password first.
Passster
Protect your entire website, entire pages, or just parts of your content with one or more passwords.
Method #2: Share downloadable content
If you’re running a corporate website or a membership site, you might need to share downloadable resources with your site’s visitors. Instead of telling people where to go to download the resources, it’s much easier to create a direct access link and share it with them.
An easy way to do this is by using the Filr plugin.
Get the Filr plugin and install and activate it on your WordPress website. Next, go to Filr > Add New from the admin panel. Give your file a name and use the Libraries metabox on the right-hand side of the screen to create a library to organize your files into.

Once that’s done, upload the file (or files) you’d like to share with users in the File Upload meta box. Click the Publish button to continue.

Next, create a page (or post) where users can download the files from. Enter the shortcode [filr library=”library-name”] in a shortcode block. Remember to replace library-name with the slug of your library’s name.
Click the Publish button to continue. The downloadable file table should look something like this on the front-end:

If you upload multiple files, the Filr plugin will automatically create a .zip archive file for downloading instead of individual files.
Bonus: Create a direct link to downloadable resources
What if you want to create a password-protected document hub of downloadable files and create a direct access link to it to share with users? You can do that using both the Passster and Filr plugin!
Here’s how:
Follow the steps we covered in Method #2 above to create your document hub of downloadable files. Once that’s done, use the Filr shortcode to add it to a page or post.
Same as before, toggle the Activate Protection button on and use the dropdown menu to set the Protection Type to Password. Enter a password in the Password for link generation field and save the page or post.
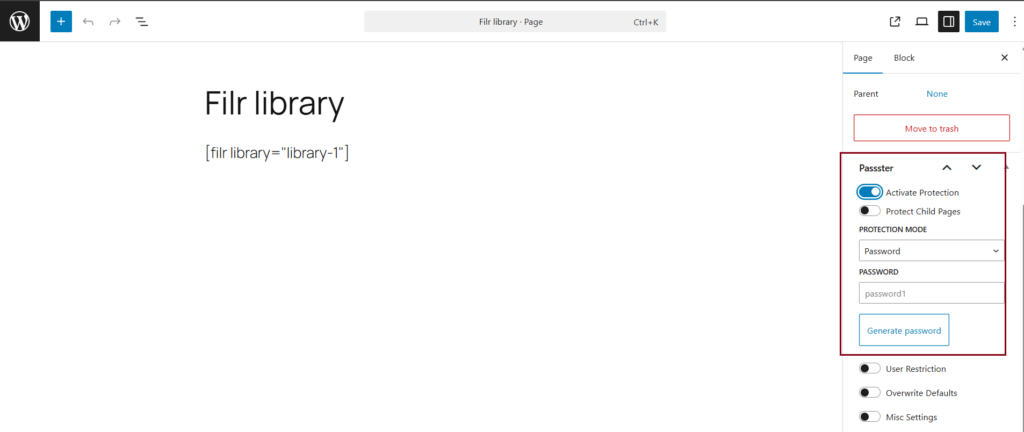
A direct access link will automatically be generated for you. You can share this with users to grant them direct access to downloadable resources on your website.
Wrapping Up
Creating direct access links is a great way to deliver a better user experience to your site’s visitors. This way, they won’t have to save passwords and enter them on the password-protected page or find the correct downloadable material. Instead, they can simply click the link and view the content.
We shared three different ways to create direct access links in WordPress. Hopefully, you’re in a good position now to take the next steps.
If you’re looking to grant users access to restricted content on your website, we recommend using the Passster plugin. And if you want to give users direct access to downloadable resources, go with the Filr plugin. Plus, you can use both plugins in tandem to grant users access to password-protected downloadable resources!
Filr
Easily upload, store and share files in WordPress. Secure, flexible, and user-friendly document libraries for your next project.
-
Version:
7 Best Document and File Management Plugins for WordPress
Release-Date:
With the right document and file management plugin, you can enhance the file organization workflow on your website and enable your site’s users to easily find, access, and download files.
In this article, we’ll take a look at some of the best WordPress document and file management plugins and highlight the standout features on offer with each tool to help you find the right solution for your website
Why You Need a Document and File Management Plugin
Document and file management plugins enable businesses and webmasters to better manage their files through a centralized dashboard and share them with users and team members in a secure way. For example, you can protect files using passwords and only allow authorized people or logged-in users to access them.
Here are some of the things you can do with a document and file management plugin:
- Make documents and files downloadable e.g. if you want to share PDF files with your site users.
- Restrict access to documents and files e.g if you want to sell online courses or if you run a membership site.
- Better manage documents on the WordPress back-end e.g if you have a large library of image or audio files that team members regularly need access to.
- Make it easy for your team to access documents and files e.g. if you want to share an important document with team members.
Here are the key features you should look for when choosing a document and file management plugin for WordPress:
- It should let you showcase documents and files on the front-end. You should also have the option to display individual files or a collection of files in an archive.
- You need document security features e.g. encryption and directory protection.
- It should give you full control over making documents accessible to users.
- Your file management plugin should let you create downloadable files.
Also, be sure to check out our article on the 5 ways to protect PDF documents and files!
Best Document and File Management Plugins for WordPress in 2021
Below, we’ll take a look at some of the best document and file management plugins that can help you improve how you manage files on your website and share them with other people.
#1: Filr

Filr is a powerful WordPress document and file management plugin that lets you easily upload, secure, and distribute files through your WordPress site. It offers several file protection features out of the box such as filename encryption and file expiration based on chosen dates or number of downloads. In addition to this, you’ll be able to display files on your site pages using simple shortcodes.
Key Features:
- It can help you limit user access to documents and files on your website and make them accessible to authorized users only.
- Filr offers a simple way to create a document library and add one (or more) files directly to your website’s front-end.
- You can group files and documents based on libraries. This enables you to quickly track and organize files on the back-end.
- Let you make files accessible to site users in two ways: as individual files allowing users to choose and download one file at a time or zip multiple files into a single archive file and download all of them in one go.
- You can change the appearance of your document libraries by modifying colors, font sizes, borders, and box-shadows.
- Restrict file access by the user (e-mail) or user role
- manage your files in folders in a modern and UX-friendly way
- provide a live search and pagination solution to display hundreds of files within a library
- password-protect ZIP files for maximum security, encrypt file names and completely shut down external access to files
- Prevents uploaded files to be visible as an attachment by uploading only to secured folders and blocks Google and other search engines from indexing your files accidentally
It’s an easy-to-use tool with the most powerful feature set on the market. Don’t rely on unsecure products, when you handle viable data or customer information.
Price: Single version is available for $49.
Filr
Easily upload, store and share files in WordPress. Secure, flexible, and user-friendly document libraries for your next project.
Check out our step-by-step tutorial on how to create a secure document hub in WordPress!
#2: WP Download Manager
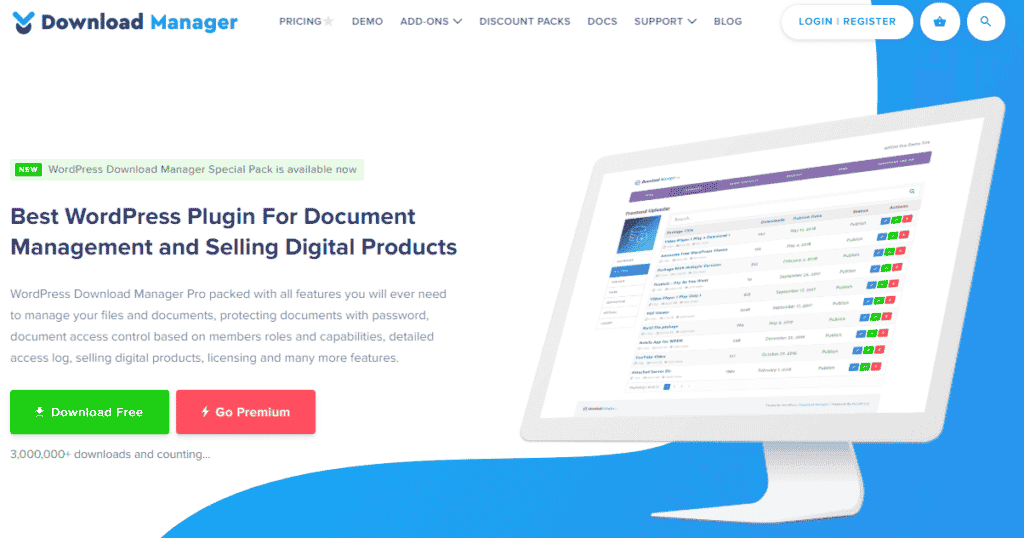
If you’re looking for a multi-purpose plugin for your files, WP Download Manager is just what you need. It can help you organize your documents, protect files with passwords, and sell digital products.
Key Features:
- You can allow site users to download multiple files as a single zip file.
- It lets you control who can access and download your documents and files.
- WP Download Manager enables you to secure a full zipped package or individual files within a package with one (or more) passwords.
- You can limit file download speeds so users don’t abuse server resources.
- It lets you upload files using FTP and quickly import and convert those files to packages at the same time.
It’s a great file and document manager for online entrepreneurs and membership site owners.
Price: Free version is available.
#3: WP File Download
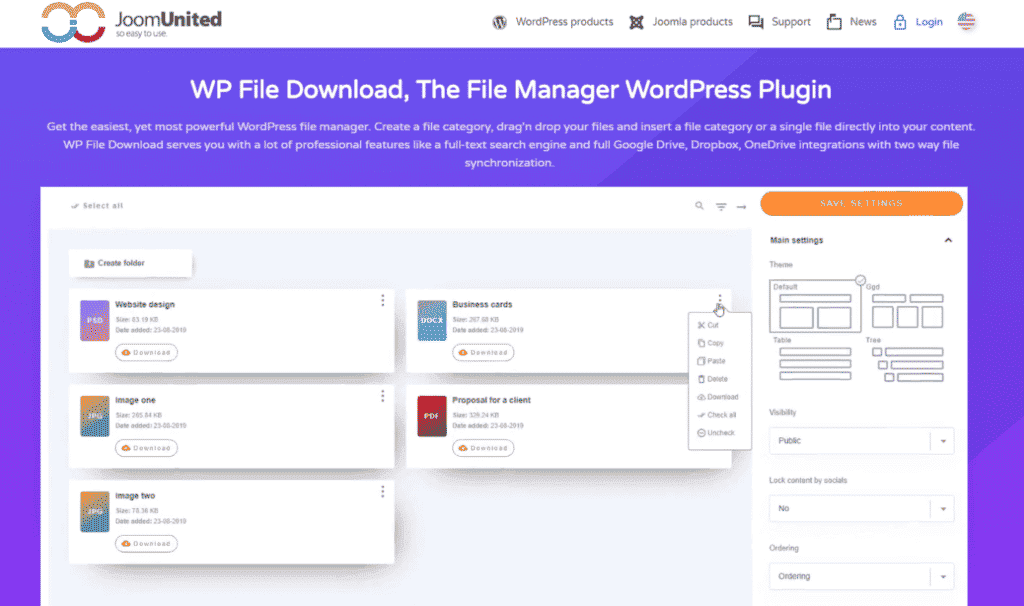
WP File Download is a WordPress file manager plugin that helps you organize and distribute your files and documents through your website. You can connect this tool with your WooCommerce store and start using its selling features including payment systems and sales statistics.
Key Features:
- It comes with four themes that control the way files are shown to users. They include a standard listing, table, accordion tree, and Google Drive view.
- WP File Download offers a user-friendly, drag-and-drop WordPress file manager that lets you easily organize files, file categories, and move and duplicate files.
- It lets you set permissions to allow users to view, update, download, delete, and edit files. Additionally, you can limit user access to a file or file category.
- Its flexible search engine helps you easily find the required files using tools such as text search, category file filtering, and tag filtering.
It’s an ideal tool for WooCommerce store owners and freelancers.
Price: Start version costs $29 for six months.
#4: WP Document Revisions

WP Documents Revisions is a file management plugin that helps you manage and securely share files including images, text, and spreadsheets with other people. As a version control tool, it can help you easily track each document’s progress and keeps you informed about any updates to the document.
Key Features:
- It supports all file types including docs, PDFs, spreadsheets, and images.
- You can securely store all your important files as well as any of their revised versions. Additionally, all files are checked out and locked so revisions don’t collide or get edited.
- It creates a permanent, authenticated URL for each file that always points to the latest version.
- You can toggle between private, public, and password protection for files with a single click.
It’s a great document management tool for small businesses and professional web designers.
Price: Free.
#5: CatFolders
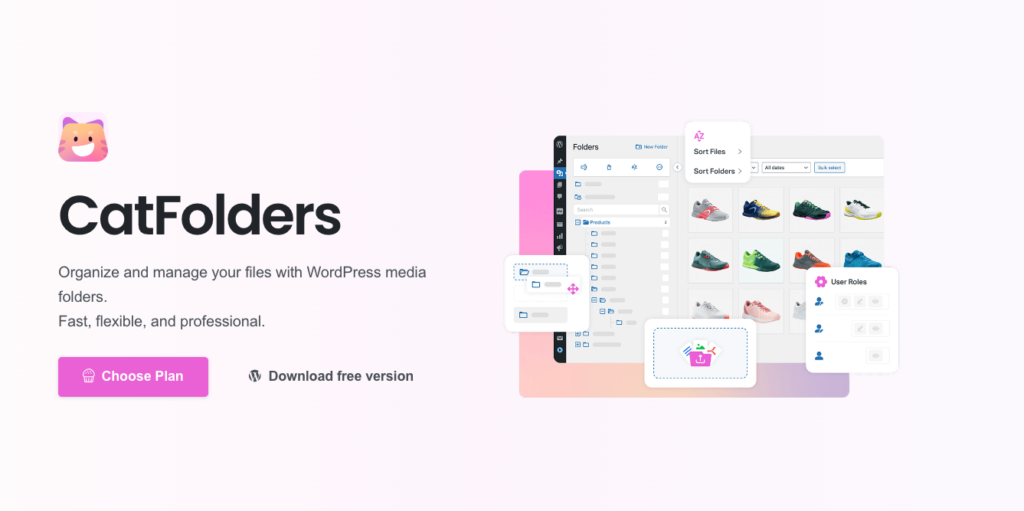
CatFolders is a freemium WordPress plugin, that offers useful features that make a quick, flexible, and professional management file tool for your site.
With CatFolders, it has no folder restrictions, you create tons of folders and subfolders, making it easy to filter and search through your document files. This helps blow away your worry about a slow site, interrupted workflow, and hindering your site’s growth by the mountain of cluttered files.
Additionally, with this plugin, sorting by name, date, or author is a breeze, making it simple for you to manage in a folder tree, locate all of your necessary documents, and bulk-select files or folders as well.
Besides adding an image gallery on your post page, CatFolders also lets you create a document gallery. This enables the display of various document file types on WordPress websites, adding content richness to your WordPress website. With a document gallery, even you can preview files in a popup window and download files if necessary.
Key Features:
- Drag and drop files/folders from your computer to add document files to a chosen folder and see it in list/grid mode.
- Remember your most recent folder or auto back to a specific folder.
- Sort files by file name, created date, modified date, author, newest or oldest, etc.
- Bulk-select files and folders to optimize your document and file management process.
- UX/UI design that makes your management process easier and more logical.
- Folder access permissions allow you to have an admin role to control folder and folder permission on your site.
- Import folders from other plugins with one click.
- You can keep a record of files and folders on your website with the Backup and Restore tool.
- Support multi-languages such as English, Spanish, Italian, French, German, etc.
- Compatible with many third-party and page builders plugins.
Enjoy ultimate productivity with CatFolders and wave goodbye to disorganized document files for your page.
CatFolders free version can create unlimited folders and other simple features. The paid version with advanced features costs $79/year for 1 site and $159 as a one-time payment.#6: Embed Any Document

Embed Any Document enables you to easily upload and embed documents in your WordPress site. This way, you don’t need to install any extra browser plugin such as Acrobat Reader or Flash. You can implement either Microsoft Office Online or Google Docs Viewer to display documents on your website, and if one of them is not working, you can always switch to the other one.
Key Features:
- Simple and user-friendly interface.
- It supports all popular file types including Microsoft Word, Microsoft Excel, Microsoft PowerPoint, Adobe Portable Document Format (PDF), text files, TIFF images, Adobe Illustrator, and Scalable Vector Graphics (SVGs).
- You can quickly upload documents directly to your media library and embed them with a single click.
- The document viewers are cross-browser compatible and are fully mobile-responsive.
- It comes with extensive documentation which includes explanations, video tutorials, and screenshots.
It’s built primarily for graphic designers, creatives, and website owners.
Price: Free.
#7 FileBird
Filebird is a WordPress media and document organizer. It helps you create folders and sub-folders to categorize your files as much as you like.
With folders, file management becomes much easier using a drag and drop interface. Meaning you can move files and folders around without changing their permalinks or breaking the folder structure.
Combined with the document gallery plugin, you can create dynamic document galleries with file-type thumbnails in Gutenberg as well as in the classic editor. Whenever you add new documents or remove files from the gallery folder, the gallery displayed on the front-end will be updated accordingly.
Key Features:
- Widely compatible with all major themes and page builders
- Supports multiple file types and languages
- Independent folder structure for different users
- Import folders/categories from 5+ file manager plugins
Price:
FileBird is free to use and allows you to create unlimited folders and subfolders. Pro version costs $39 as a one-time payment and comes with 6-month support via ticket system, email, and Messenger live chat.
Conclusion
With the right document and file management plugin for your site, you can make it easier to manage a large number of files, securely share them, and quickly access them when needed.
Based on the key features discussed above, we recommend:
- Filr for anyone who’s looking for a way to better manage documents on the back-end, make documents accessible to visitors from the front-end, and avail document and file encryption options.
- WP Download Manager is for anyone looking to sell documents and files and leverage licensing features.
- Embed Any Document for embedding documents on their WordPress site.
Filr
Easily upload, store and share files in WordPress. Secure, flexible, and user-friendly document libraries for your next project.
-
Version:
How to Build a Members-Only Library for Your WordPress Membership Site
Release-Date:
If you’re thinking of starting a membership site or already have one, you might consider building a members-only library for it. This makes it easy to share documents, files, and other downloadable resources with your members in an organized way.
In this post, we’ll take you step-by-step through the process of building a members-only library for your WordPress membership site.
Why you should build a members-only library for your WordPress membership site
A members-only library is a document library (or resource library) that only members have access to. Typically, it contains downloadable resources, PDFs, files, forms, and other members-only content. It may also contain audio lectures and video courses.
So, should you consider building a members-only library for your WordPress membership site? If you have a public-facing website and a membership site set up in WordPress, a members-only library can help you make exclusive content available to site members only.
It’s also an easy way to provide users different levels of access. For example, you might have multiple membership subscription programs e.g. Bronze Plan, Silver Plan, and Gold Plan. A members-only library allows you to share more content with members subscribed to the Silver Plan than those on the Bronze Plan.
You can set it up so that:
- Members on the Bronze Plan get the online course only.
- Members on the Silver Plan get the online course and downloadable resources.
- Members on the Gold Plan get the online course, downloadable resources, and a 30-minute one-on-one session.
How to build a members-only library for your WordPress membership site using Filr and Passster
Here, we’ll show you how to build a members-only library for your WordPress membership site to control access to your website’s content. For this tutorial, you’ll need WordPress, the Filr plugin, and the Passster plugin.
Step #1: Install and activate the Filr plugin
The Filr plugin for WordPress lets you easily restrict user-access to files and documents on your membership site and make them available to authorized users only.
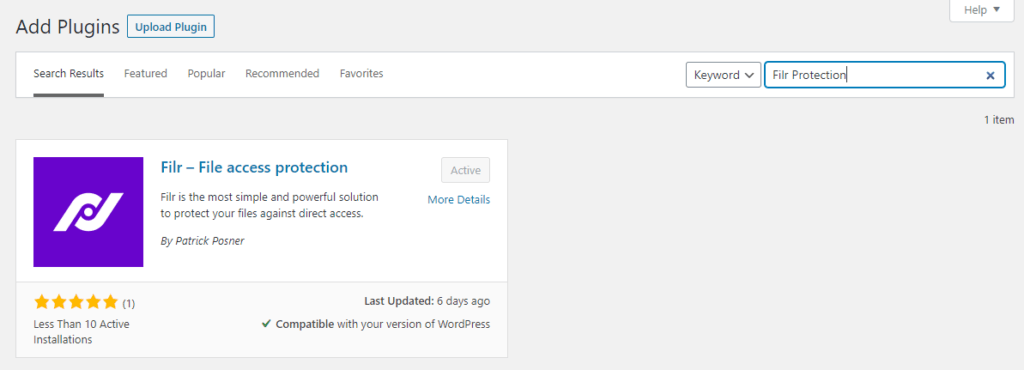
You can use it to securely upload files in any format straight to your membership website in order to build a members-only library. This plugin also gives you different protection options and encryption features, so unauthorized users don’t access the exclusive content.
Get the Filr plugin and install it on your WordPress website. Once that’s done, click the Activate button to proceed.
Step #2: Create a library to organize your files
Create a new library that will be used to organize your files and documents for members. This will help you sort your files and documents while keeping the back-end organized.
From your WordPress dashboard, go to Filr > Libraries. Give a title to your library and enter a brief description. Click the Add New Library button to continue.

A new library will automatically appear on the right-hand side of the page along with a shortcode.

We’ll use this shortcode later in the tutorial to display the members-only library on the front-end of your WordPress website.
Step #3: Upload your files to WordPress
Filr makes it easy to create a document library in WordPress. It lets you:
- Add one or more files straight to a secure folder on your WordPress membership site.
- Group files based on libraries, helping you easily track and manage documents on the back-end.
- Set files to expire on a specific date or after a set number of downloads.
- Use filename encryption to prevent direct access to files and documents.
In addition to this, you can offer files to your site members using one of two methods:
- Individual files. This option downloads only one file when a user clicks the download button. Use this method if you want members to download a single file or if you want to let them pick and choose which files they’d like to download.
- Multiple files. This allows users to quickly download multiple files from your site at once. Filr automatically creates a single .zip file and generates a direct download link. You should use this option if you want your site members to save multiple files in one go.
Next, we’ll look at how to upload the files and documents to your WordPress membership site.
Navigate to Filr> Add New and enter a title for your files. In the File Upload metabox, upload the files you wish to share with your site’s members.

The Libraries metabox on the right-hand side of the page lets you select the library you created in Step #2.
You can set documents to expire based on a specific date or the number of downloads using the Advanced Options metabox. Similarly, you can activate filename encryption by turning on the Encrypt Filename option. Click the Publish button to continue.
Filr – WordPress Document Library Plugin
Easily upload, store and share files in WordPress. Secure, flexible, and user-friendly document libraries for your next project.
Step #4: Install and activate the Passster plugin
Passster is a simple file security plugin that allows you to prevent access to your WordPress content. Here, we’ll explain how you can use it to easily secure a members-only library on your WordPress membership site.
From the WordPress dashboard, go to Plugins > Add New and search for Passster. Install Passster – Password Protection plugin to your WordPress site and activate it.

This plugin comes with a free version which only lets you secure content using a single password. Its premium version lets you create multiple passwords to secure content and offers an unlock via link option and user restriction option which you can use to give site members direct access to protected files.
Step #5: Choose the correct type of password protection
After activating the plugin, go to the WordPress dashboard, navigate to “Pages” > “All Pages,” select the page where you added the Filr library shortcode.
In the settings sidebar on the right (if you don’t see this, click the cog icon at the top right of your screen), scroll down until you get to the Passster section.
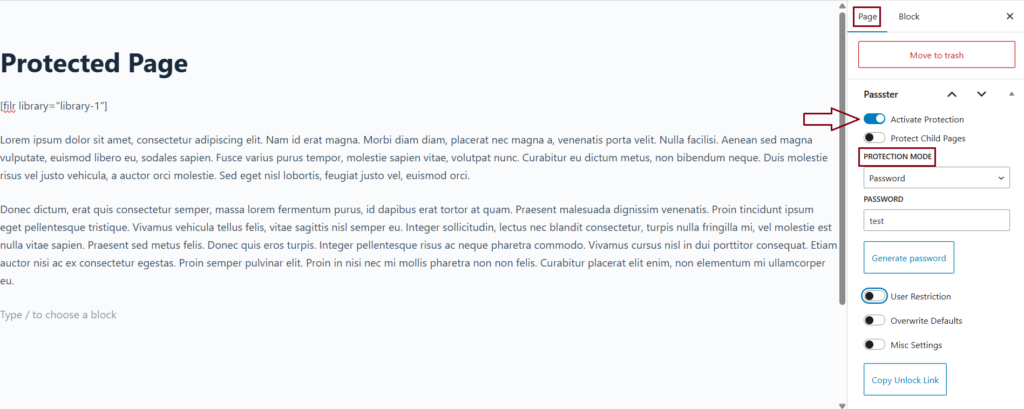
Now, under Protection Mode, choose how you’d like to protect the content. For member-only access, skip the reCAPTCHA and Turnstile options. Instead, use User Restriction. This lets you limit access to specific logged-in users by their username or user role (like “subscriber” or “member”).
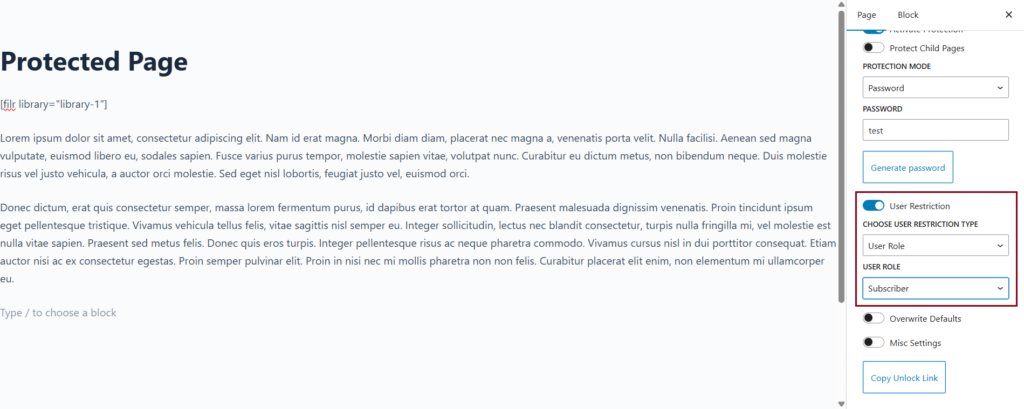
Once you’ve selected the appropriate restriction type, enter the usernames or roles allowed to access the content. You can also use a password or list of passwords if you’re managing access manually, but user-based restriction is the best choice for members-only content.
When you’re done setting everything up, click Update at the top of the page.
That’s it—your content is now restricted to members only using Passster.
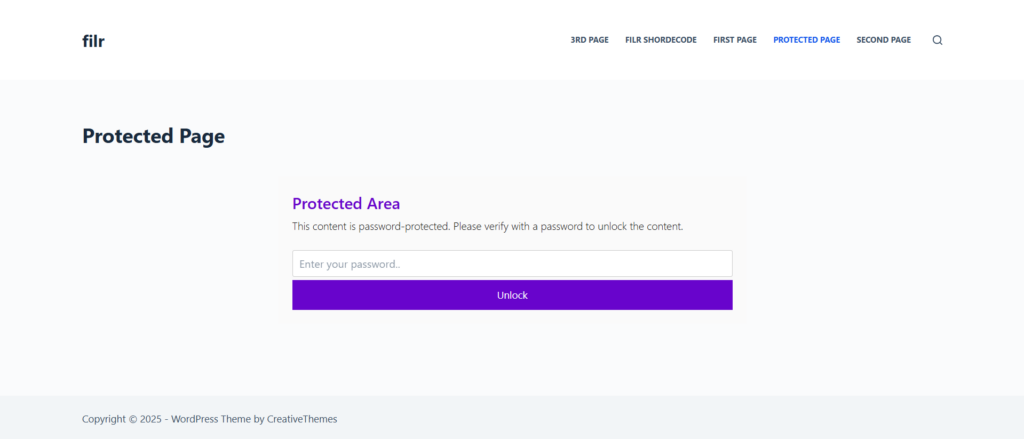
ConclusionManaging and protecting members-only content is incredibly easy with Filr and Passster. You can use these plugins to build a members-only library for your WordPress membership site and offer exclusive content – including downloadable resources – through it.
Passster
Protect your entire website, entire pages, or just parts of your content with one or more passwords.
-
Version:
5 Ways to Protect PDF Documents and Files in WordPress
Release-Date:
Protecting PDF documents on your WordPress site is crucial, especially if you’re sharing premium content, confidential files, or exclusive resources.
Without proper security measures, unauthorized users can easily access, download, and distribute your files. This can put your content as well as your business at risk.
Luckily, the WordPress ecosystem offers different forms of plugins to safeguard your PDFs. In this post, we’ll explore 4 effective methods to keep your PDFs safe and ensure that only the right people can view or download them.
Let’s begin by understanding the importance of protecting your PDF files.
Why Protect Your PDF Files
PDF files often contain valuable content—whether it’s premium resources, confidential documents, client reports, or digital products. If left unprotected, they can be easily accessed, shared, or even stolen, putting your business and intellectual property at risk.
Here’s why securing your PDFs is essential:
- Prevent unauthorized access – Without protection, anyone with a direct link can download your files, even if they weren’t meant for public access. This can lead to sensitive information being shared or misused.
- Protect your revenue – If you sell digital products or offer exclusive content, unprotected PDFs can be copied and distributed for free. This not only reduces sales but also devalues your content.
- Safeguard sensitive information – Business documents, contracts, and client data can fall into the wrong hands if not properly secured. This can lead to legal risks, data breaches, and a loss of trust.
- Avoid SEO and content duplication issues – Search engines can index your PDFs, making them publicly accessible and vulnerable to content theft. Competitors or unauthorized users could republish your content, harming your SEO rankings and credibility.
Let’s now move on to understand how to protect your PDF files and documents in WordPress.
How to Protect Your PDF Files in WordPress
If you want to protect your PDF files in WordPress, you can do that in a few different ways like –
- Auto-expire PDF files on a specific date
- Auto-expire PDFs based on the number of downloads
- Password protect PDFs with a password
- Protect PDFs with reCaptcha
- Unlock via link
We’ll look at each of these in detail in the following section. Since WordPress does not offer any default option to do the above, we’ll have to use a plugin to get our job done.
We’ll talk about the plugin as and when we describe the processes. So let’s begin.
Method 1: Auto-expire PDFs on a Specific date
In this section, we’ll look at how to protect your PDF files and auto-expire them in WordPress on a specific date. To implement this we’ll be using the Filr plugin.
Filr is an amazing WordPress plugin that lets you safeguard your PDFs with just a few clicks. With this plugin, protecting your PDFs can not just be easy but super quick too.
Filr is available in two version – Lite and Pro. To use this feature of the plugin, we’ll have to use the Pro version of Filr. To get started you can purchasing Filr and then install and activate it in your WordPress dashboard.
Step 1: Create a Document Library
Once you’ve installed and activated Filr, you can start creating your document library. For that, go to Filr > Libraries. On the right side of your screen, you’ll see various fields under the Add New Library option. Here you can fill in the details as labeled.
You just have to fill in your library name, and add the slug. The slug is the same as your library name but in lowercase and with a hyphen in between the names.

Once done, click on the Add New Library button at the bottom. Now on the right side, you’ll see the newly created library along with the shortcode next to it.

We’ll use this shortcode later to display your document library on your website. Now you’ll have to add your files to this library.
Step 2: Add Your PDF Files Using Filr
Now, you’ll have to add your PDF files to your WordPress website. For that, on your WordPress dashboard, click on Filr > Add New File.
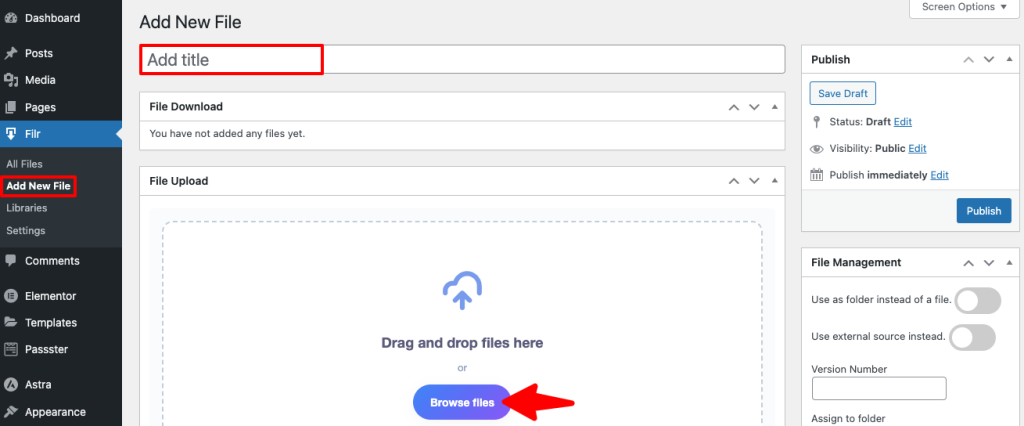
Now add a title to your new file. Then using the Browse Files button, start adding your PDF files one by one.
Step 3: Adding Expiry Date to Your PDF Files
Once you’re done adding your files, go to the Advanced Options section on the right side of your screen. Here you’ll have an option to add the date on which you want the file to expire. You can add your date here.
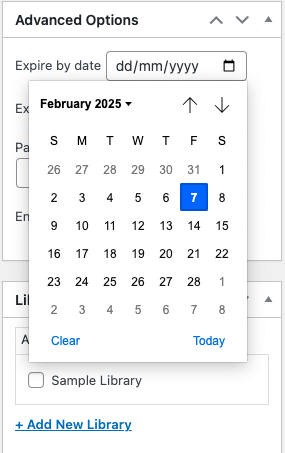
Then add the Password for ZIP and turn on the Encrypt Filename bar.
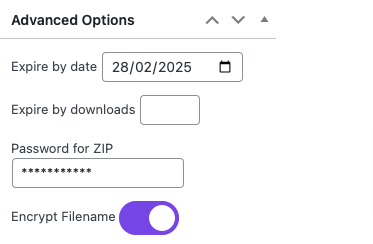
Once you’re done, scroll down to Libraries. Here select the library that you’ve just created in step 1 which is Sample Library in this case.
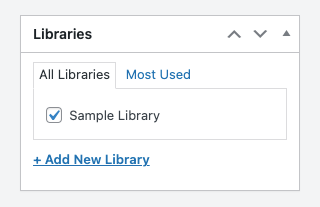
Now hit the Publish button on the top right corner of your screen.
Step 4: Publishing Your Auto-Expiring PDF Files
Now you’re ready to publish your auto-expiring PDF files. If you know which page or post you want to add this PDF, go to that page on your dashboard. You can also create a whole new page if you want.
In this tutorial, we’ll add it to an existing page. So go to All Page. Select the page where you want the PDF to show and click on the Edit button.
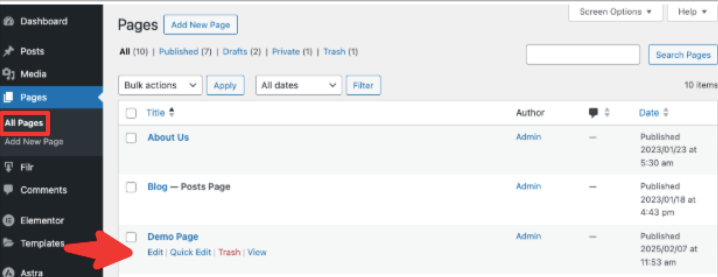
In this page, copy the shortcode of the document library that you created in step 2.
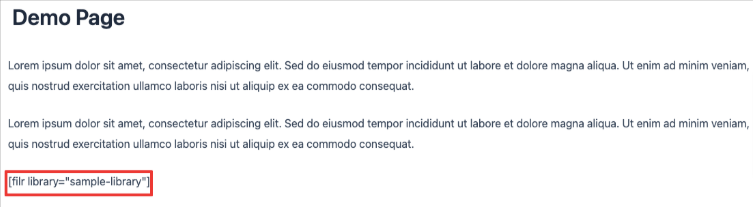
And that’s it. Your password-protected PDF will now appear on your website. This is how it will appear if you want to expire the file by date.
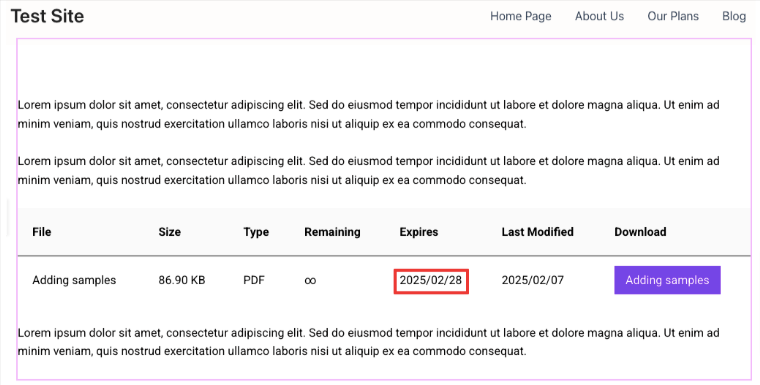
Method 2: Protect PDF Files to Auto-expire Based on Number of Downloads
To protect your PDF files and auto-expire them based on the number of downloads, you’ll need the same Filr plugin.
So you can follow Step 1 and Step 2 from Method 1.
Step 3: Adding Expiry Based on Number of Downloads
Once you’ve followed steps 1 and step 2 from Method 1, we’ll move on to adding expiry to your PDFs based on the number of downloads.
For that, under Advanced Options, instead of selecting Expiry by date, add the number of downloads after which you want to expire your PDF. Let’s add it as 99.
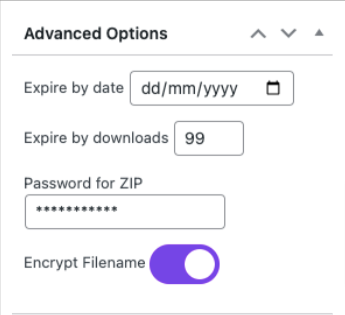
Everything else remains the same. Now hit the Publish button on the top right corner of your screen.
Here’s how it will look if you want it to expire based on the number of downloads.
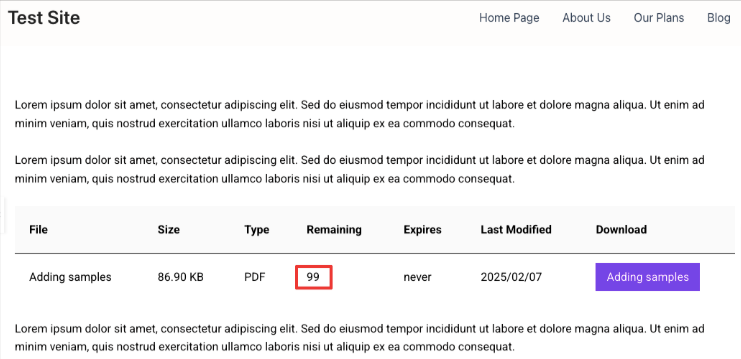
Method 3: Protect PDFs with a Password
For this method, we’ll be using a different plugin called the Passster plugin. Passster is a robust WordPress plugin that lets you protect your WordPress PDF files and documents in a number of ways. Password protecting your PDF files is one of them.
To password-protect your PDFs with Passster, you first need to install and activate it on your WordPress dashboard. Let’s check out what to do next.
Step 1: Creating Protected Areas in WordPress
Once the plugin is activated on your website, you’ll have to add a protected area to your WordPress website. In WordPress, protected areas refer to parts of your website or content that are restricted from public access.
When creating the protected areas, we’ll first upload the PDF file to your WordPress website. For that, on your WordPress dashboard, go to Passster > Protected Areas > Add New Protected Area.
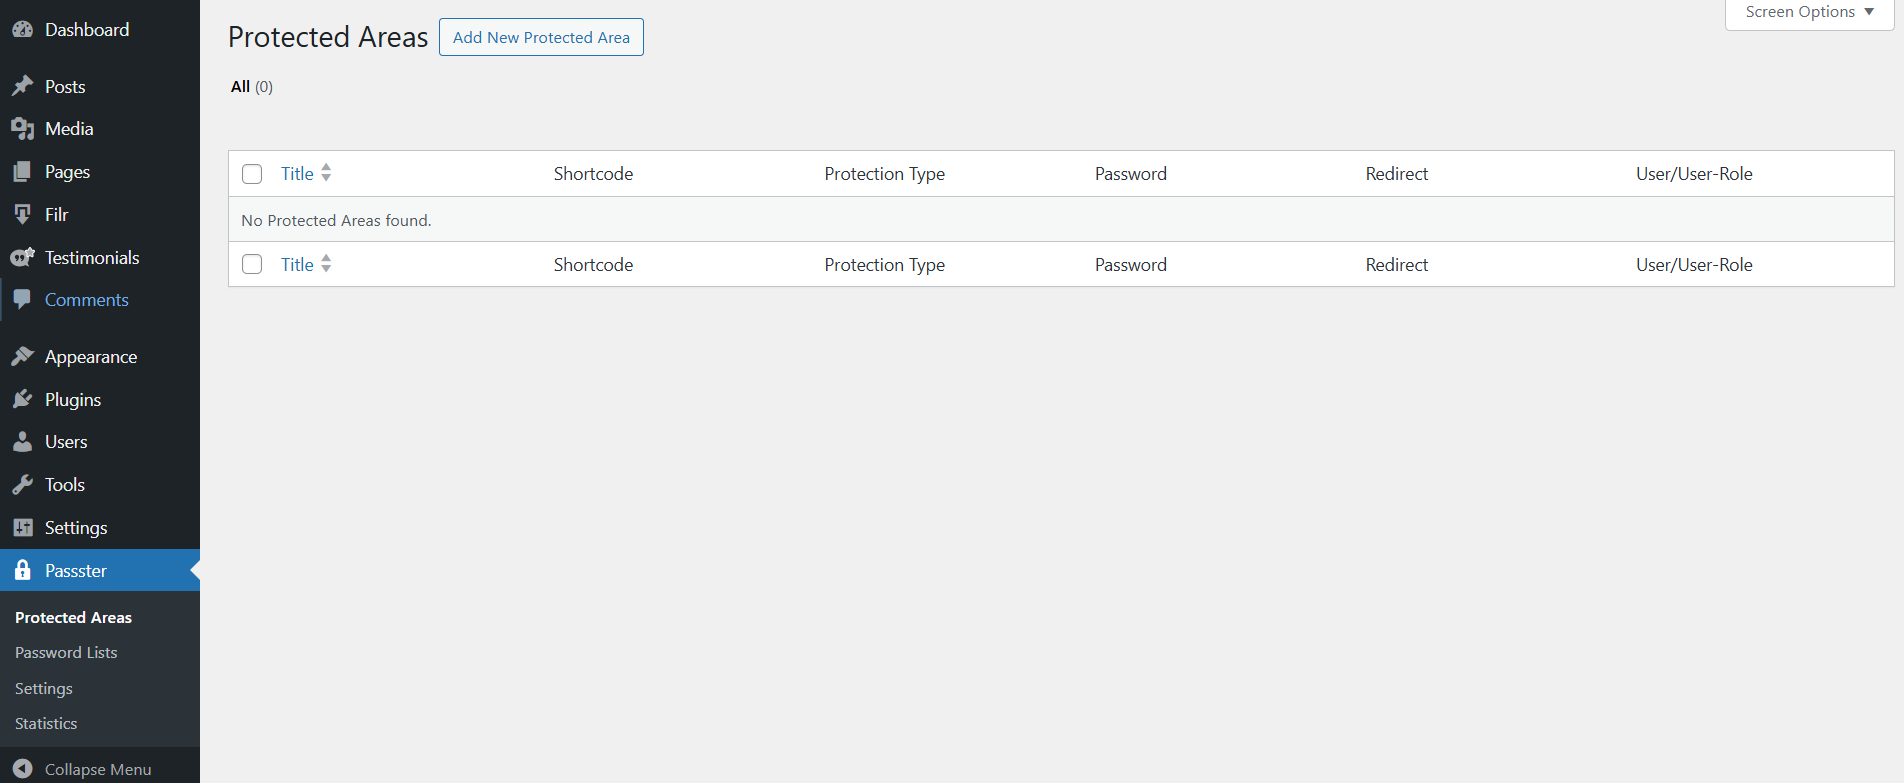
This will open a new page. On this page, add a title for your Protected Area.
Next, in the content section of this page, click on the ‘+’ sign of the Gutenberg editor. Then using the search box, search for File.
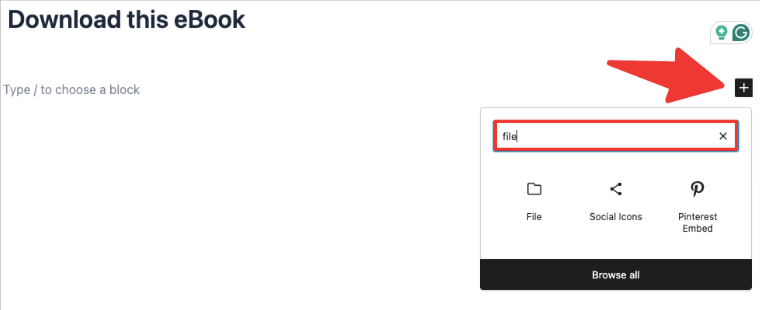
Now select the File option and use the Upload button to upload the PDF file that you want to add to your website.
Now on the right side of the screen, under Protected Areas, you’ll see an option called Protection Mode. Under this, click on the drop-down arrow and select Password. Then click on the Generate Password option below it.
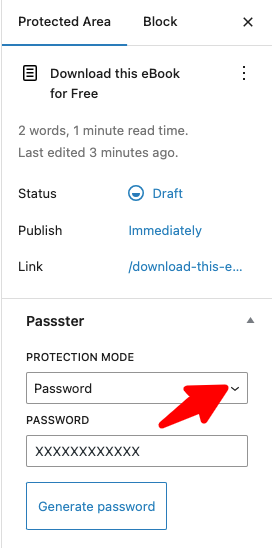
Next, activate the Overwrite Defaults option by clicking on the toggle bar. This is not mandatory. But turning this option on allows you to customize the texts of your password-protected form. Under this, you can change the headline, add instructions for your user, label your button, etc. Go ahead and add all of this information as per your requirements.
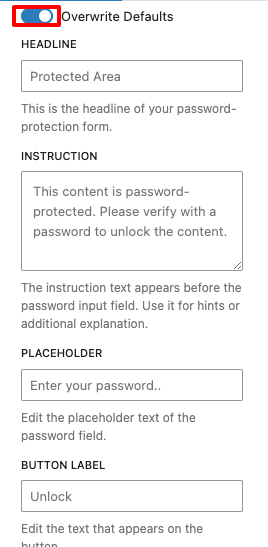
Now, if you scroll further down you’ll see a Copy Shortcode button. Click on this button and copy it.
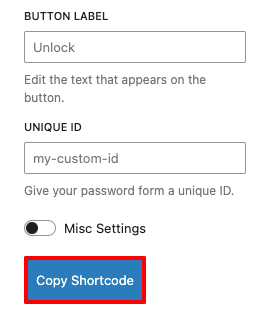
Once you copy it, hit Save > Publish on the top right corner of your screen.
Step 2: Publish your Password-Protected PDF on your Website
Now, it’s time to publish your password-protected PDF on your website. You can either publish this PDF on an already published page or create a new one.
All you have to do is add the shortcode that you copied in the above step to the page where you want it to appear. So let’s go to Pages > Add New.
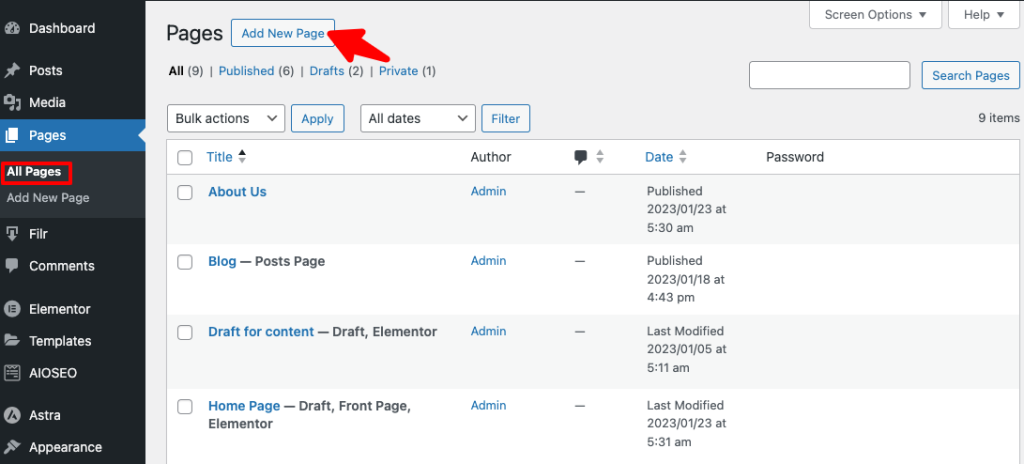
Once the page opens, add the title and content like you normally do to a WordPress page. On this page, add the shortcode that you’ve just copied.
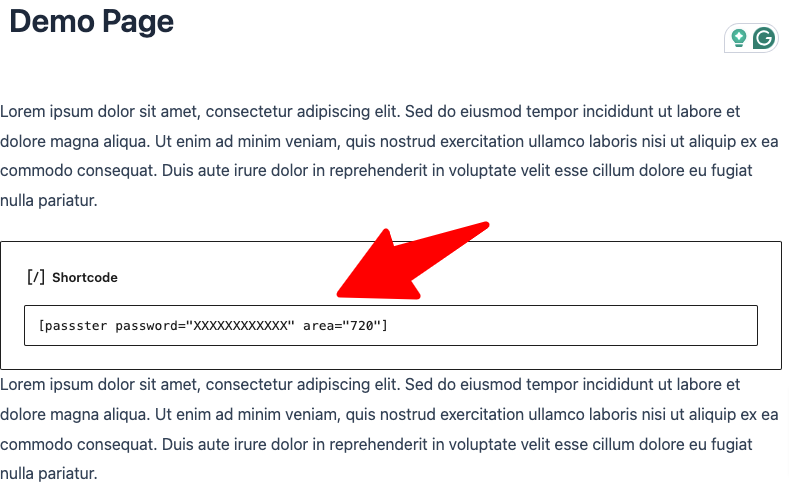
And that’s it. Your password protected PDF will start showing on your website. Anyone with a password only will now be able to access it.
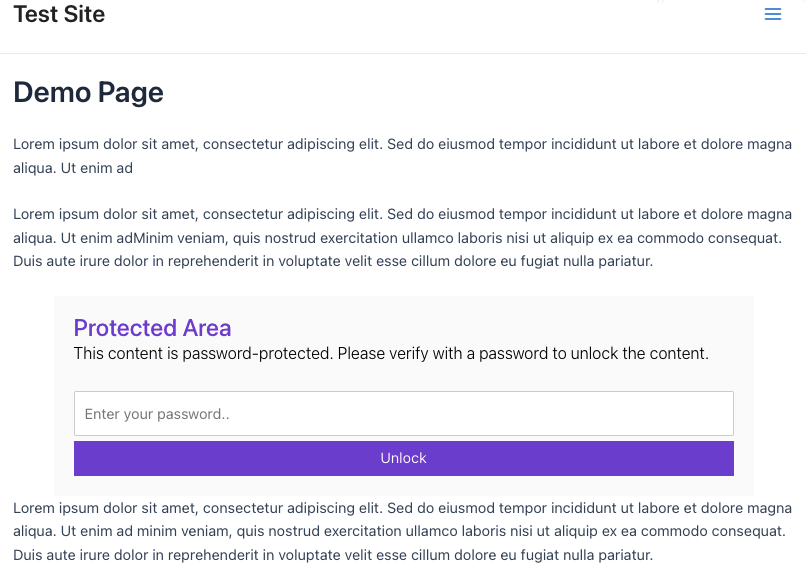
Method 4: Protect PDFs with reCaptcha
Another method to protect your PDF files is to add a reCaptcha to unlock it. Doing that is extremely simple. You can use the same Passster plugin for this method too.
You can follow the exact same steps as you did in the above method. The only difference here would be in Step 1.
After uploading your PDF file, under the Protection Mode you’ll have to select reCaptcha instead of Password.
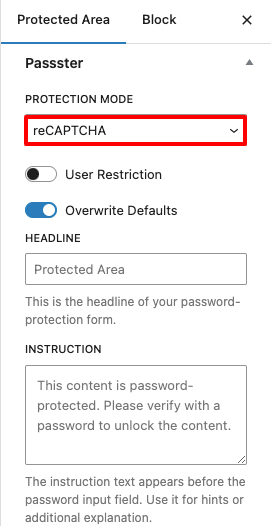
Everything else will remain the same as in Method 3.
Method 5: Unlock via Link
Another way to protect your PDF files in WordPress is to let your users unlock it via a link. You can use Passster’s Unlock via link feature to grant users direct access to restricted content using an encrypted link.
Passster will automatically generate a link for you using which you can direct people straight to a post or page on your website. Let’s see how to use this feature.
Step 1: Create a New Page
The first step is to create a new page. You can also use this step on an existing page. To create a new page, go to Pages > Add New Page.
Now add a name and your content to this page. Then on the right side of your screen select Page. Under this, click on Activate Protection. Next, select Password under Password Mode and click on the Generate Password button. Once you do that, go to the Copy Unlock Link button.
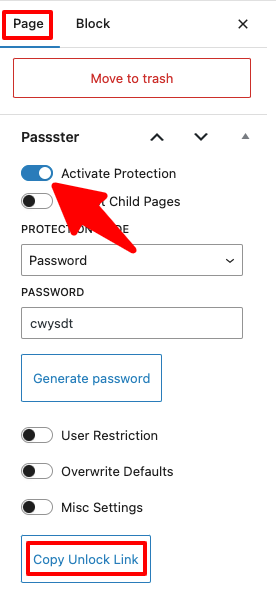
You can click on this button to copy the link and share it with your users.
Conclusion
Protecting your PDF files is extremely essential if you want to control its access and protect them from being misused. With plugins like Passster and Filr, you can easily add password protection to your files and documents and safeguard them by restricting unauthorized downloads.
Whether you’re safeguarding premium resources or private documents, these tools offer reliable solutions to keep your files safe.
-
Version:
How to Manage and Control File Downloads in WordPress
Release-Date:
If you’re making documents available for downloading through your WordPress website, you’ll need a way to manage and control file downloads. This is particularly useful if you want only a certain number of people to have access to the downloadables or grant access for a limited time only.
With this in mind, in this article, we’ll take a closer look at why you might need to manage and control file downloads in WordPress. We’ll also walk you through a step-by-step tutorial explaining how you can manage and control file downloads using the Filr plugin.
Controlling file downloads in WordPress
Controlling file downloads simply means granting users permission to download files and documents from your site. There are two main ways to control file downloads:
- You want to make a certain number of document downloads available to users.
- You want to have document downloads automatically expire by a certain date.
Let’s say you’re running an online membership site or training program for which you enroll a maximum of 200 members. You can make documents and resources available to your site’s members while making sure unauthorized users don’t gain access to them. One way to do this is by offering only 200 file downloads. In other words, the documents and resources will not be available for download after the first 200 people download them.
This is also great for online businesses that need to create limited-time offers. For example, you can make coupon codes available to the first 100 users. After 100 people download the coupon, it’ll automatically expire and won’t be available for download.
Another way to control file downloads in WordPress is by setting files to expire by a certain date. For example, if you’re organizing an event, you might want to close registrations by a specific date, say, two weeks before the day of the event. In this case, you can have your event registration form automatically expire two weeks before the day of the event. Similarly, if you’re running a membership site, you can set documents to automatically expire after the membership period.
Filr – WordPress Document Library Plugin
Easily upload, store and share files in WordPress. Secure, flexible, and user-friendly document libraries for your next project.
How to manage and control file downloads in WordPress using Filr
The easiest way to manage and control file downloads in WordPress is by using a plugin like Filr. Here’s what you need to do to get started:
Step #1: Install and activate the Filr plugin
Filr lets you upload, protect, and share files in a safe and secure way. You can use it to make a certain number of document downloads available to users or have document downloads automatically expire by a certain date.
The free version of the plugin lets you display downloadable documents on your site’s front-end in a table. However, for managing and controlling file downloads, you’ll need to get the pro version.
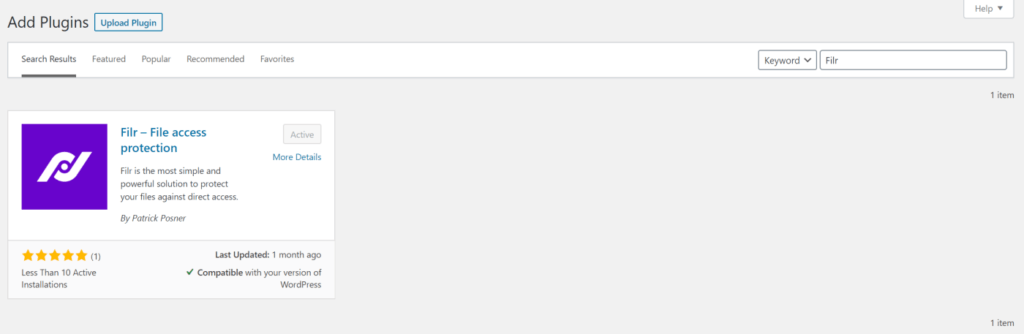
So, to get started, get the Filr plugin and install and activate it on your WordPress website. Once the plugin is activated, you’ll see a new menu item added to the sidebar menu called Filr.
Step #2: Create a library to organize your files
With Filr installed on your WordPress site, the first thing you need to do is create a library to organize your files. This helps you keep things organized on your site’s back-end and makes it easy to stay on top of the files you make available for download.
Go to Filr > Libraries from the WordPress admin panel. On the Libraries screen, enter a name and description for the new library.

Click the Add New Library button to proceed. The new library will automatically be added to the library table on the right. You’ll notice that a new shortcode is generated for it.
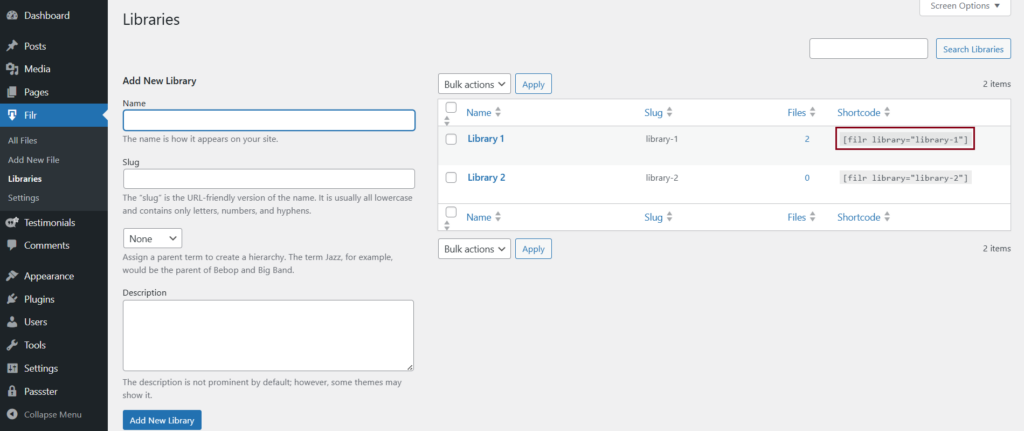
We’ll use this to display the files on the front-end. For now, copy it to your clipboard.
Step #3: Upload your files to WordPress
Now, we can start uploading files to our website. Filr automatically stores all files you upload to your site in a secure folder instead of the Media Library. This ensures that unauthorized users can’t access the files directly.
With Filr, there are two ways to make files available for download:
- Individual files. This means that a single file is downloaded when the user clicks the download file button. This is useful for when you need to let users download a single document or let users choose which documents they’d like to download.
- Multiple files. If you upload multiple files to a single new file in Filr, the plugin will automatically create a zip file and generate a matching download link. When a user downloads the file archive, all of the files in the archive will be downloaded in one go. This is useful for when you need users to download multiple related files.
Go to Filr > Add New and enter a title for the files. Use the File Upload metabox to upload the file (or files) to your website. Select the Library you created in Step #2 from the Libraries metabox in the sidebar.

Use the Advanced Options metabox to either expire the file(s) by date or by the number of downloads. In addition to this, you can also choose to encrypt the filename by toggling the Encrypt Filename setting on.
Click the Publish button to continue.
Step #4: Protect your files (optional)
Depending on the types of files you’re making available for download, you might want to take steps to protect them from unauthorized users. Filr offers three different document protection settings:
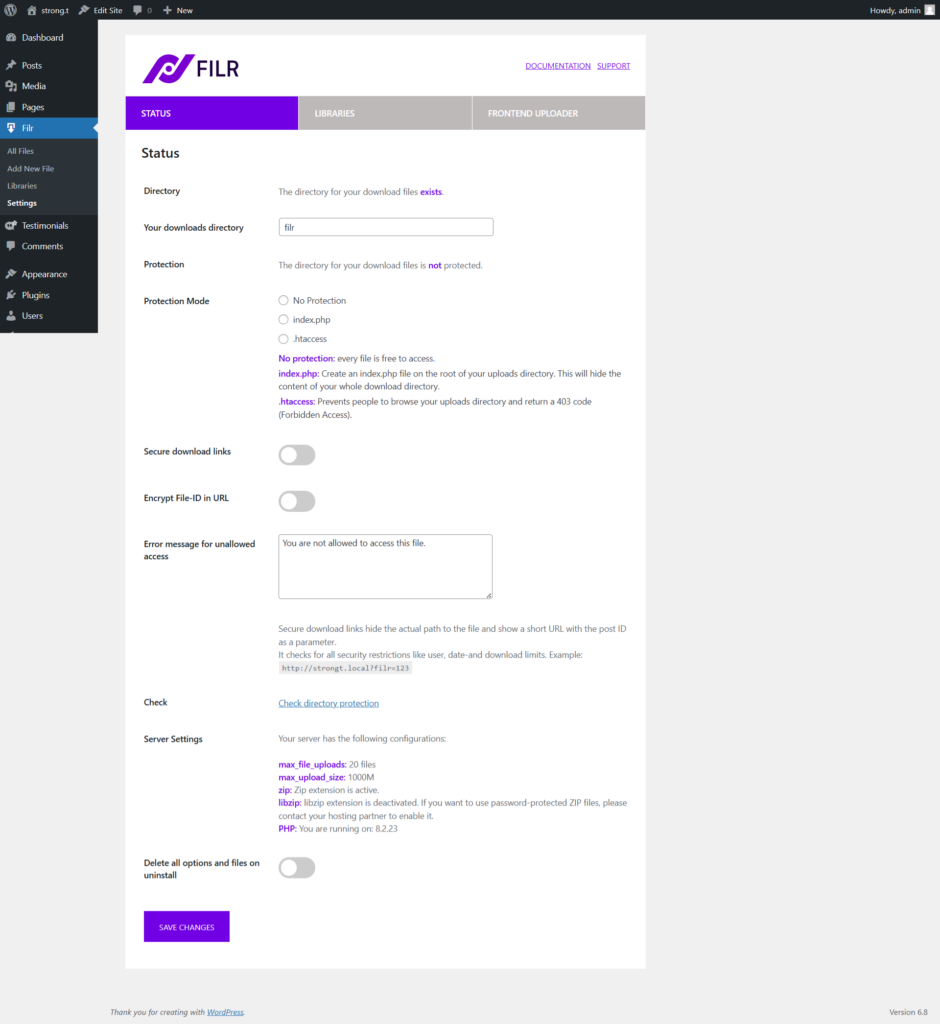
- No protection. This is the default protection type and is perfect for website owners that want to make documents free to access.
- index.php. When you enable this protection type, Filr creates an index.php file on the root of your uploads directory. This will hide the content of your whole download directory.
- .htaccess. When you enable this protection type, Filr prevents people from browsing your uploads directory and returns a 403 code (Forbidden Access).
To configure Filr protection settings, head over to Filr > Settings and click on the Status tab.
Tick the radio button next to the protection mode you’d like to apply to your files. You can also click the Check directory protection link to check the status.
Click the Save Changes button to proceed.
Step #5: Let users download the files
The final step is to display the downloadable files on the front-end so users can download them.

Go to Pages > Add New and give your page a title. Next, add a new shortcode block to the text editor and paste the shortcode you copied to your clipboard in Step #2. Click the Publish… button and preview the page on your site’s front-end.

To customize the look and feel of the front-end file table, head over to Filr > Settings > Libraries.
Wrapping up
Managing and controlling file downloads using a plugin like Filr takes a lot of the manual work off your plate.
You can either upload files individually or in groups depending on your specific needs. In addition to this, you can control file downloads either by making a certain number of document downloads available to users or having document downloads automatically expire by a certain date.
Filr
Easily upload, store and share files in WordPress. Secure, flexible, and user-friendly document libraries for your next project.
-
Version:
How to Password Protect Downloads in WordPress
Release-Date:
One of the main issues you might face by offering downloadable content through your WordPress website is managing user access to files. You need a simple tool that lets you password protect downloads and documents so you can easily restrict access to certain users.
Having the option to password protect downloads means that you can share resources with users in a secure way and it also gives you better control over file downloads.
In this post, we’ll take you through a step-by-step tutorial to help you password protect your downloads. But before we jump into the tutorial, let’s quickly take a look at some of the different types of password-protection methods you can use to restrict access to files and documents in WordPress.
Password protect downloads, files and documents
Adding password protection to WordPress means that your site’s users will be able to access the files and documents by entering the correct password. Two of the most popular password protection methods in WordPress are simple password protection and multiple password protection.
Simple password protection is when you restrict user access to your files and documents by creating a single password for all users. It’s the simplest method for restricting access to files in WordPress.
You should use simple password protection if you’re looking for an easy way to restrict access to content and/or you only have a few users you’d like to grant access to.
For instance, if you’re a graphic artist or a freelancer, you may need to grant certain clients access to your digital portfolio to give them an idea of your past work. You can also use simple password protection to protect your files if you’d like to give users access to member’s only content on your membership site.
Multiple password protection, or protecting content with multiple passwords, is great for when you want to give different types of users access to downloadable content.
This method of protection gives a different password to each user (or types of users) while making it easy for you to manage and revoke access to site content from the back-end.
This is particularly useful when you want to grant access to a large, segmented list of contacts or if you want to make downloadable documents available to different types of customers.
There are other ways to restrict access to content in WordPress including CAPTCHA, Google ReCAPTCHA, user role protection, and unlock via link. For more information, be sure to check out our post on the 6 Different Ways to Restrict Content in WordPress.
Passster
Protect your entire website, entire pages, or just parts of your content with one or more passwords.
How to password protect downloads, files, and documents in WordPress
Here, we’ll show you how to password protect downloads, files, and documents. For this tutorial, you’ll need your WordPress website and some downloadable files. You’ll also need to get the Filr plugin and the Passster plugin.
Step #1: Create a new library for password-protected downloadable files using Filr
Start by creating a new library for your downloadable files and documents. This will enable you to keep all of the downloadable files organized in the back-end.
For instance, if you want to add more resources to a file, update it, or revoke access to it entirely, you’ll know exactly which library it’s located in.
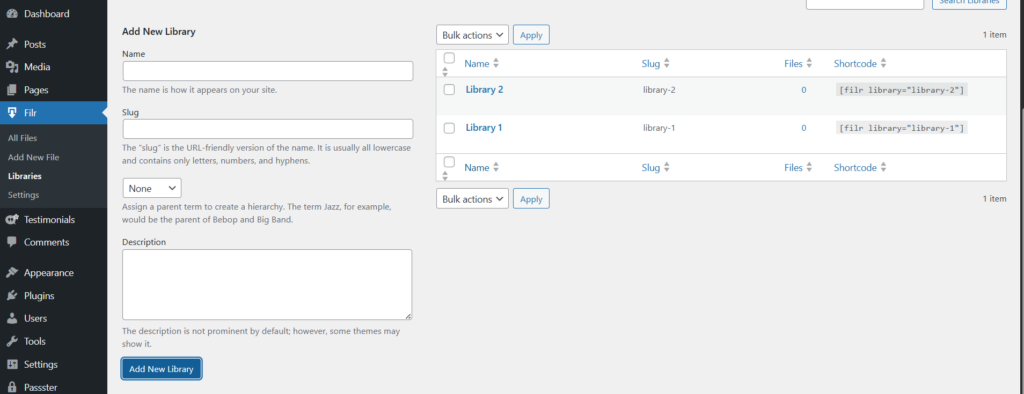
Go to Filr > Libraries from the WordPress dashboard, give your library a name, and provide a brief description. After that’s done, click the Add New Library button to continue.
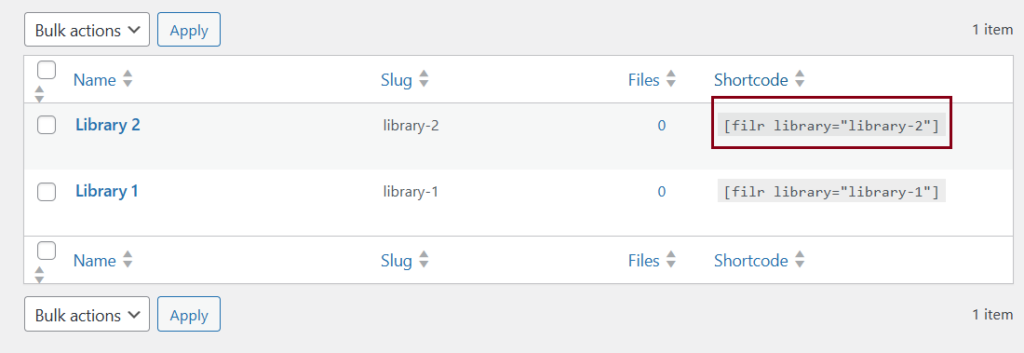
The new library will automatically be added to the right-hand side of the page along with a shortcode. We’ll use this shortcode in Step #3 to display the document library on the front-end of your WordPress site so you should copy it to your clipboard.
Step #2: Upload files and documents to WordPress
Filr makes it incredibly easy to create a document library in WordPress, enabling you to securely add files in any format straight to your website. It comes with encryption and protection features out of the box which ensures that unauthorized people can’t download files.
Using Filr, you can:
- Upload one or more documents directly to a secure folder on your WordPress site
- Group documents by library to make it easier to manage files on the back-end
- Expire files based on the number of downloads or a specific date
- Restrict direct access to files using filename encryption
Go to Filr > Add New and give a name to your files. Then, use the File Upload meta box to upload the files you’d like to make accessible to your site’s users.

Categorize it under the library you created in Step #1 using the Libraries meta box located on the right-hand side of the page.
Use the Expire by date and Expire by downloads options to control the expiry of downloadable files.
Click the Publish button to continue.
Pro tip: You can enable filename encryption by toggling the Encrypt Filename option on.
Step #3: Add the document library to a page
In this step, we’ll display the document library on the front-end of your website. Start by creating a new page by navigating to Pages > Add New. Name the page and copy-paste the shortcode from Step #1 to a new shortcode block in the text editor.

Press the Publish… button to continue. A document library will automatically be created on the front-end of your website and it should look something like this:

Your website users will be able to download files by clicking the button(s) in the Files column.
Pro tip: You can use the Filr plugin to customize the appearance of your document library by going to Filr > Settings > Libraries from the WordPress dashboard and clicking the Shortcode tab.
Filr – WordPress Document Library Plugin
Easily upload, store and share files in WordPress. Secure, flexible, and user-friendly document libraries for your next project.
Step #4: Password-protected downloads using Passster
A simple way to manage access to downloadable files is by using the Passster plugin. You can use it to enable single or multiple password protection for downloadable files and documents.
Start by logging into your WordPress admin panel and going to Plugins > Add New. From here, search for Passster and install and activate the Passster – Password Protection plugin on your site.
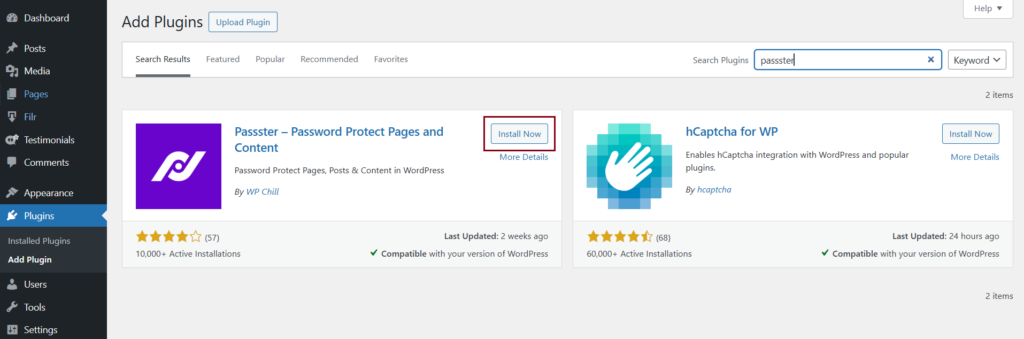
Then navigate to the page where you added the FILR shortcode and open the metabox Passster:

Choose “password” within the “Protection Mode” setting and adding your desired password in the field which appears below. Done!
If you want to use multiple passwords or entire password lists (which can contain thousands of passwords) you may want to check out the pro version of Passster here.
Conclusion
Password protect downloads and documents become much easier with Filr and Passster. It’s a great way to restrict user access to downloadable files without compromising on user experience.
To recap:
- Single password protection involves creating a single password for all users. It offers an easy way to restrict access to content, especially when you’re looking to grant access to a handful of people only.
- Multiple password protection can help you grant different users (or types of users) access to files and documents. It also makes it easier to manage and revoke access to downloadable resources.
Ready to password protect downloads? Get Filr and Passster today!
-
Version:
2 Ways to Expire Document Downloads in WordPress
Release-Date:
A lot of the time, business owners need an easy way to share documents with employees, team members, clients, and customers without granting permanent access to them. This is useful for sharing sensitive information or software securely, forms that are valid for a limited time, or marketing collateral that’s intended for use by a specific date.
The easiest way to implement this in WordPress is to expire document downloads.
In this article, we’ll step through some scenarios of when you might want to expire document downloads. We’ll also walk you through a quick, step-by-step tutorial explaining how you can expire document downloads in WordPress in two different ways using the Filr plugin.
Expiring document downloads
There are two different types of document access limitations that you can set:
- Expiring documents. This is used when you need to limit user access to certain files or documents until a specific date or by the number of accesses (such as downloads). Membership site owners, for example, can use this to set an expiry date on the course material they share with paying members.
- One-time sharing. This is useful for when you need to let users view the document once before it becomes unavailable to them. For example, you can use this to sell paid licenses.
Let’s take a look at why you might need to expire document downloads:
Online courses and membership sites
If you sell online courses or run a membership site, you can expire document downloads by date so students don’t have access to the course material after a certain date. In other words, you can make course videos and resources available until the training program ends.
You can also expire your course videos by the number of downloads. For example, you might want to grant only a specific number of registrants access to downloadable content to create a sense of urgency and drive registrations.
Digital agencies
Digital agencies can set project files and resources to expire after the duration of the project. This way, clients would only have access to the resources while they’re still availing the agency’s services.
Developers and designers can expire deliverables by date to grant clients a short window to provide feedback. This is an effective way to keep the project moving and make sure clients don’t stall the next project phase.
Event sites
Event organizers can expire event registration forms by the number of downloads or by date to restrict the number of entries. This is especially useful for when you’re hosting an event at an in-door venue which typically has a limited seating capacity.
Intranet sites
If your company uses an intranet site to facilitate information sharing and collaboration within the organization then having the ability to expire document downloads is a must-have. Managers and team leads can expire files (such as license keys) by a certain date or by the number of downloads as soon as they upload them to take some of the heavy lifting out of user access and document management.
Filr – WordPress Document Library Plugin
Easily upload, store and share files in WordPress. Secure, flexible, and user-friendly document libraries for your next project.
2 ways to expire document downloads in WordPress
Here, we’ll show you two different ways to expire document downloads in WordPress and explain when you should use each method. For this tutorial, you’ll need the Filr plugin installed and activated on your WordPress website and some downloadable documents or files.
Method #1: By date
With Filr, you can expire document downloads by date which simply means that users will not be able to download or access the file or document after the date it’s set to expire. You can expire just about any type of document including PDFs, spreadsheets, or presentations as well as different types of files including images, videos, audio files, PSDs, and more.
Here’s what you need to do to expire document downloads by date in WordPress:
Head over to Filr > Add New from the WordPress admin panel and enter a title for your file(s). Next, upload the file (or files) you’d like to make downloadable from the front-end. If you upload multiple documents or files, Filr will automatically create a zip file out of them.
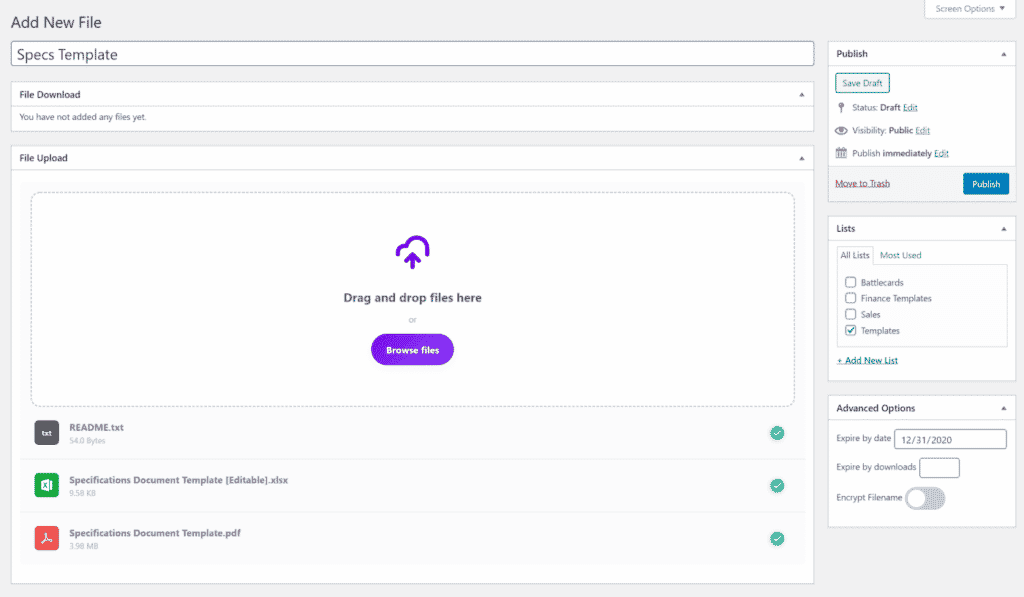
Once that’s done, organize your file into an existing library or create a new library. We’ll use this to display the downloadable documents in a table layout on the front-end.
Finally, use the Advanced Options meta box in the right-hand side of the screen to set the Expire by date option to the date you’d like to expire the documents and files by.
Click the Publish button to proceed.
The next step is to display the downloadable documents on the front-end. For this, you’ll need to create a new page and enter the [filr library=”templates”] shortcode in a shortcode block.
If you preview the page on your site’s front-end, it should look something like this:
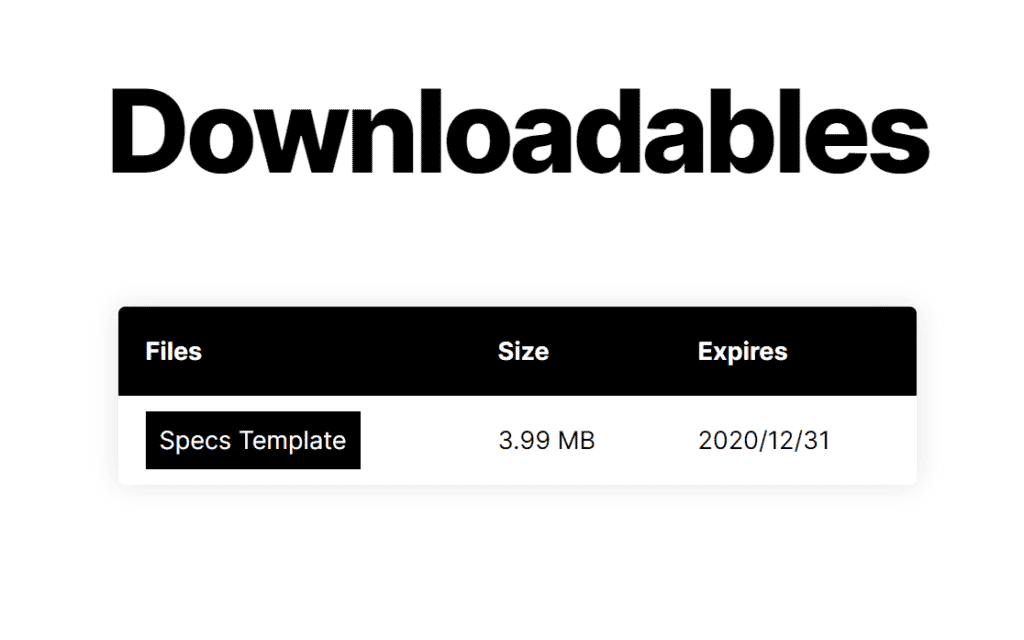
Method #2: By the number of downloads
The Filr plugin also lets users expire document downloads by the number of downloads. For example, if you set a document to expire after 10 downloads, it will automatically become unavailable to users after it has been downloaded a total of ten times.
Here’s what you need to do to expire document downloads by the number of downloads in WordPress:
Navigate to Filr > Add New from the WordPress admin panel and enter a title for your file(s). Next, upload the file (or files) you’d like to make downloadable from the front-end. Filr will automatically create a zip file out of the files if you upload multiple documents or files.
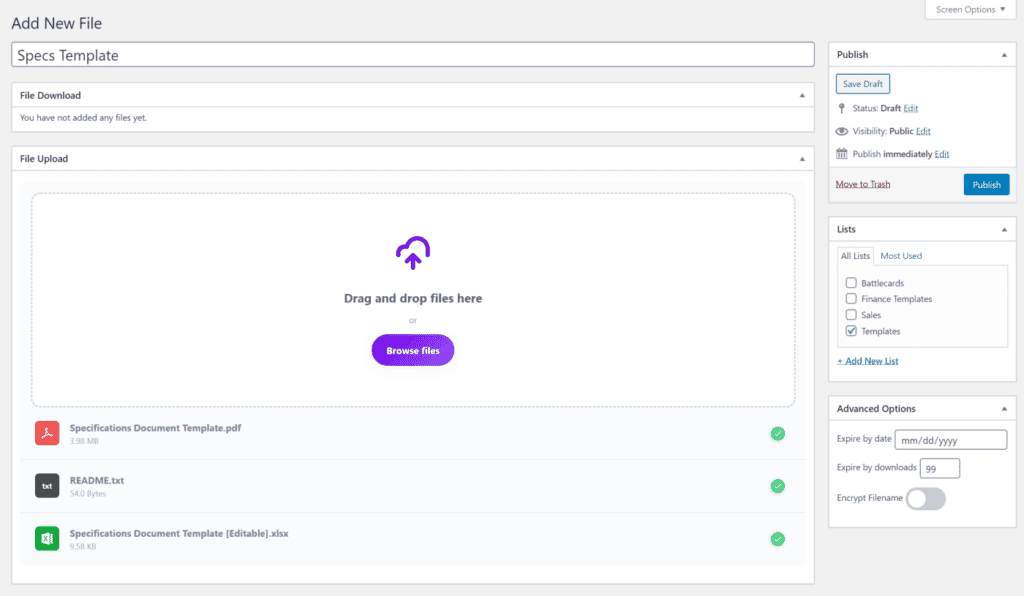
Once that’s done, organize your file into an existing library or create a new library. We’ll need this to display the downloadable documents in a table layout on the front-end.
Finally, use the Advanced Options meta box in the right-hand side of the screen to set the Expire by downloads option to the total number of downloads you’d like to allow for your document or set of files.
Click the Publish button to proceed.
To display the downloadable documents on the front-end, you’ll need to create a new page and enter the [filr library=”templates” shortcode in a shortcode block.
If you preview the page on your site’s front-end, it should look something like this:
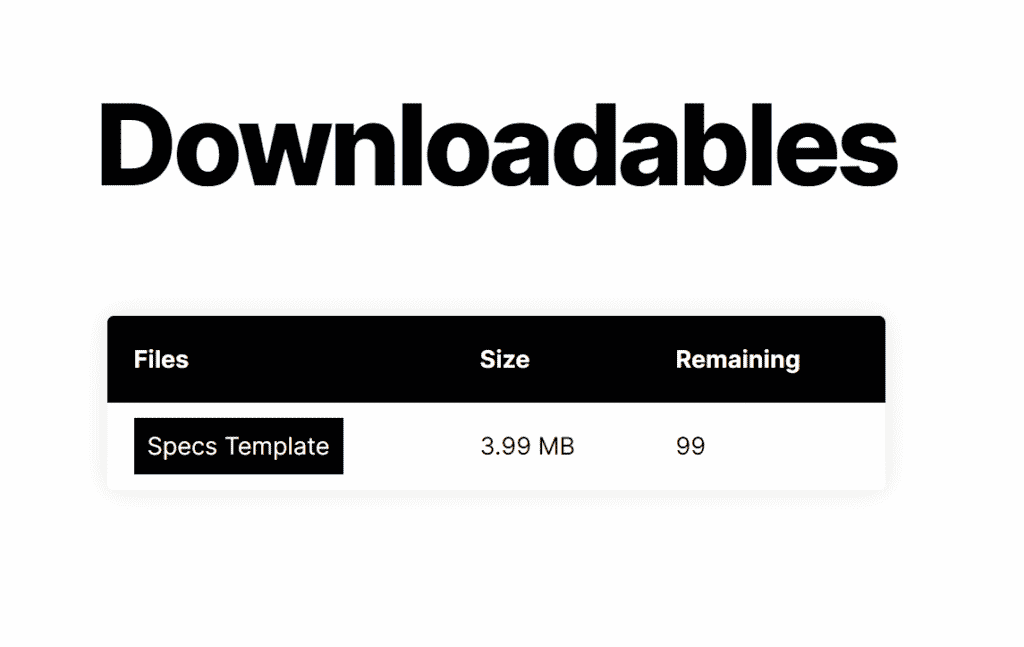
For more information, be sure to check out our in-depth guide on How to Make a Document Library.
Limit user access to document downloads
Using Filr, you can expire document downloads in WordPress and give users temporary access so that they have a brief window to view and download them.
You can expire document downloads either by date or by the number of downloads. In the context of sales, it’s a great way to create a sense of urgency and encourage clients and customers to take the next step. And in the context of document security, you can take a lot of the heavy lifting off your plate by setting expiry dates early on.
Filr
Easily upload, store and share files in WordPress. Secure, flexible, and user-friendly document libraries for your next project.
-
Version:
How to Restrict User Access to Downloadable Files in WordPress
Release-Date:
As an online business owner, there are tons of scenarios where you might need to restrict user access to downloadable files. This ensures that only authorized users can access the files.
In this article, we’ll take a look at some examples of websites that might need to provide users access to downloadable files. We’ll also explain how you can restrict user access to downloadable files in WordPress.
When you might need to restrict access to downloadable files in WordPress
Whether you’re looking for a secure way to share files and documents with employees or grant paying members access to certain resources, you need a simple way to restrict access to downloadable files.
Here are some common use case scenarios of websites that grant specific types of users access to files:
Membership sites
In its simplest form, a membership site is a gated or protected part of your business website that only paying members have access to. Only members can view the content you add to your membership site. This is great for anyone looking for a way to sell training programs or online courses.
As a membership site owner, you need a way to restrict user access to downloadable files and resources. This way, you can rest assured that only paying members have access to the correct downloadable resources, e-books, and worksheets. Or, if you share video lectures or training sessions, you might want to give members the option to download them to their device to view on-demand.
For more information, be sure to check out our tutorial on How to Create Member’s Only Content in WordPress (Without a Membership Plugin).
Agencies
An agency provides some sort of digital services to clients and typically have a client portal that allows the agency’s clients to access files, documents, and forms.
For example, if you’re running a photography agency, you might need to grant your clients access to their photo albums so they can pick and choose the ones they’d like to pay for. Agency sites with client portals also make it easy for businesses to provide downloadable links to templates and forms that clients can access directly instead of placing a request via email.
Intranet site
Intranet sites are used by companies to facilitate internal communication and collaboration in a secure and efficient way. This includes having the ability to share downloadable files, forms, and marketing collateral with employees.
Restricting user access to downloadable files in your intranet means that employees with the correct user roles will have access to the files that are relevant to them. For example, you might want to provide your sales department access to sales battle cards and other marketing materials and your accounting department access to balance sheet templates.
Check out our tutorial on How to Set Up a WordPress Intranet Site for Your Organization for step-by-step instructions.
How to restrict user access to downloadable files in WordPress
The easiest way to restrict user access to downloadable files in WordPress is by using plugins. Here, we’ll walk you through a step-by-step process to help you restrict user access to downloadable files for specific users and user groups.
For this tutorial, you’ll need the Filr plugin a installed on your WordPress website. We’ll use the Filr plugin to manage downloads and to restrict access by user role. You’ll also need some downloadable files that you’d like to restrict user access to.
Filr – WordPress Document Library Plugin
Easily upload, store and share files in WordPress. Secure, flexible, and user-friendly document libraries for your next project.
Step #1: Create a new library of downloadable files using Filr
To get started, create a library of the files you’d like to grant users access to. The key benefit of organizing files into libraries is that it helps you keep the back-end clutter-free and makes it easy to manage files in the long run.
Navigate to Filr > Libraries from the WordPress admin panel and enter a name and description for your library. Click the Add New Library button to continue.

The library will appear in the right-hand side of the screen along with an automatically generated shortcode.

For now, copy the shortcode to your clipboard.
Step #2: Upload files and downloadables to WordPress
Now that we’ve created a library to organize the files into, the next step is to upload the downloadable files to WordPress.
One of the key benefits of using Filr is that it doesn’t upload files to your WordPress Media Library. Instead, the plugin stores the files in a secure folder on your website so unauthorized users can’t access them.

To upload files, go to Filr > Add New from the WordPress admin panel and enter a title for the files. Once that’s done, use the File Upload meta box to upload the files and resources to your website. Finally, select the library you created in Step #1 from the Library meta box in the right-hand sidebar.
Note: You can upload multiple files to each new file you create in WordPress. This way, users can download multiple files to their device in a file archive. If you’d like to display individual files per row in your front-end files library, create multiple files and sort them under the same library.
In addition to this, you can also expire documents either by date or by the number of downloads. Filr also gives you the option to enable file name encryption to further secure them from being accessed directly.
Once you’ve uploaded all of the files you’d like to make available to users, click the Publish button.
Step #3: Add downloadable files library to a page
Now that we’ve uploaded the files to WordPress and organized them under the correct library, it’s time to display the downloadable files library on the front-end.

For this, you’ll need to create a new page by going to Pages > Add New. Enter a title for the files library page and paste the shortcode you copied to your clipboard in Step #1 to a new shortcode block. Click the Publish… button to continue.
A downloadable files library will be rendered on your site’s front-end:
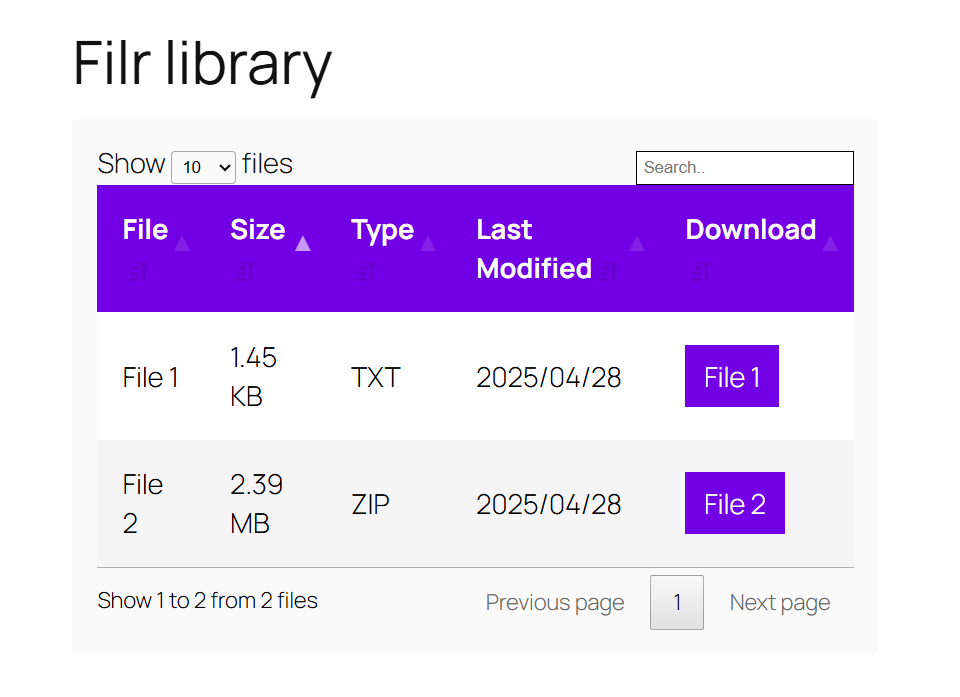
Individual files in Filr file library Pro tip: Head over to Filr > Settings > Shortcode to customize the look and feel of the front-end file library.
Step #4: Grant users access to the downloadable files
By now, we’ve created a front-end downloadable file library that users can access to download files to their device. Now we open the file and limit the access to specific users (by e-mail) or user roles:
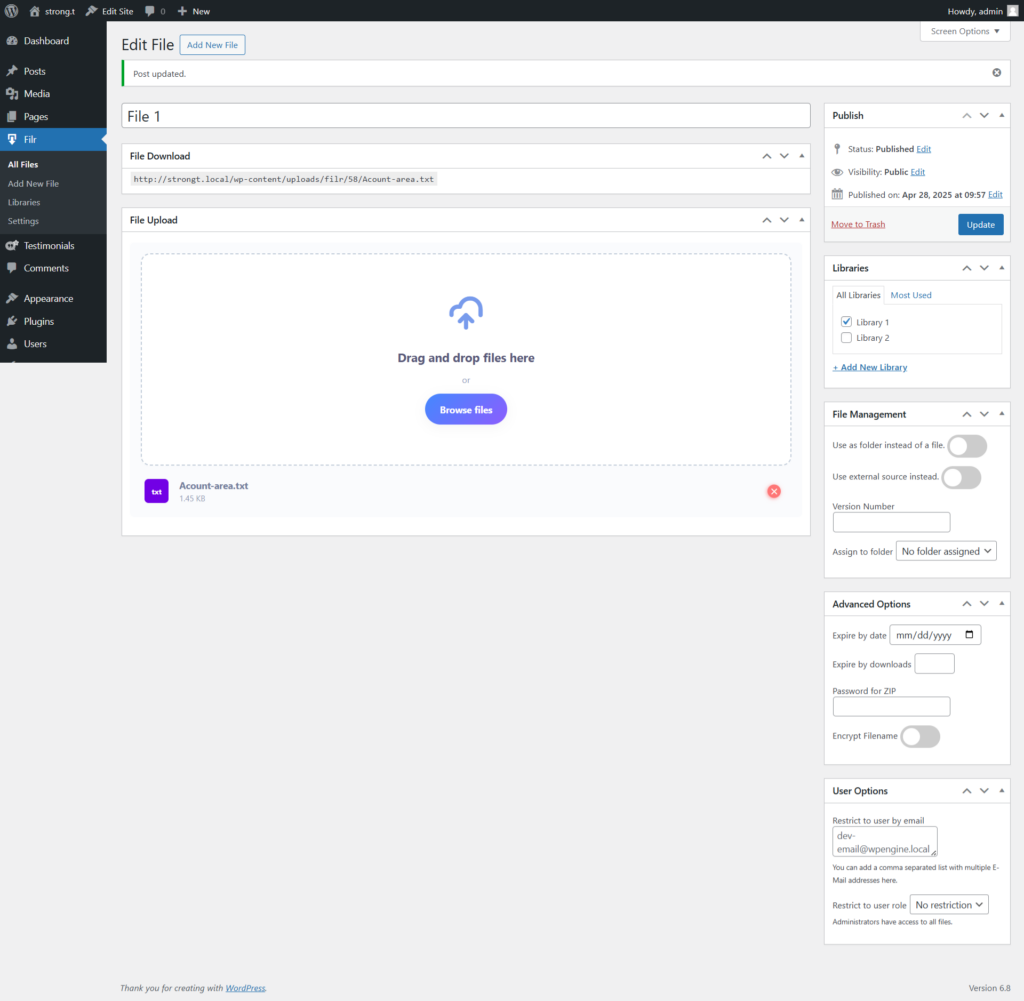
Take a closer at “User Options” here you can find two options: restrict by e-mail or user role. You can also use both together to further customize the restriction:
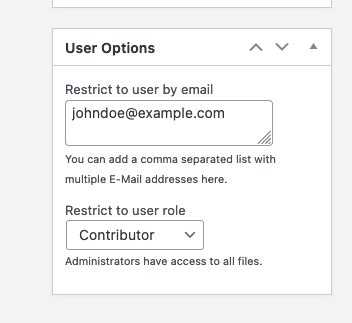
One last tip: Administrators have always access to all files without any restrictions, so make sure you test the restriction accordingly with a new user account.
Conclusion
By restricting user access to downloadable files in WordPress, you can rest assured that only authorized users are able to access the files and resources you upload to your website.
The Filr plugin makes it incredibly easy to create a downloadable files library in a secure and organized way.
Filr
Easily upload, store and share files in WordPress. Secure, flexible, and user-friendly document libraries for your next project.