

Organizing WordPress documents gets harder the longer you wait. You upload a handful of PDFs when your site is new, and the media library handles them fine. Then your file count doubles, contributors start adding files, and locating any one document becomes a guessing game through a flat, undifferentiated list.
The default WordPress media library doesn’t solve this. It sorts uploads by date, not purpose — useful for photos, but impractical for a growing collection of contracts, guides, product sheets, or reports. This guide covers how to organize WordPress documents properly, using the Filr plugin (also known as WP Document Library) to build a structure that scales.
For a closer look at how a well-organized document library appears to your site visitors, see our guide to setting up a WordPress document library.
—
Why the Default Media Library Isn’t Built for Documents
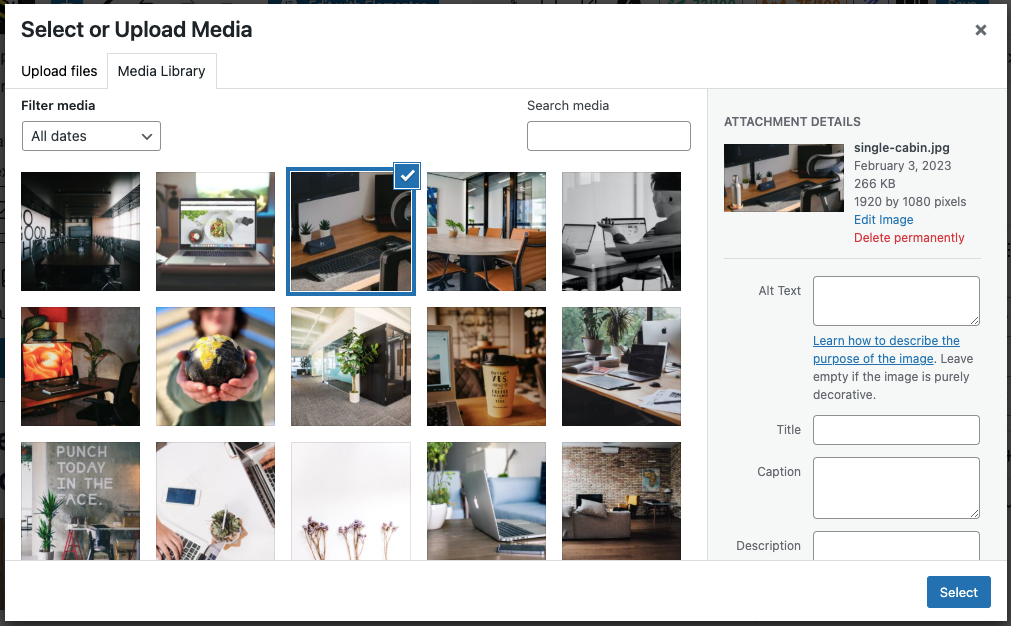
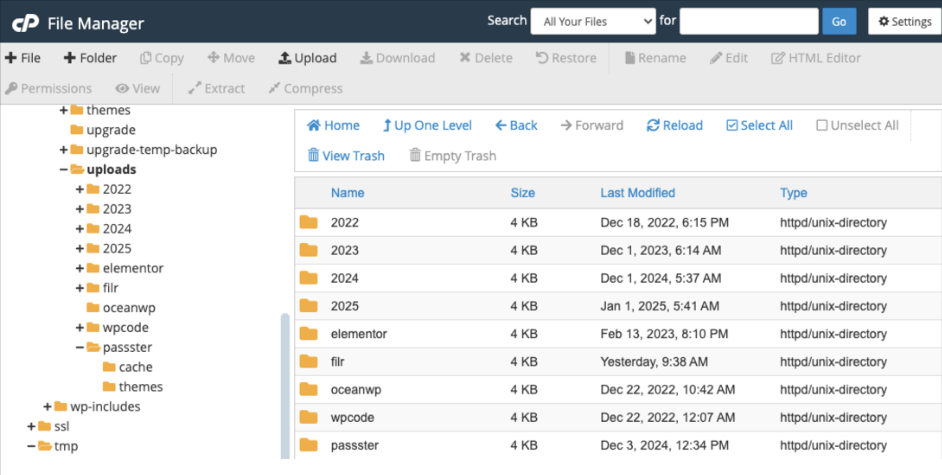
WordPress automatically places uploaded files into /wp-content/uploads/YYYY/MM/ subdirectories based on the month and year you upload them. You can confirm this under Settings → Media → Organize my uploads into month- and year-based folders — it’s enabled by default.
For images attached to posts, date-based sorting is logical. For documents, it creates a problem. A legal agreement from March and a product brochure from October land in separate folders with no connection — even if they belong to the same project.
The default media library also lacks four features that any practical document management workflow needs:
- Custom categories and folders — you can’t group files by project, department, or document type, only by upload date.
- Access control — there’s no way to restrict which users can download or see a specific document.
- Filtered search — the built-in search finds files by name only; you can’t filter by type, date range, or custom criteria.
- Document expiry — once published, a file stays live indefinitely with no automatic expiration option.
These gaps are what a dedicated WordPress document management plugin fills.
—
Filr: A WordPress Document Management Plugin Built for Scale

Filr is a WordPress document management plugin that replaces the flat media library structure with a proper document management system. The plugin has 10,000+ active installs and comes in two versions:
- Lite (free): Creates document libraries, assigns files to libraries, generates shortcodes, and adds basic directory-level security (index.php or .htaccess protection).
- Pro (paid): Adds file expiry by date or download count, access restriction by email address or WordPress user role, frontend uploading, secure download links with encrypted file IDs, and extra customization columns.
For most sites starting out, the free version is enough to get documents organized. The pro version becomes useful when you need to control who can access specific files or when documents have a defined lifespan.
If you’re evaluating alternatives, our roundup of document and file management plugins compares Filr against other tools in this space.
—
The Three-Tier Structure: Libraries, Categories, and Tags
Filr organizes every document across three independent layers — library, category, and tag — giving admins and users multiple paths to locate any file:
- Libraries — the top-level containers. Think of a library as a named collection: “HR Documents,” “Client Contracts,” or “Product Datasheets.” Libraries can have parent and child relationships for deeper nesting.
- Categories — taxonomic groupings that cut across libraries. If you have multiple libraries, categories let you group related documents without duplicating them.
- Tags — fine-grained labels that users can apply for quick filtering. Tags sit on individual documents and make keyword-based search more precise.
This three-tier approach separates document management from basic folder sorting. A document about a software license might belong to the “Legal” library, carry the “Software” category, and hold tags like “2026” and “SaaS” — so a user can find it by any of those dimensions.
The separation between libraries and categories also gives you flexibility as your collection grows. Libraries control the display: what appears on which page, what layout it uses, who can access it. Categories control the taxonomy: which labels and filters apply to each document. You can reorganize one without affecting the other, which matters once you have hundreds of documents across multiple teams.
—
How to Organize WordPress Documents with Filr
The following four-step walkthrough uses the Lite (free) version to take a WordPress site from no document structure to a working, front-end-visible library. Steps requiring the Pro version are indicated as such.
Step 1: Install and Activate the Filr Plugin
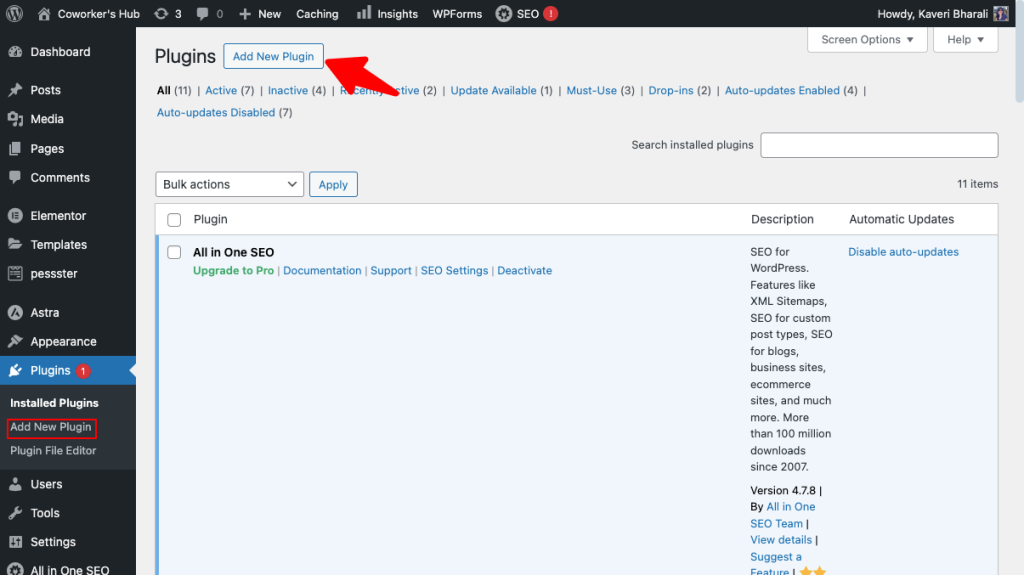
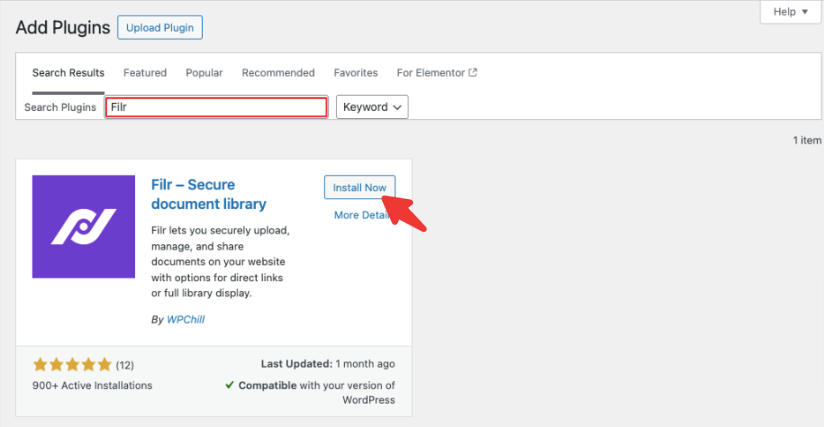
Go to Plugins → Add New Plugin. Search for “Filr” and click Install Now → Activate.
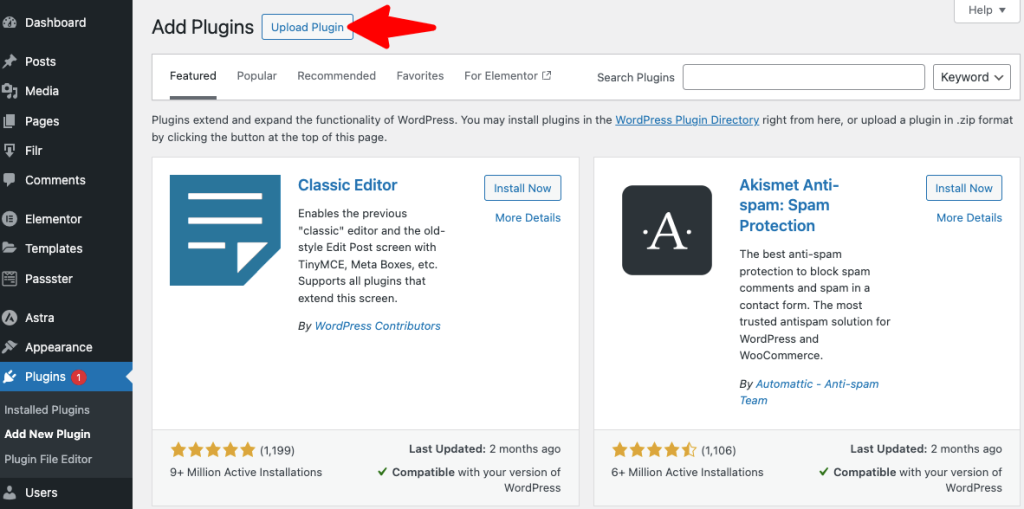
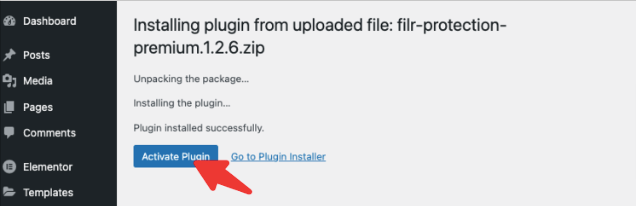
For the Pro version, buy from wpdocumentlibrary.com, download the ZIP file, then go to Plugins → Add New → Upload Plugin. Choose the file and click Install Plugin → Activate Plugin.
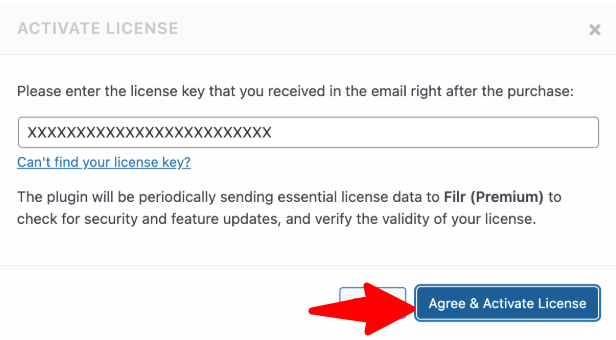
Once activated, go to Plugins → Filr → Activate License. Paste the license key from your confirmation email into the popup and click Agree and Activate License. You’ll receive a confirmation email before the Pro features unlock.
Step 2: Create a Document Library
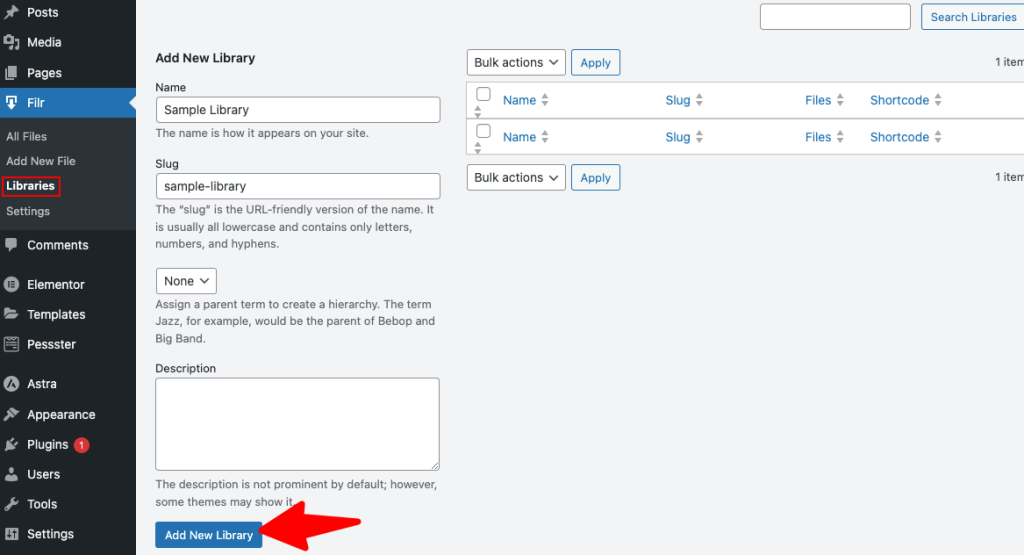
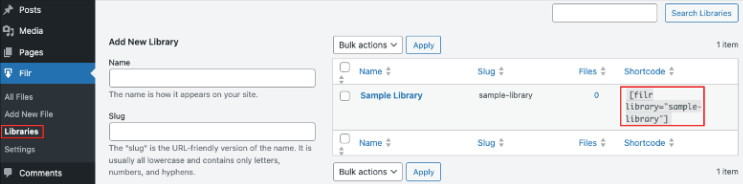
Navigate to Filr → Libraries. On the right side of the screen, fill in the Add New Library fields — give your library a name and a URL slug (lowercase, hyphens instead of spaces).
Click Add New Library. The library now appears in the list with its slug and a shortcode next to it. Copy the shortcode — you’ll need it in Step 4.
Libraries support parent and child entries. For example, a parent library called “HR Documents” can contain child libraries called “Policies” and “Job Descriptions.” Note that shortcodes only work for top-level parent libraries, not child libraries.
Step 3: Add Files to Your Document Library
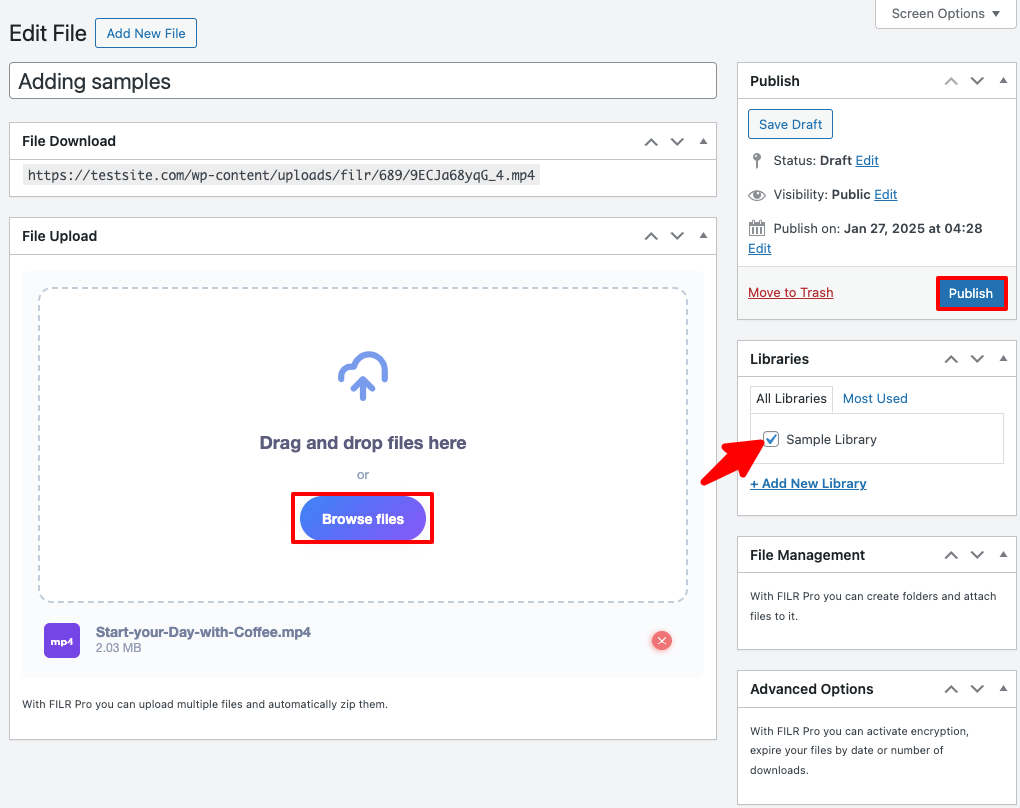
Go to Filr → Add New. Give the document a title, then click Browse Files to upload your file.
On the right side, find the Library dropdown and select the library you created in Step 2. This connects the file to its library.
Click Publish to make the document live. Repeat for each document, assigning each to the appropriate library.
Pro tip: to pin a document to the top of its library — useful for frequently-accessed files — enable the Featured toggle before publishing. Featured documents always appear first in their library listing.
Step 4: Display the Library on a Page
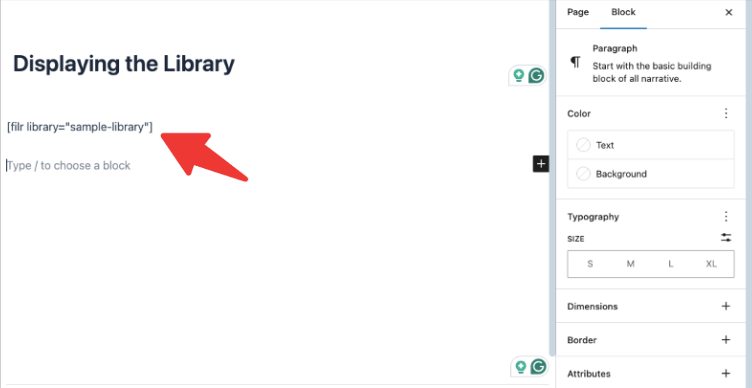
Create a new page under Pages → Add New. Add any introductory content, then paste the shortcode from Step 2 into the page body. Click Publish.

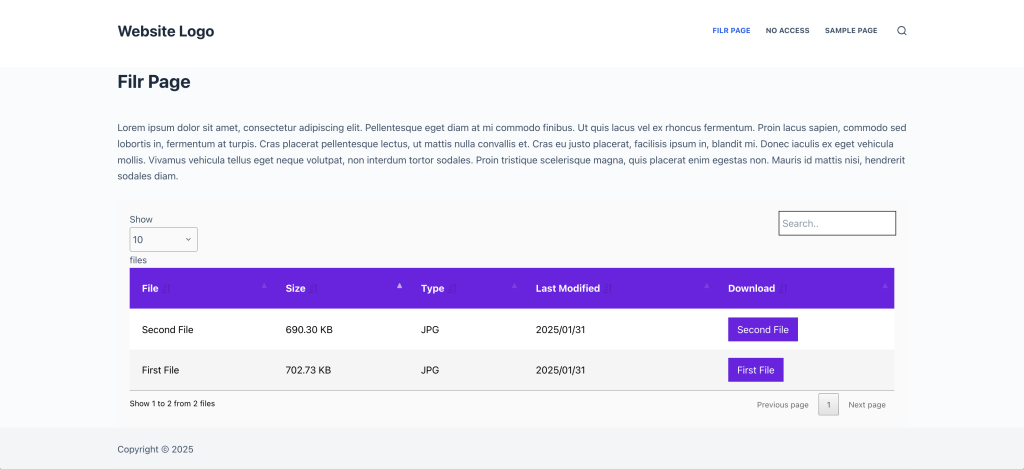
The document library now displays on the front end as a sortable table. Visitors can search by name, sort by file type or date, and click to download.
—
Customizing the Appearance of Your Document Library
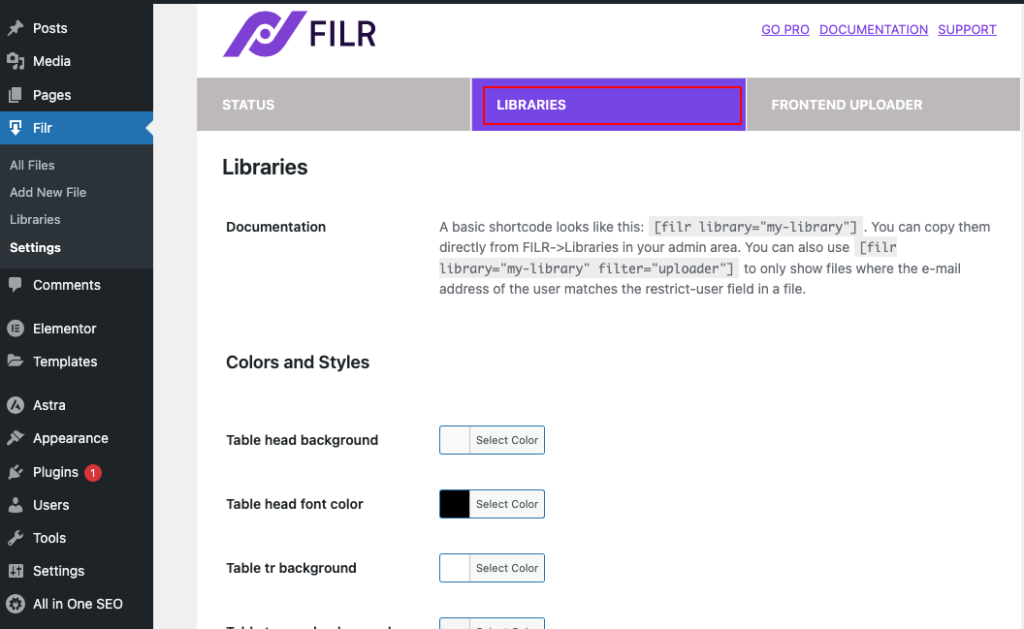
Filr’s library settings cover eight appearance areas — colors, hover effects, border radius, row count, default sort, column visibility, search bar, and pagination — all configurable without custom code. Go to Filr → Settings → Libraries to access them.
From here you can:
- Change the table heading and background colors
- Add hover effects and adjust button colors and typography
- Set the table border radius
- Configure the number of rows shown per page and the default sort column
Scrolling further, you’ll find options to show or hide specific columns — name, file size, file type, and more. You can also enable or disable the search bar and pagination controls.
—
Securing Documents with Filr
Filr’s directory-level protection gives you three modes for controlling who can directly access uploaded files — a meaningful upgrade from the default WordPress media library, which offers no file-access controls at all. Go to Filr → Settings → Status and choose from the Protection options.
Three modes are available:
- No Protection — anyone with a direct file URL can access it.
- Index.php — blocks direct directory browsing; works on Nginx and Windows servers.
- .htaccess — forbids unauthorized access to the uploads directory; works on Apache servers.
Choose the option that matches your server setup, then click Save Changes.
—
Filr Pro Features
Filr Pro extends document management into four capability areas the free version doesn’t cover: file lifecycle controls, role- and email-based access restrictions, secure download links, and frontend uploading.
More Options When Adding Files
Under File Management, a Use as folder instead of a file toggle lets you group multiple uploaded files under a single folder entry.
The Advanced Options section adds:
- Set an expiration date for the file
- Set a download limit (file expires after N downloads)
- Add a password to a ZIP archive
- Encrypt the filename in the URL
Access Control by User Role or Email (Pro)
The User Options section lets you restrict a specific document to one or more WordPress user roles or individual email addresses. Users without access see an error message you can customize.
Secure Download Links (Pro)
Under Settings → Status, Pro users can enable Secure Download Links to prevent direct URL hotlinking. Alongside this, Encrypt File-ID in URL masks the file identifier so the actual file path is never exposed.
Frontend Uploader (Pro)
The Pro version adds an Enable Libraries Upload setting that generates an upload shortcode. Paste this shortcode on any page to let logged-in users submit documents from the front end without accessing the WordPress dashboard.
Once submitted, users receive a confirmation email. This feature suits team document repositories, student submission portals, and collaborative intranets.
—
Best Practices for Keeping Your Document Library Organized
Getting documents into Filr is straightforward; keeping the library tidy as it scales takes eight consistent habits that prevent the disorganization the default media library encourages:
- Plan your library structure before uploading. Map out parent and child libraries and decide on your category taxonomy before adding the first file. Reorganizing a large library later is time-consuming.
- Use consistent naming conventions. A file named “2026-Q1-Sales-Report.pdf” is easier to find than “sales report v3 copy last.pdf.” Consistent naming also makes filtered search more useful.
- Assign categories and tags at upload time. It’s faster to tag a document when you’re already editing it than to go back and tag a hundred files later.
- Enable category filters for large collections. If your library has more than 50–100 documents, turn on the Categories Filter in settings. Users can then narrow the list to a specific document type without scrolling through everything.
- Use featured documents strategically. Pin the most-accessed files to the top of their library — current policy documents, active project briefs, or frequently downloaded forms.
- Review and retire expired content. Set a quarterly reminder to check the library. Use Filr Pro’s expiry settings for documents with a known end date — annual reports, contracts, event programs.
- Keep column choices minimal. The more columns you display, the harder the library is to scan on mobile. Show the document name, file type, and a download button by default; add size or date only if your audience needs them.
- Test the library as a visitor. After publishing, open the page in a private browser and try to find a document as a first-time user would. If it takes more than two clicks, your category structure probably needs refinement.
—
Conclusion
The default WordPress media library organizes files by upload date — fine for images, but not for a document collection that needs to scale. Filr, with more than 10,000 active installs, gives you the structure the default library lacks: libraries for grouping, categories for cross-cutting classification, tags for fine-grained search, and access controls for security.
Whether you’re managing a handful of HR policies or hundreds of product datasheets, building the three-tier structure from the start (libraries → categories → tags) saves time and makes documents findable for admins and end users alike.
Once your documents are in order, the next step is presenting them on the front end. For that, see our guide on setting up and displaying a WordPress document library.
—
Frequently Asked Questions
Yes, if you want meaningful organization beyond date-based sorting. The default WordPress media library sorts all uploads into year/month folders automatically, which works for images but not for a document collection you need to browse, filter, or access-control. A plugin like Filr adds libraries, categories, tags, and security controls that the default system lacks.
The WordPress media library is a built-in repository for all uploaded files — images, videos, PDFs, audio — organized only by upload date. A document library, created with a plugin like Filr, organizes files into named collections with categories, tags, filtered search, and optional access restrictions. It also displays documents to front-end visitors in a searchable, sortable table rather than keeping everything in the backend.
Filr uses “libraries” as its primary organizational unit, which function similarly to folders. You create a library under Filr → Libraries, give it a name, and then assign documents to it when you upload them. Libraries support parent and child entries for nested organization. The Pro version also includes a folder grouping option under the File Management section when adding individual files.
With Filr Pro, you can restrict a document to specific WordPress user roles or individual email addresses via the User Options section on each document’s edit screen. At the directory level, the Lite version offers .htaccess or index.php protection to block direct URL access to the uploads folder.
Yes, with Filr Pro. Enable the Enable Libraries Upload setting, then add the upload shortcode to any page. Logged-in users can submit files directly without accessing the WordPress dashboard. Submitters receive a confirmation email on successful upload.
After creating a library in Filr → Libraries, copy the shortcode shown next to the library name. Paste that shortcode into any page or post using the WordPress editor and publish it. The library will render as a searchable, sortable table on the front end. For display configuration options, see our guide on setting up a WordPress document library.